Listing Builder streamlines building an Amazon product listing quickly, from gathering and selecting the most effective keywords to sending the final listing to Seller Central to be published.
While the tool is easy to use, it has many features to help you optimize your listings. This article walks you through the process of both creating a new listing and optimizing an existing listing.
Although you can create a listing without it, generally, you want to have a prepared set of well-researched keywords and keyword phrases, and possibly a shortlist of competitor ASINs, which you can:
-
- Import via My List folders
- Upload via a CSV file
- Copy-and-paste from documents on your computer
Each of these methods is discussed in sections III and V of this article.
1. From the Helium 10 dashboard, click on Tools, and then find Listing Builder under the set of Listing Optimization tools.
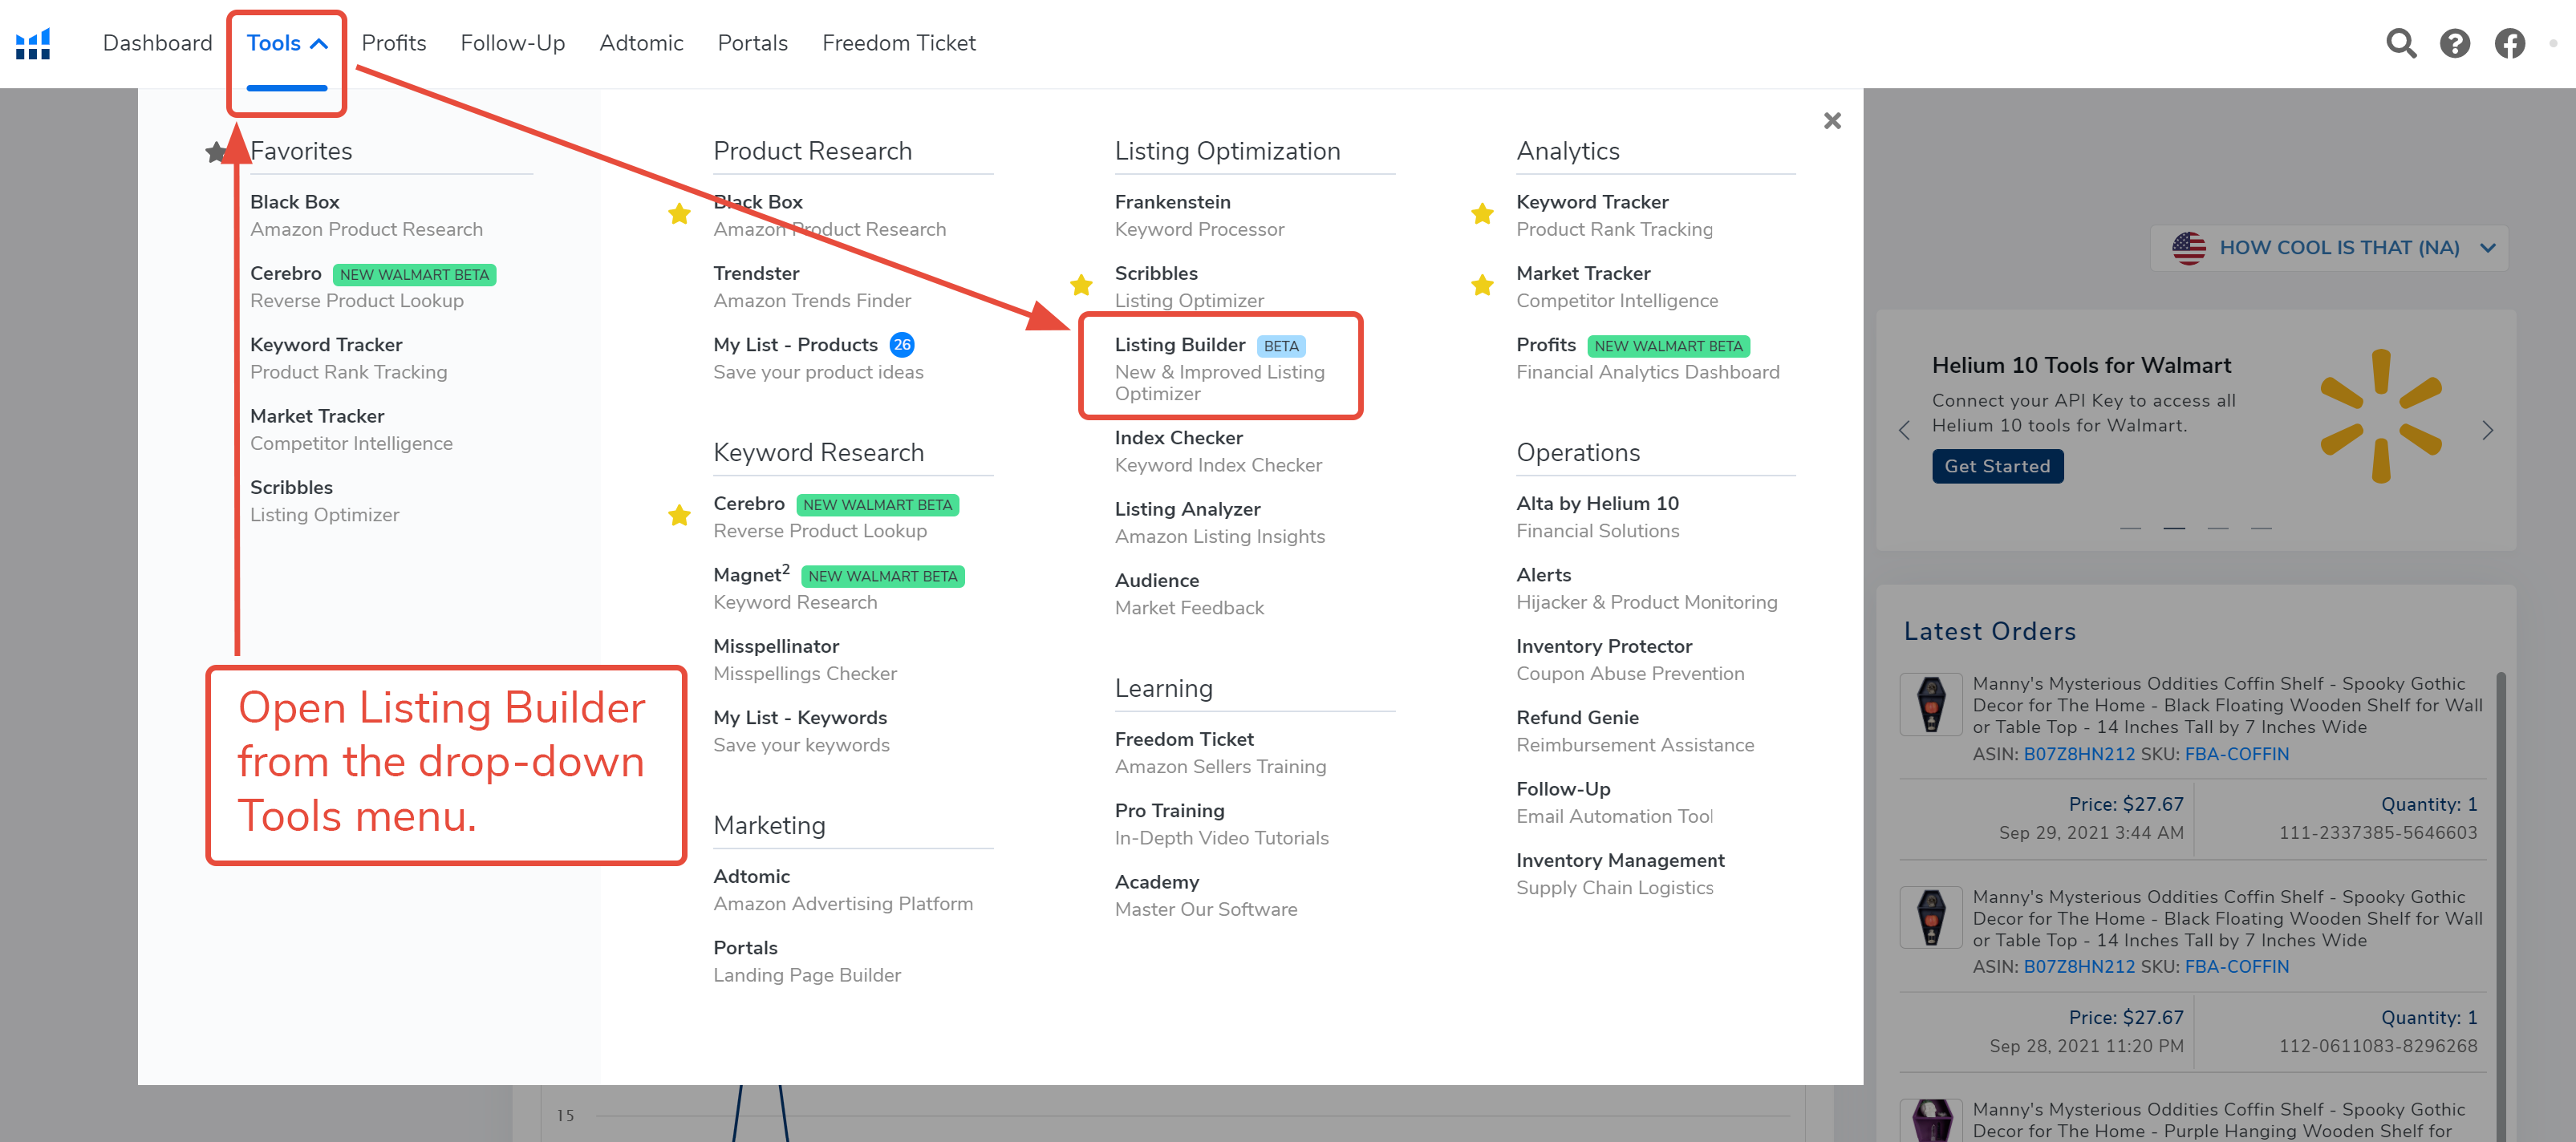 2. When you begin building listings in Listing Builder, the dashboard displays the number of listings you’ve created in Listing Builder and their statuses; they appear as buttons in the top left corner, above the table that you can use to filter the displayed list.
The statuses Processing and Error each prompt the display of listings that are in the process of being synced to Amazon. Synced shows the number of listings currently synced on Amazon, and Linked shows the number of listings linked to a specific product associated with your Amazon account.
Different plan levels have different listing allowances, and the dashboard tracks how many you’ve used out of the number allowed in your plan. In the image below, the user has created 16 of the allowed 300 listings on their Diamond plan.
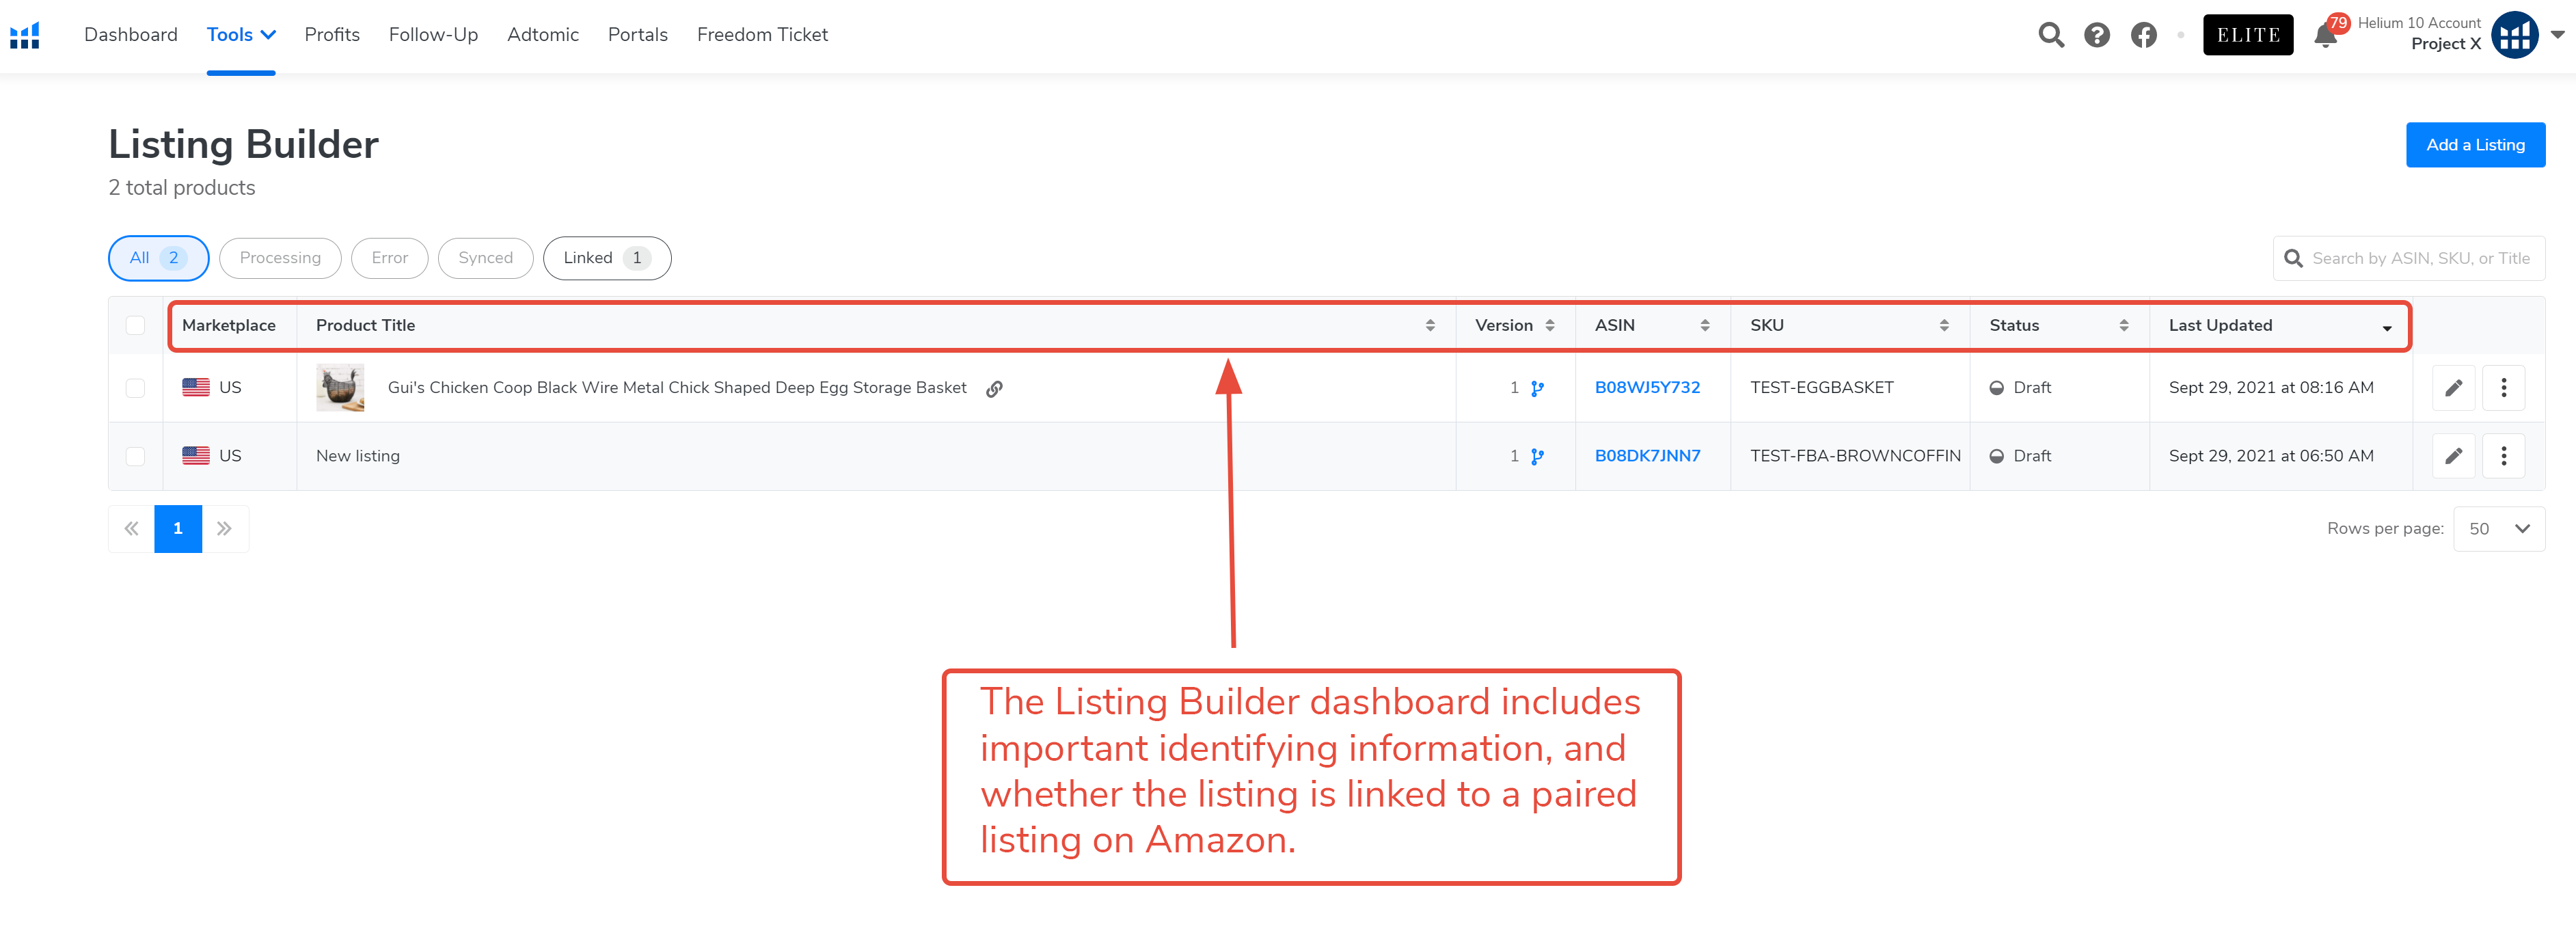
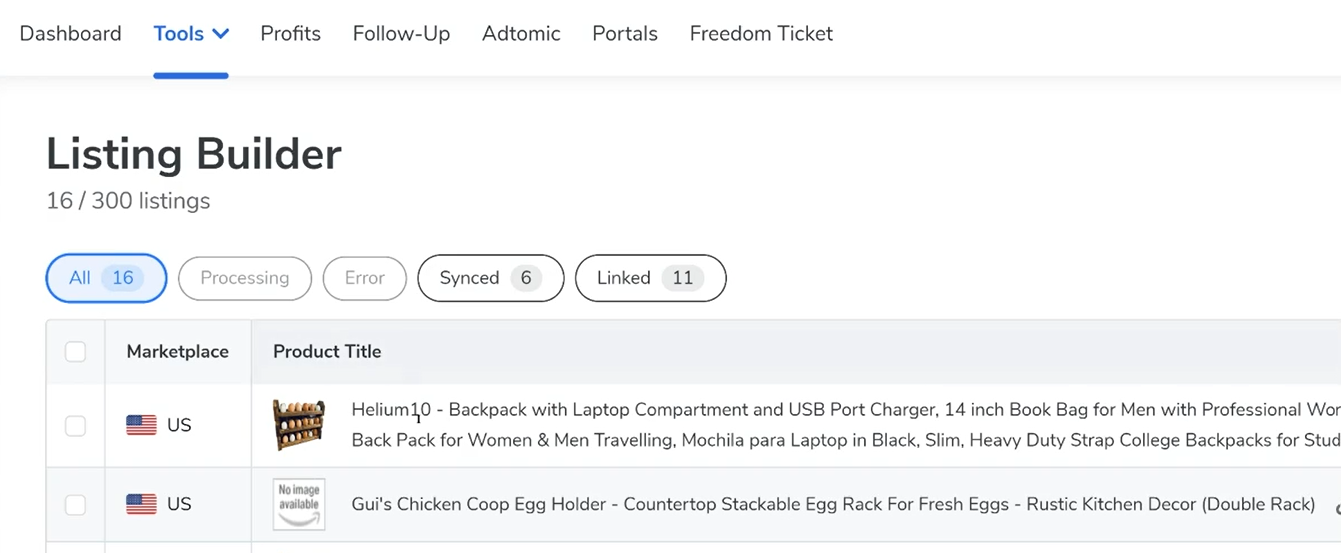 3. The Listing Builder dashboard table displays all the listings you’ve created or optimized using Listing Builder. From the dashboard, you can see the listing:
- marketplace
- product title, ASIN, SKU, and image (if listing is linked)
- number of versions and when a listing was last edited
- status (draft, processing, synced, or error)
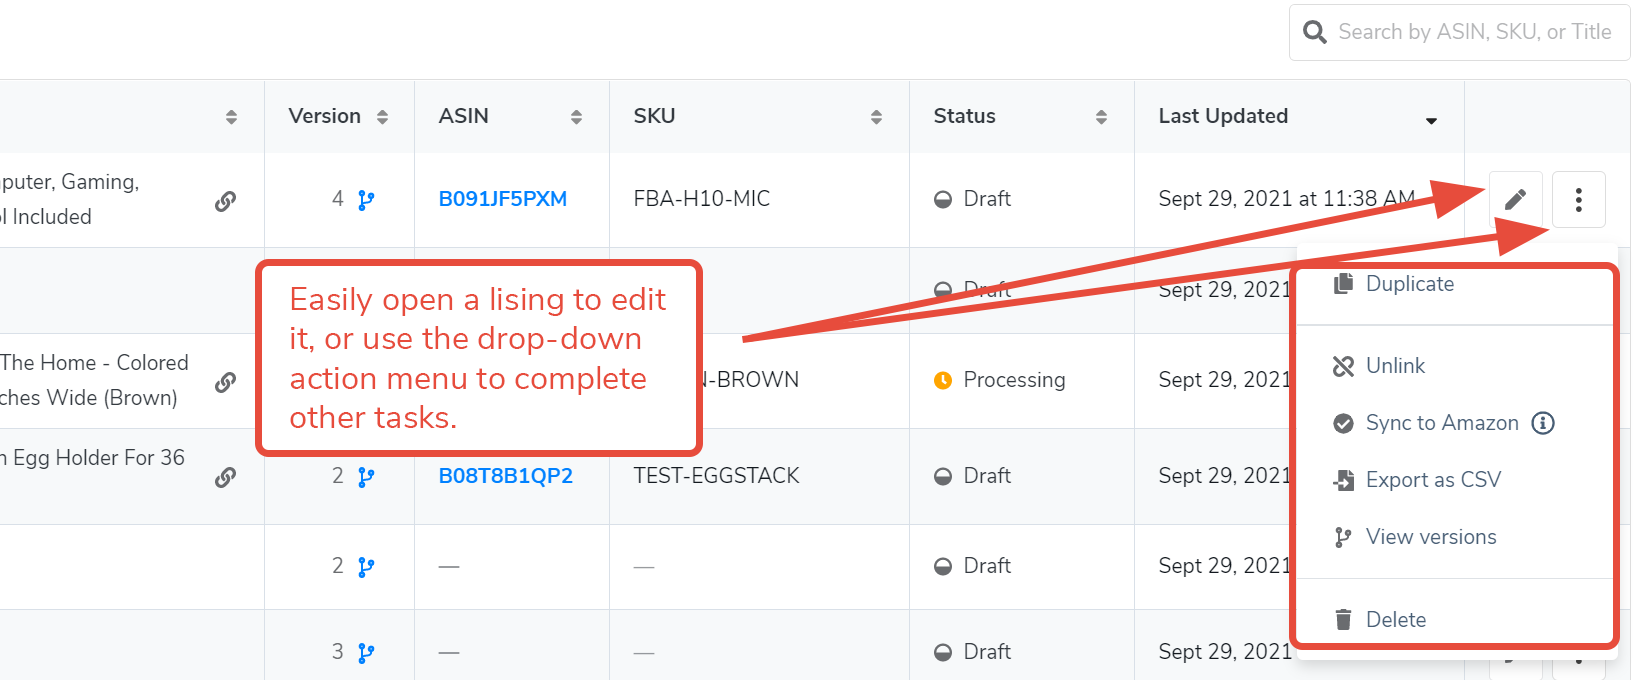
 4. The dashboard also includes an editing button to allow you to quickly open and begin working on a listing in progress, as well as a drop-down menu of actions including:
- Duplicate
- Link Listing or Unlink
- Sync to Amazon (if the listing is already linked to an ASIN)
- Export as CSV
- View versions
- Delete
5. Click the blue Add a Listing button, located in the top right corner of the dashboard, to start a new listing in Listing Builder.

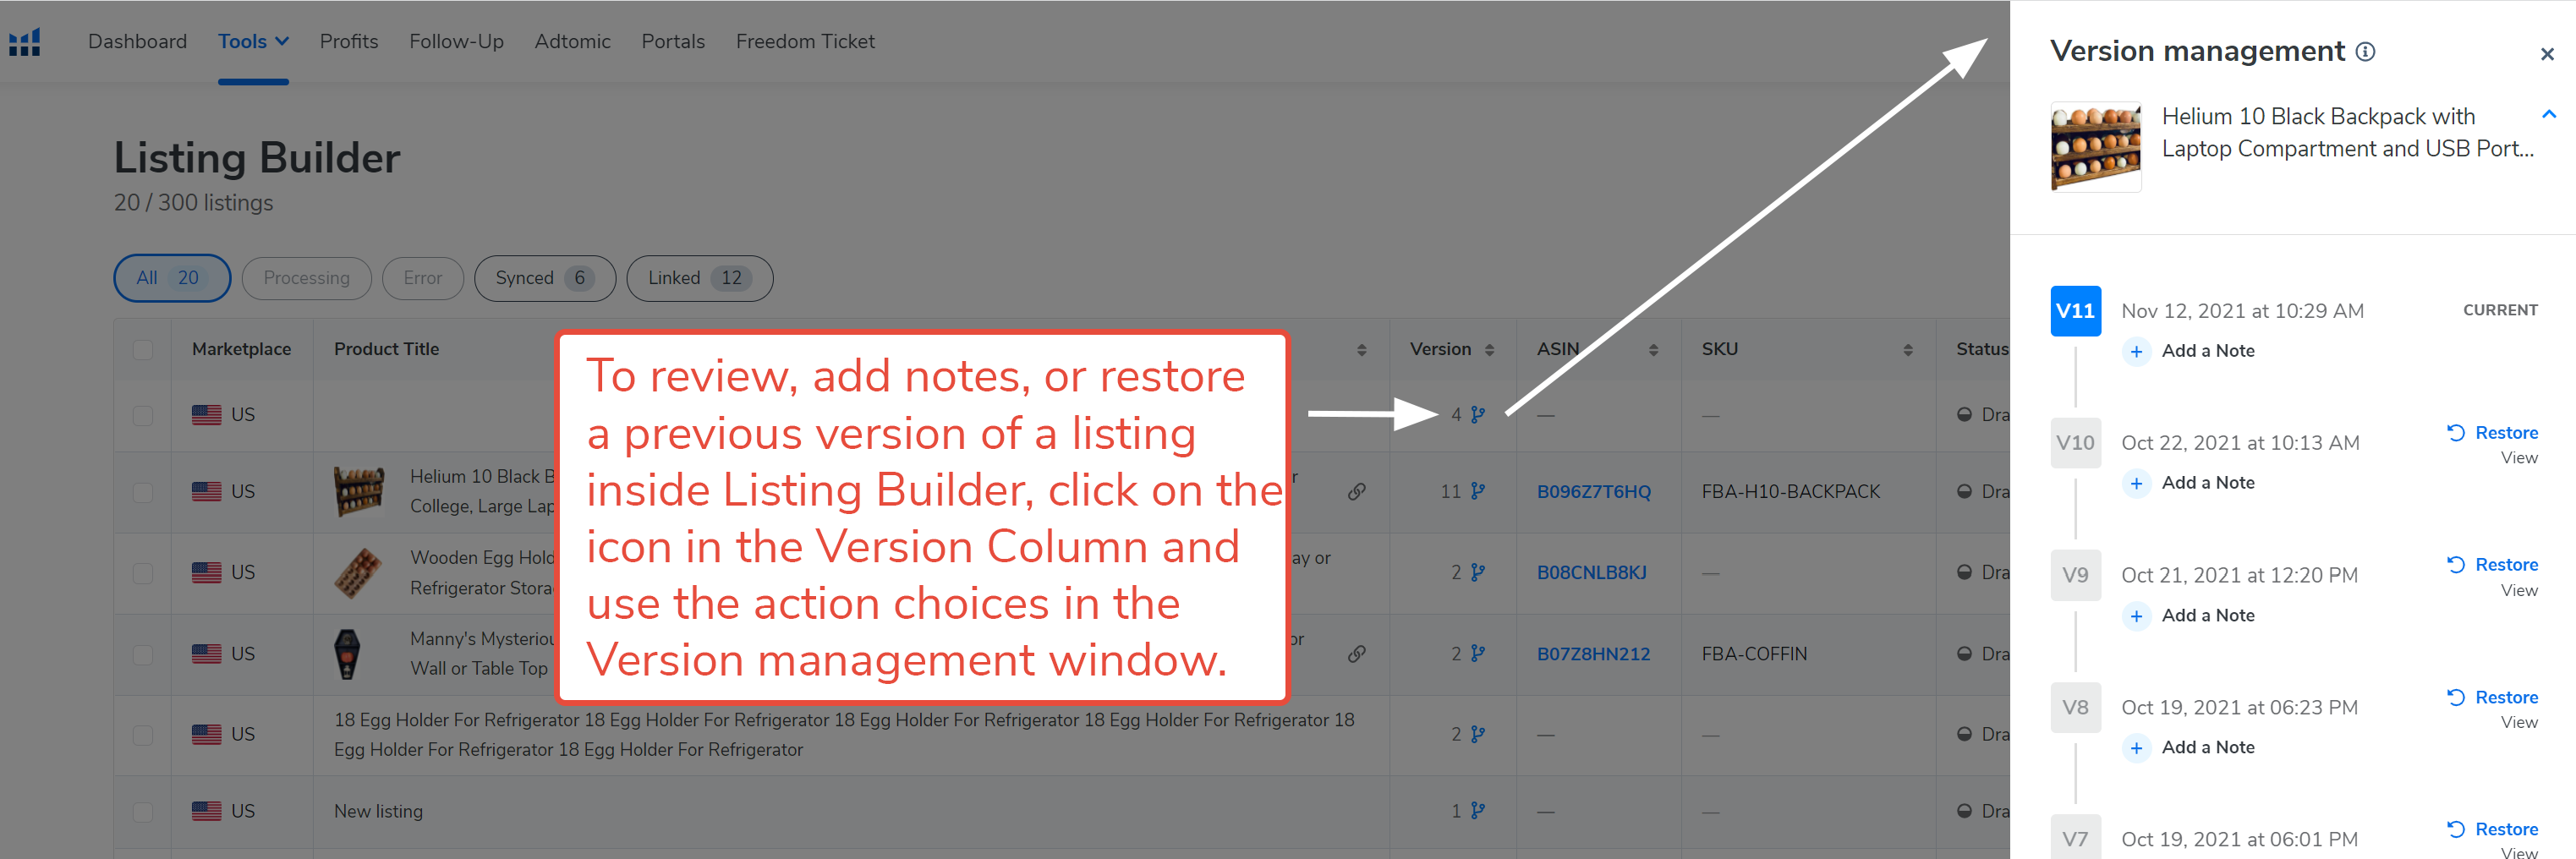
6. Every time you open and edit a listing, Listing Builder saves it as a new version. Click on the Version Link to see all of your versions for a listing. Listing Builder’s version feature makes it easy for you to make changes but then revert back to a previous version, if you prefer it.
If your intention is to use the convenient syncing function in Listing Builder once you have built a new listing, you may want to make sure that you have set up a basic product listing under your inventory in Amazon’s Seller Central, with at least a title, so that you have a product to link to your new listing. Listings must be linked to an existing product on Amazon before you can sync.
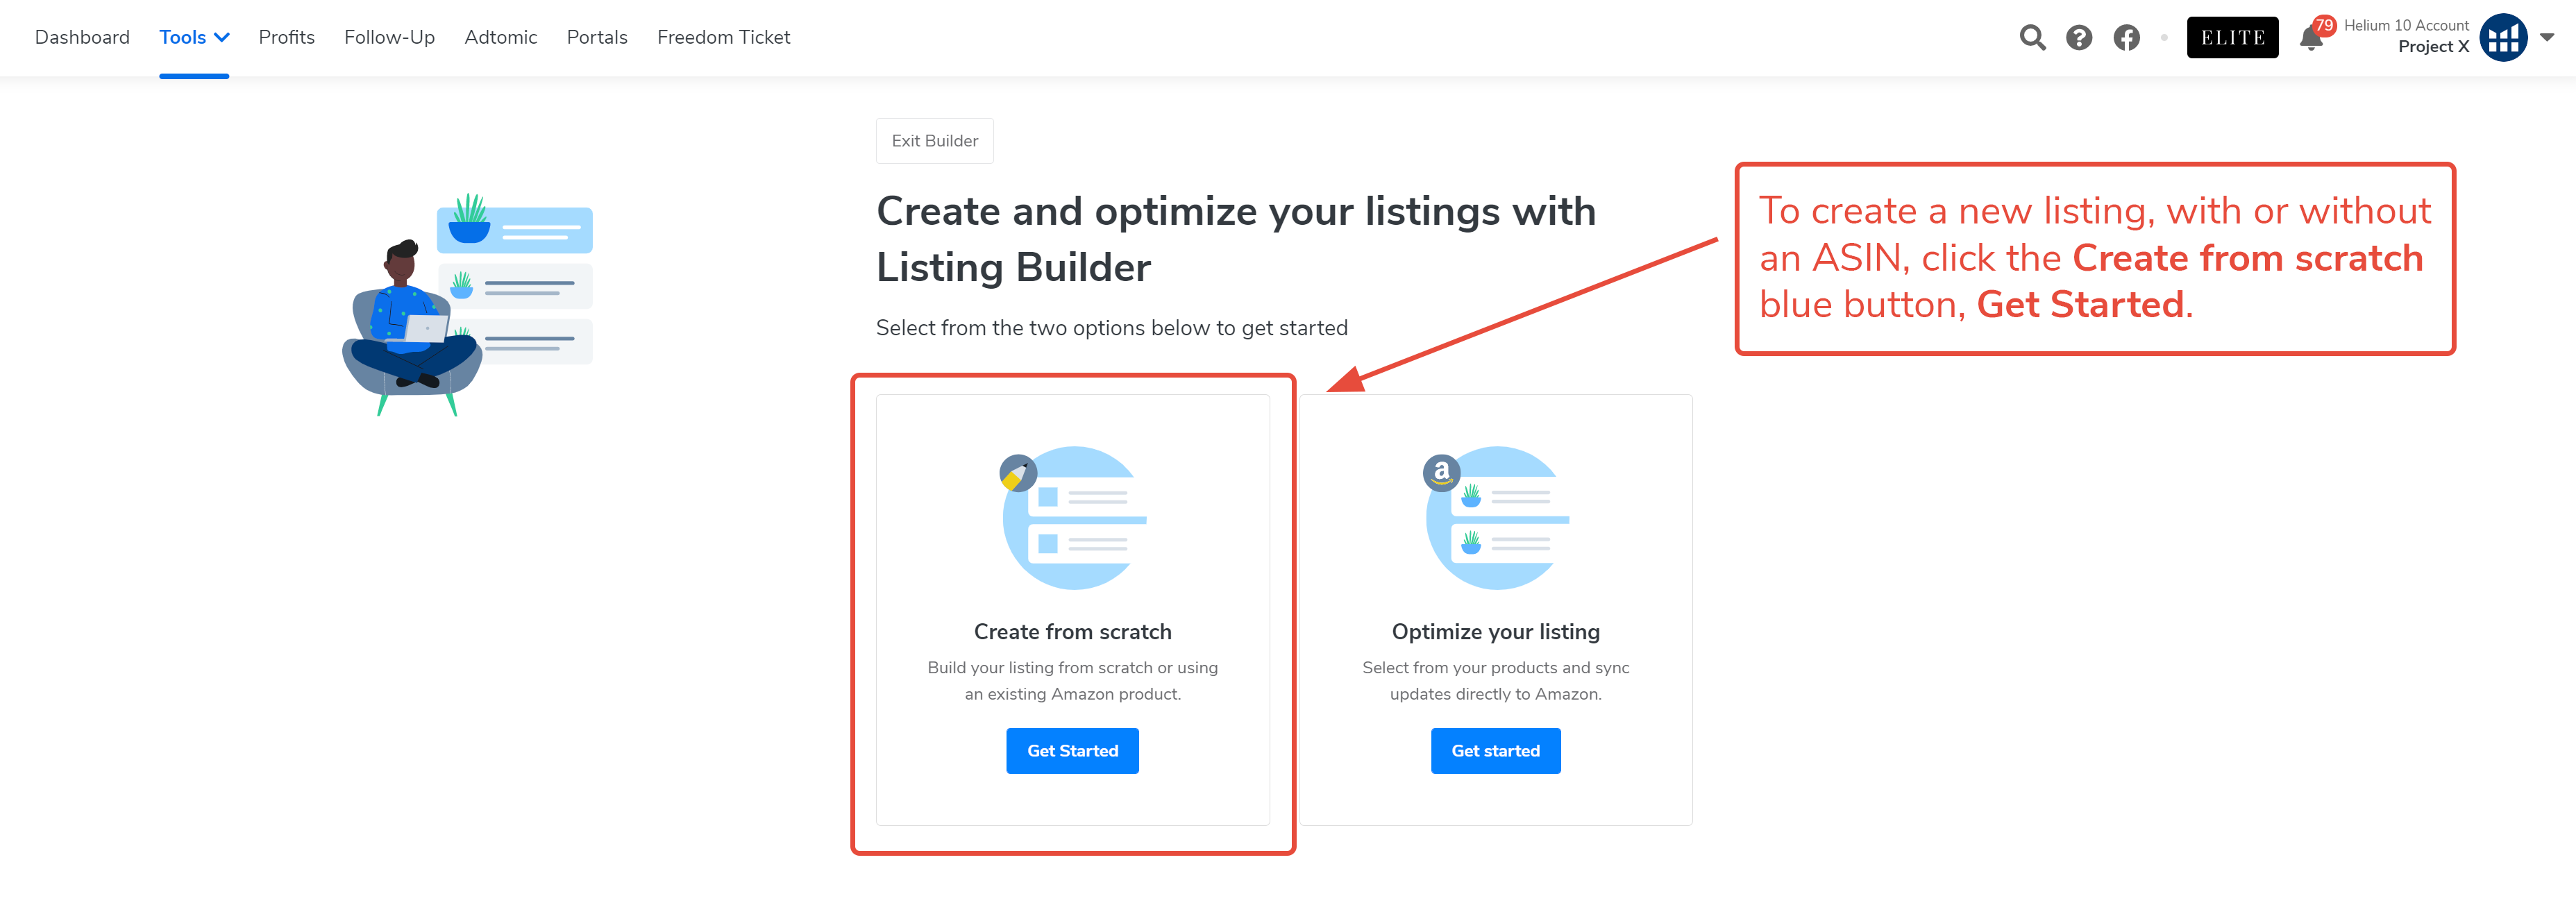
7. On the Builder entry window, click on the blue Get Started button to Create from scratch.
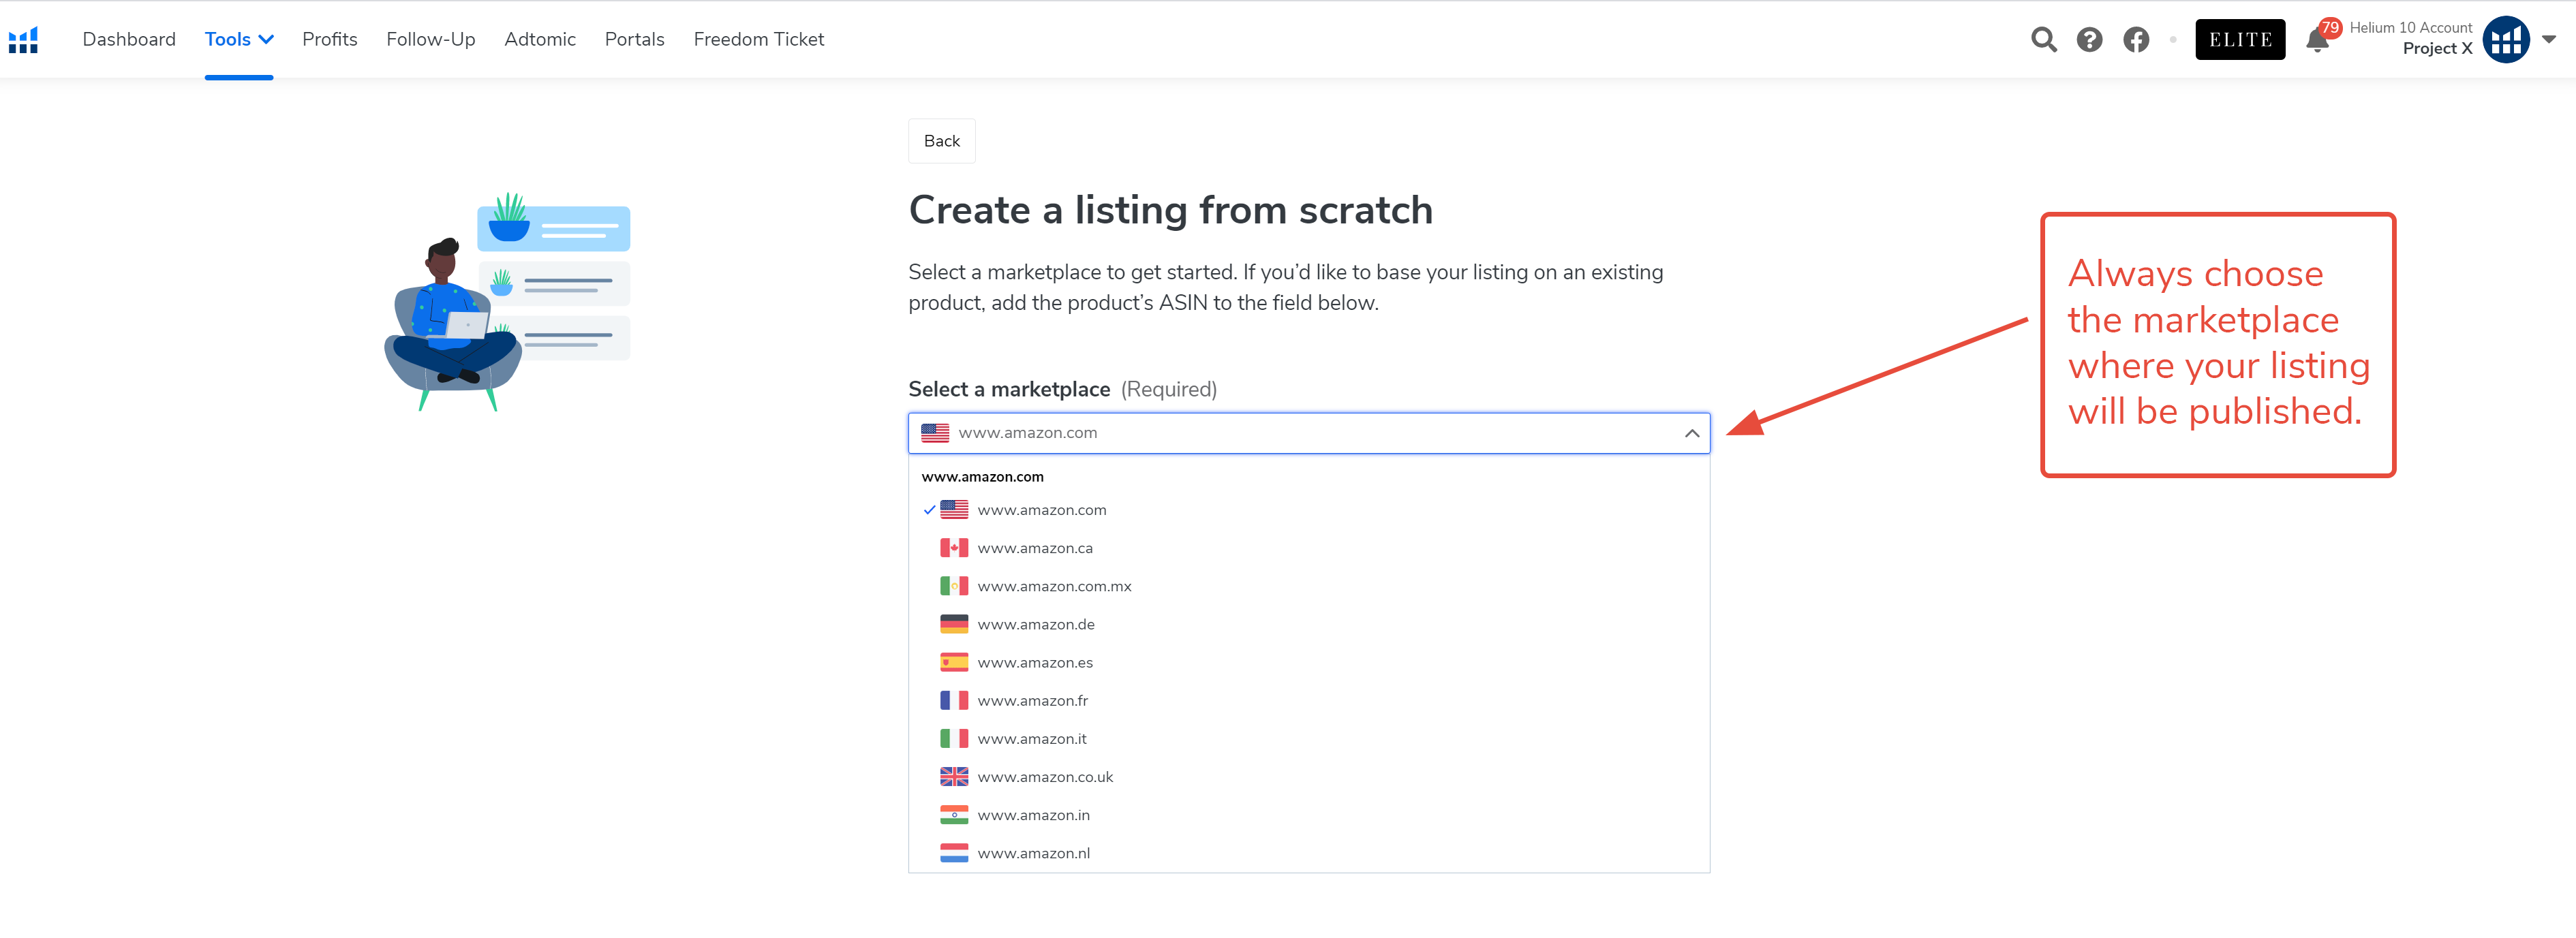
 8. On the Create a listing from scratch window, choose from the available marketplaces using the drop-down menu. The current marketplaces include:
-
- Amazon.com
- Amazon.ca
- Amazon.com.mx
- Amazon.de
- Amazon.es
- Amazon.fr
- Amazon.it
- Amazon.co.uk
- Amazon.in
- Amazon.nl
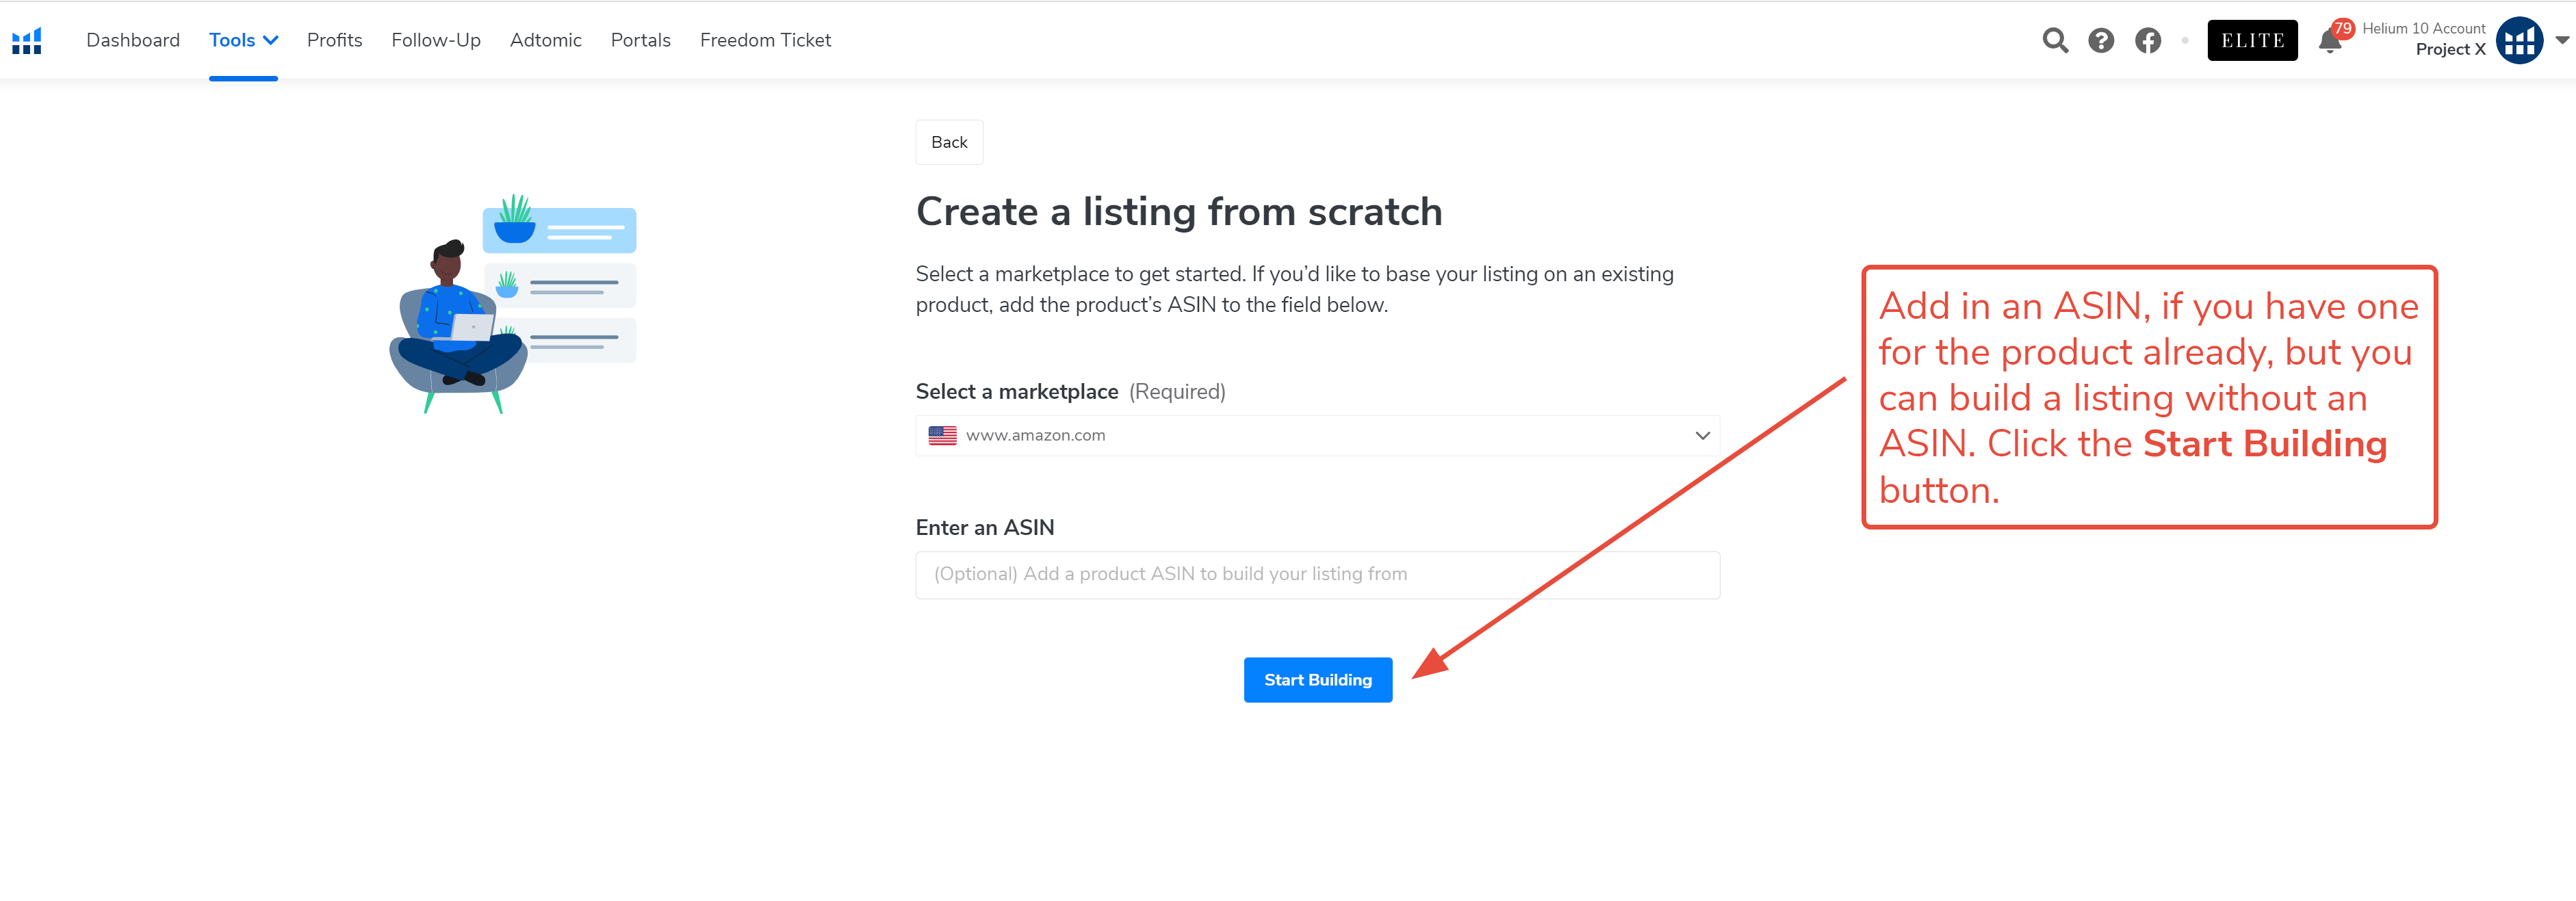
9. If you already know the ASIN for the product, you can enter it in the Enter an ASIN field, but you don’t need to have one yet to start creating your new listing. You will be able to link the product to the listing later.
10. The first thing you need to do is set up your word bank for the listing.
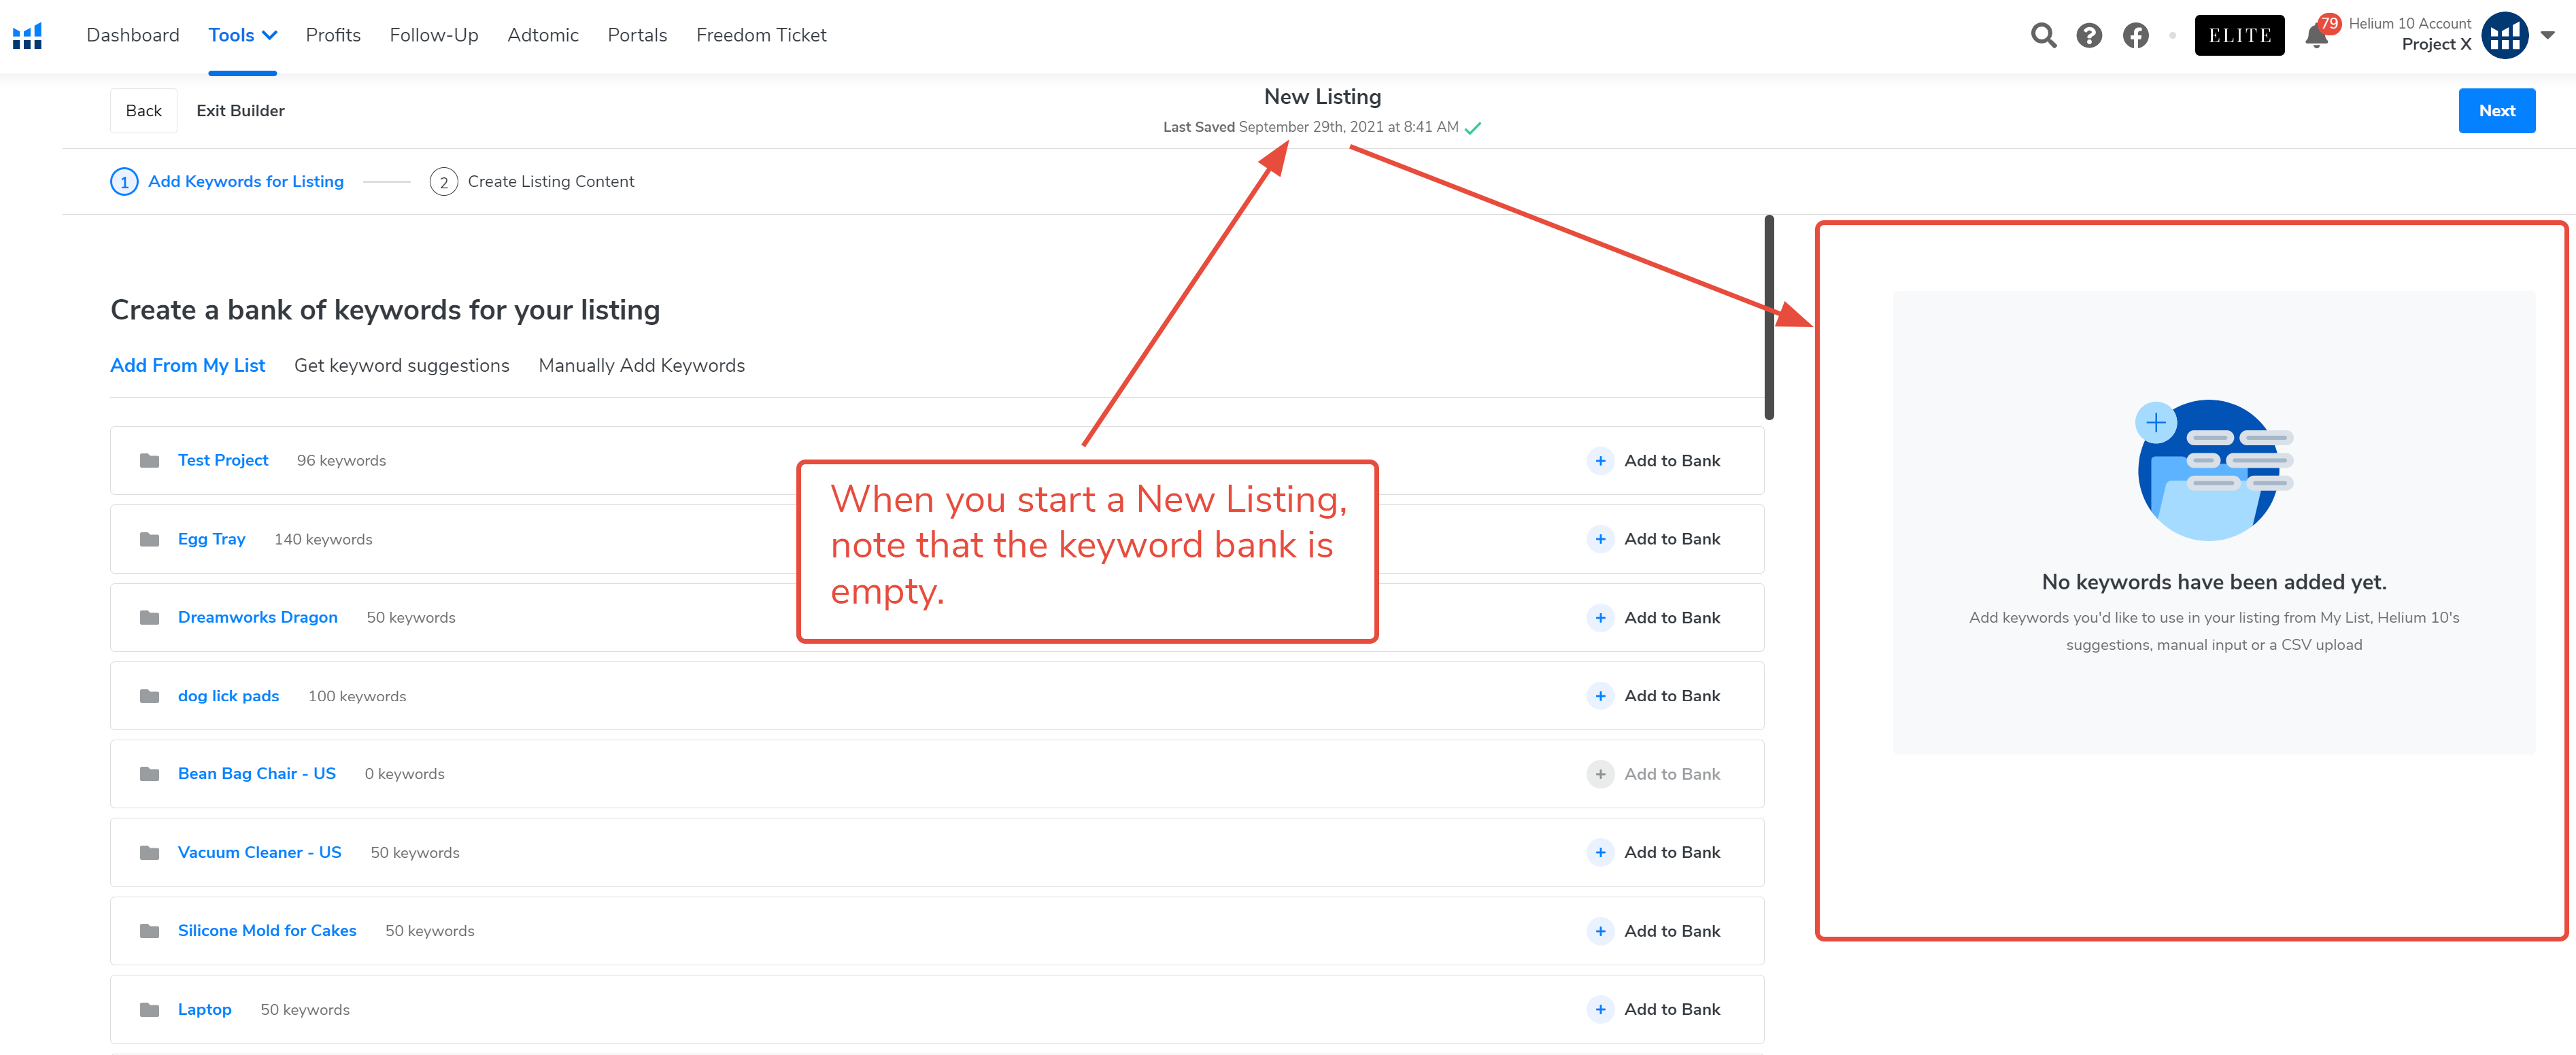
You can add words to your bank in three different ways. Listing Builder makes it easy to import cultivated lists from My List or a CSV file, or to manually type in keywords. The software also helps you find keywords using competitor ASINs, but it’s best to have a list ready.
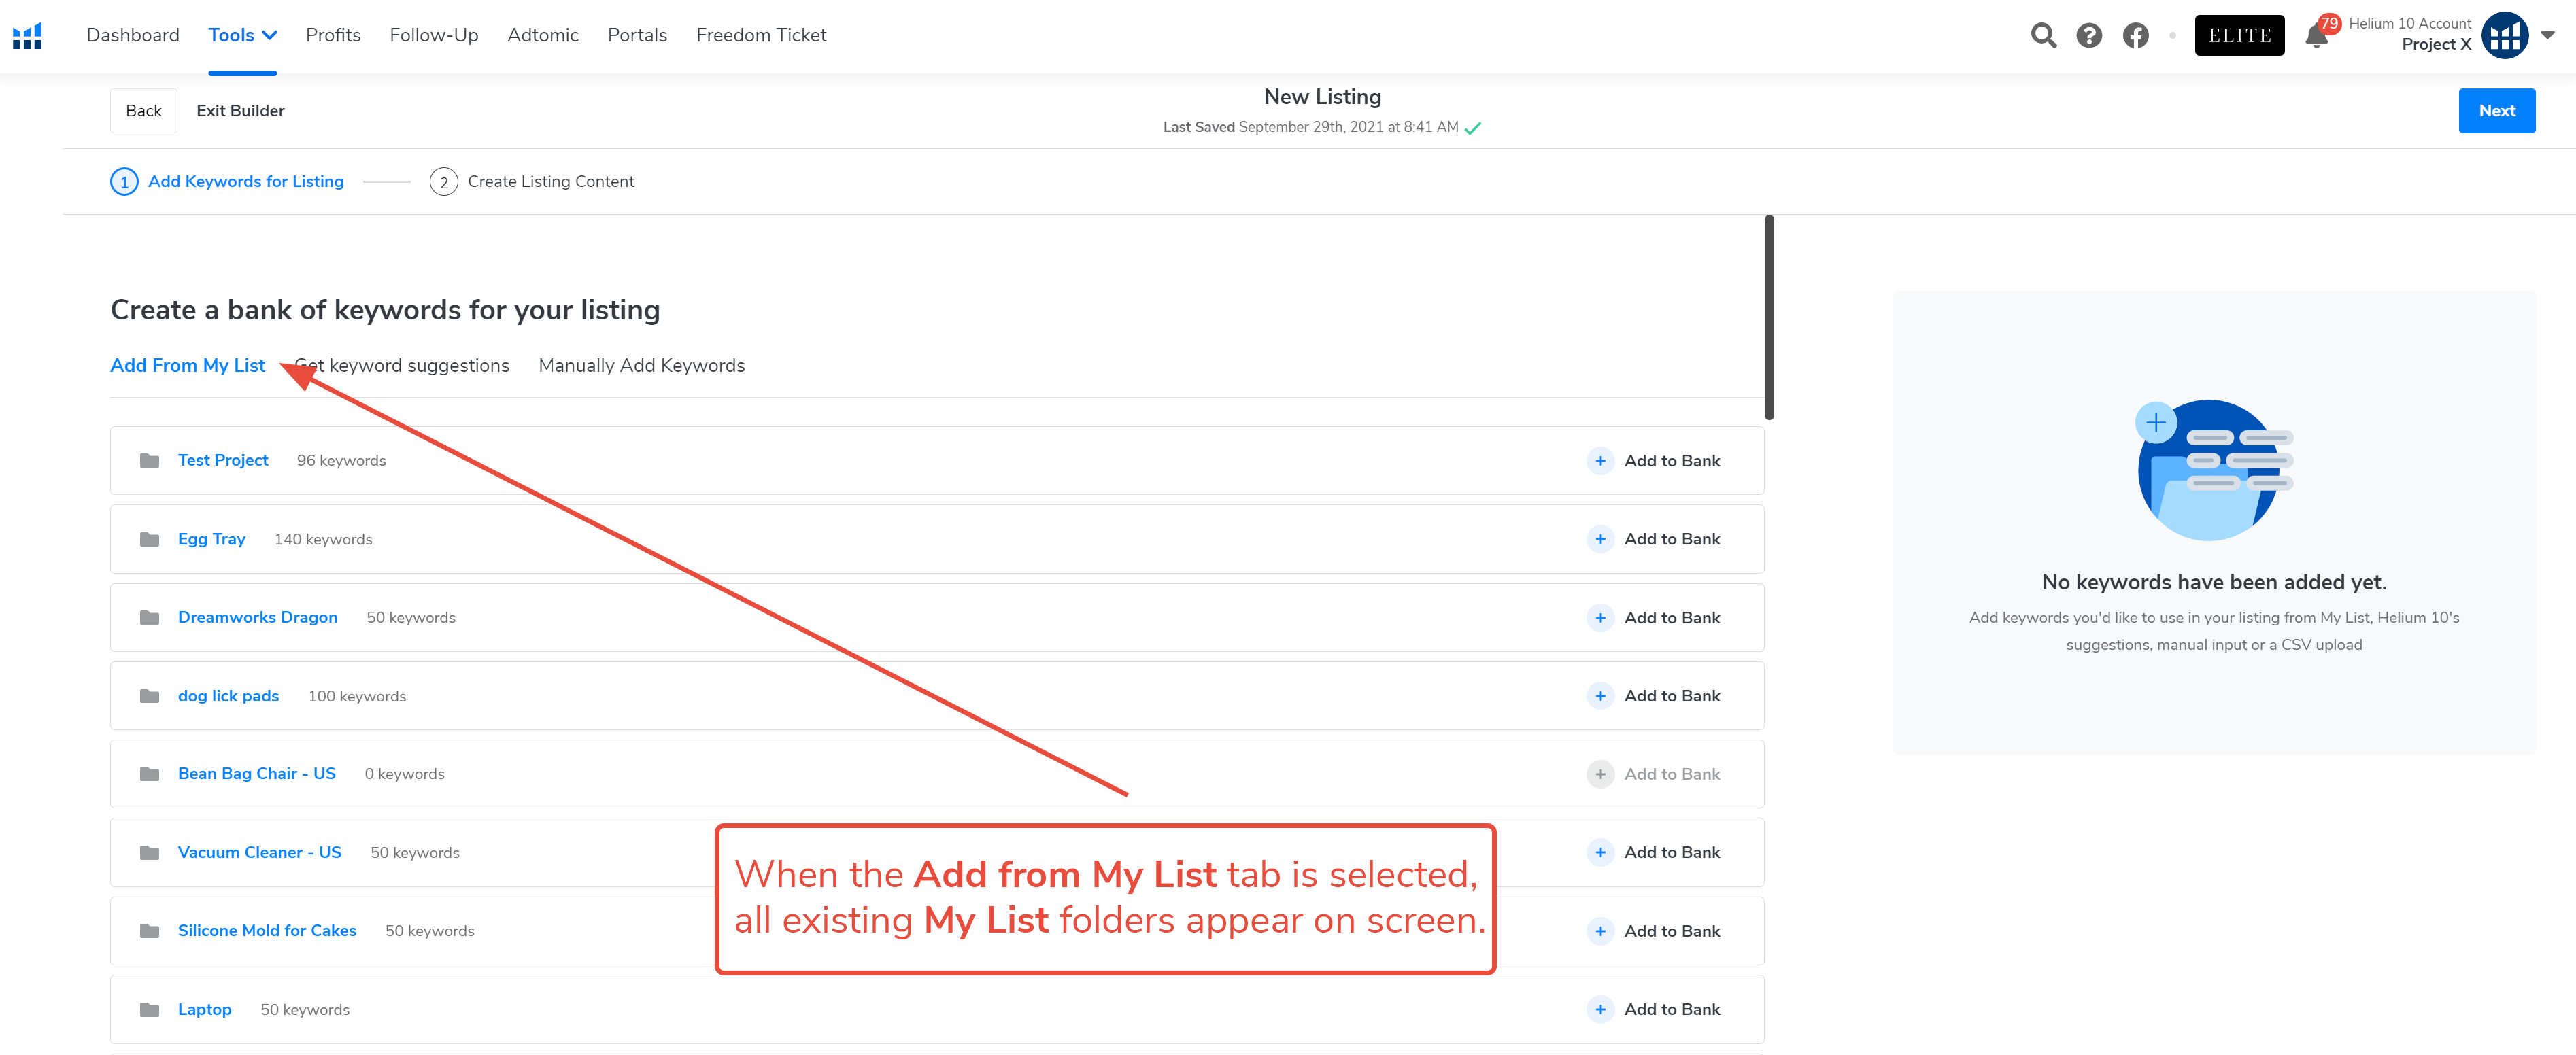
11. First, let’s walk through the process of adding keywords from previous research saved to a folder in My List. If it is not highlighted, click on the Add From My List tab under the Create a bank of Keywords for your Listing.
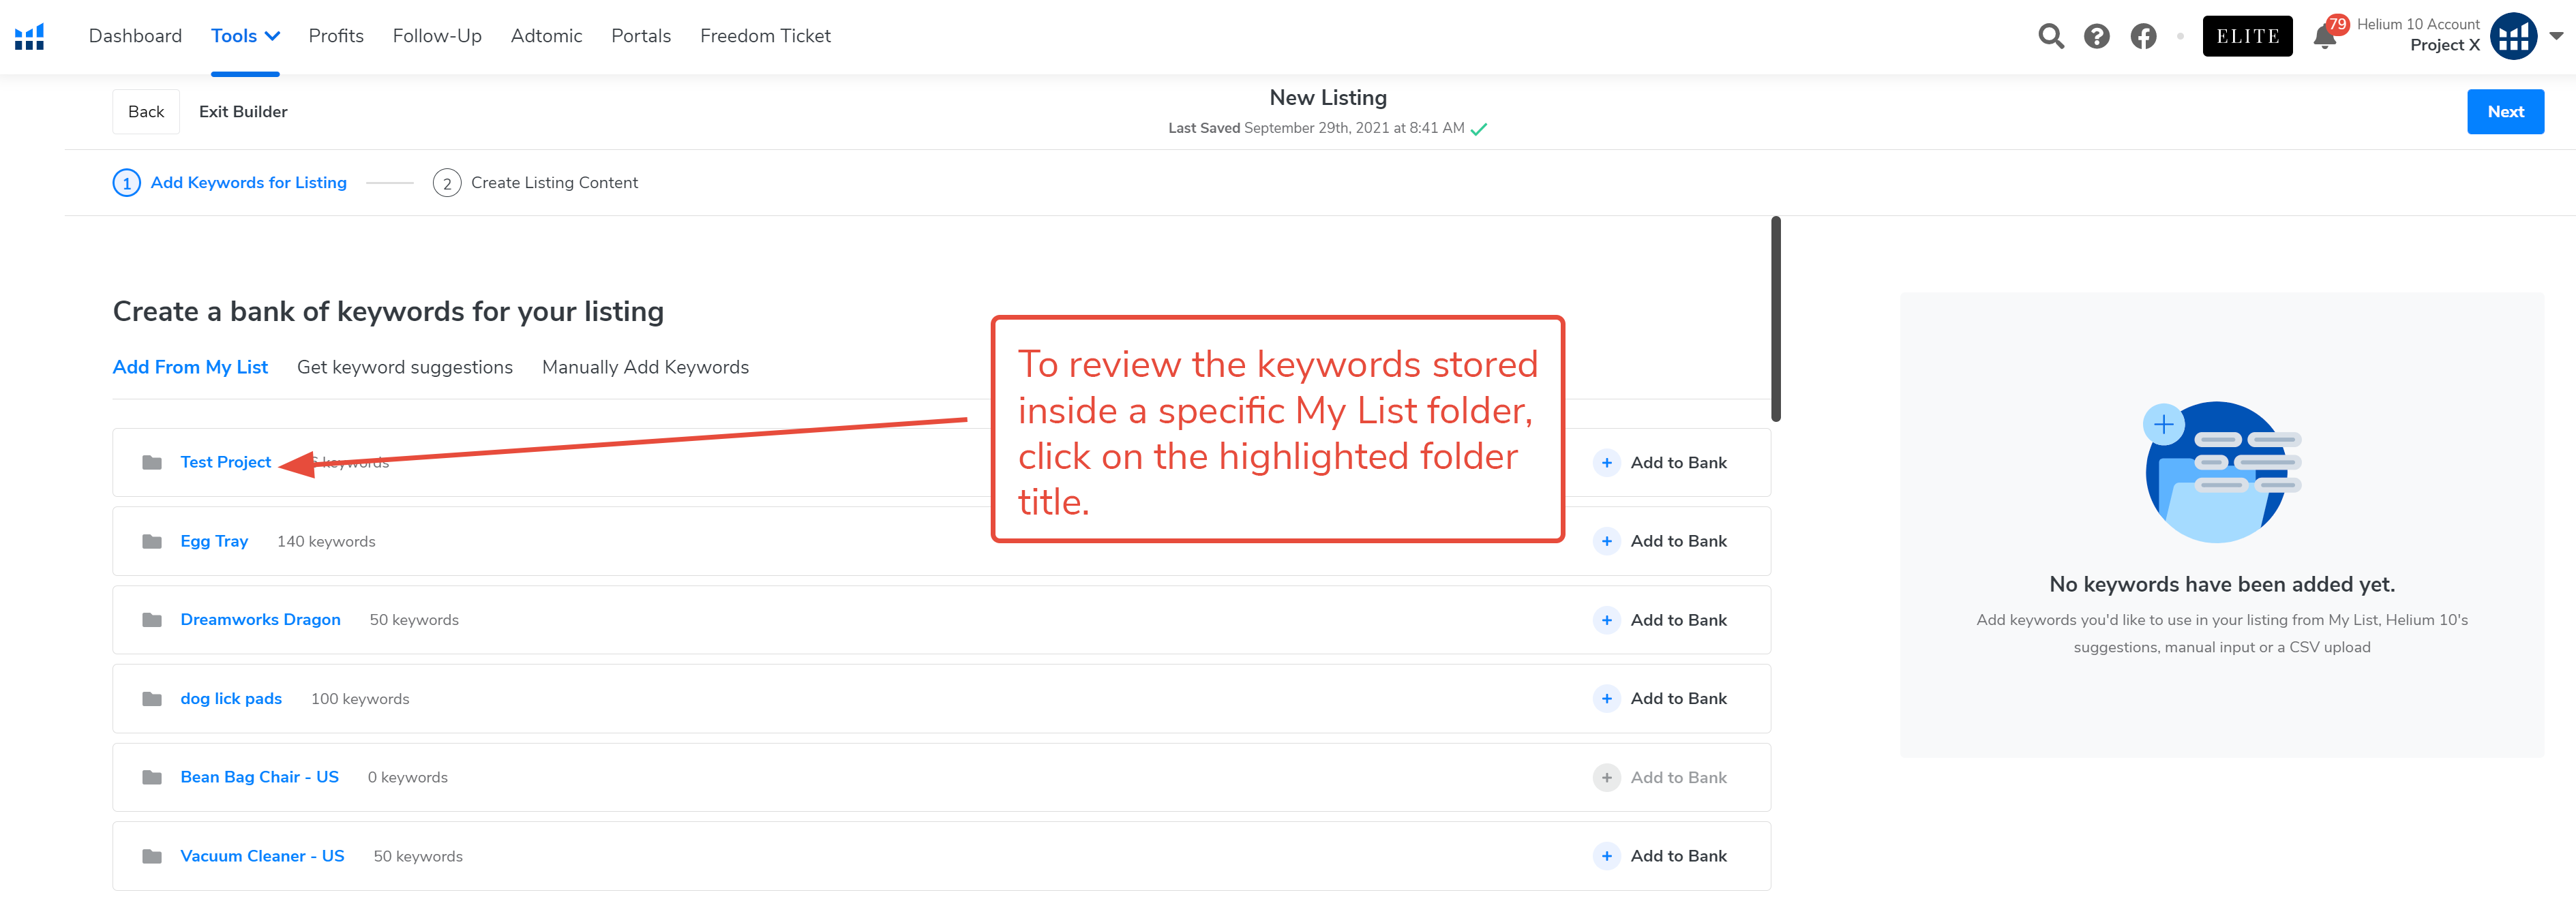
12. If you’re not sure which keywords are in a particular folder, you can click on the folder name to open it up inside My List.
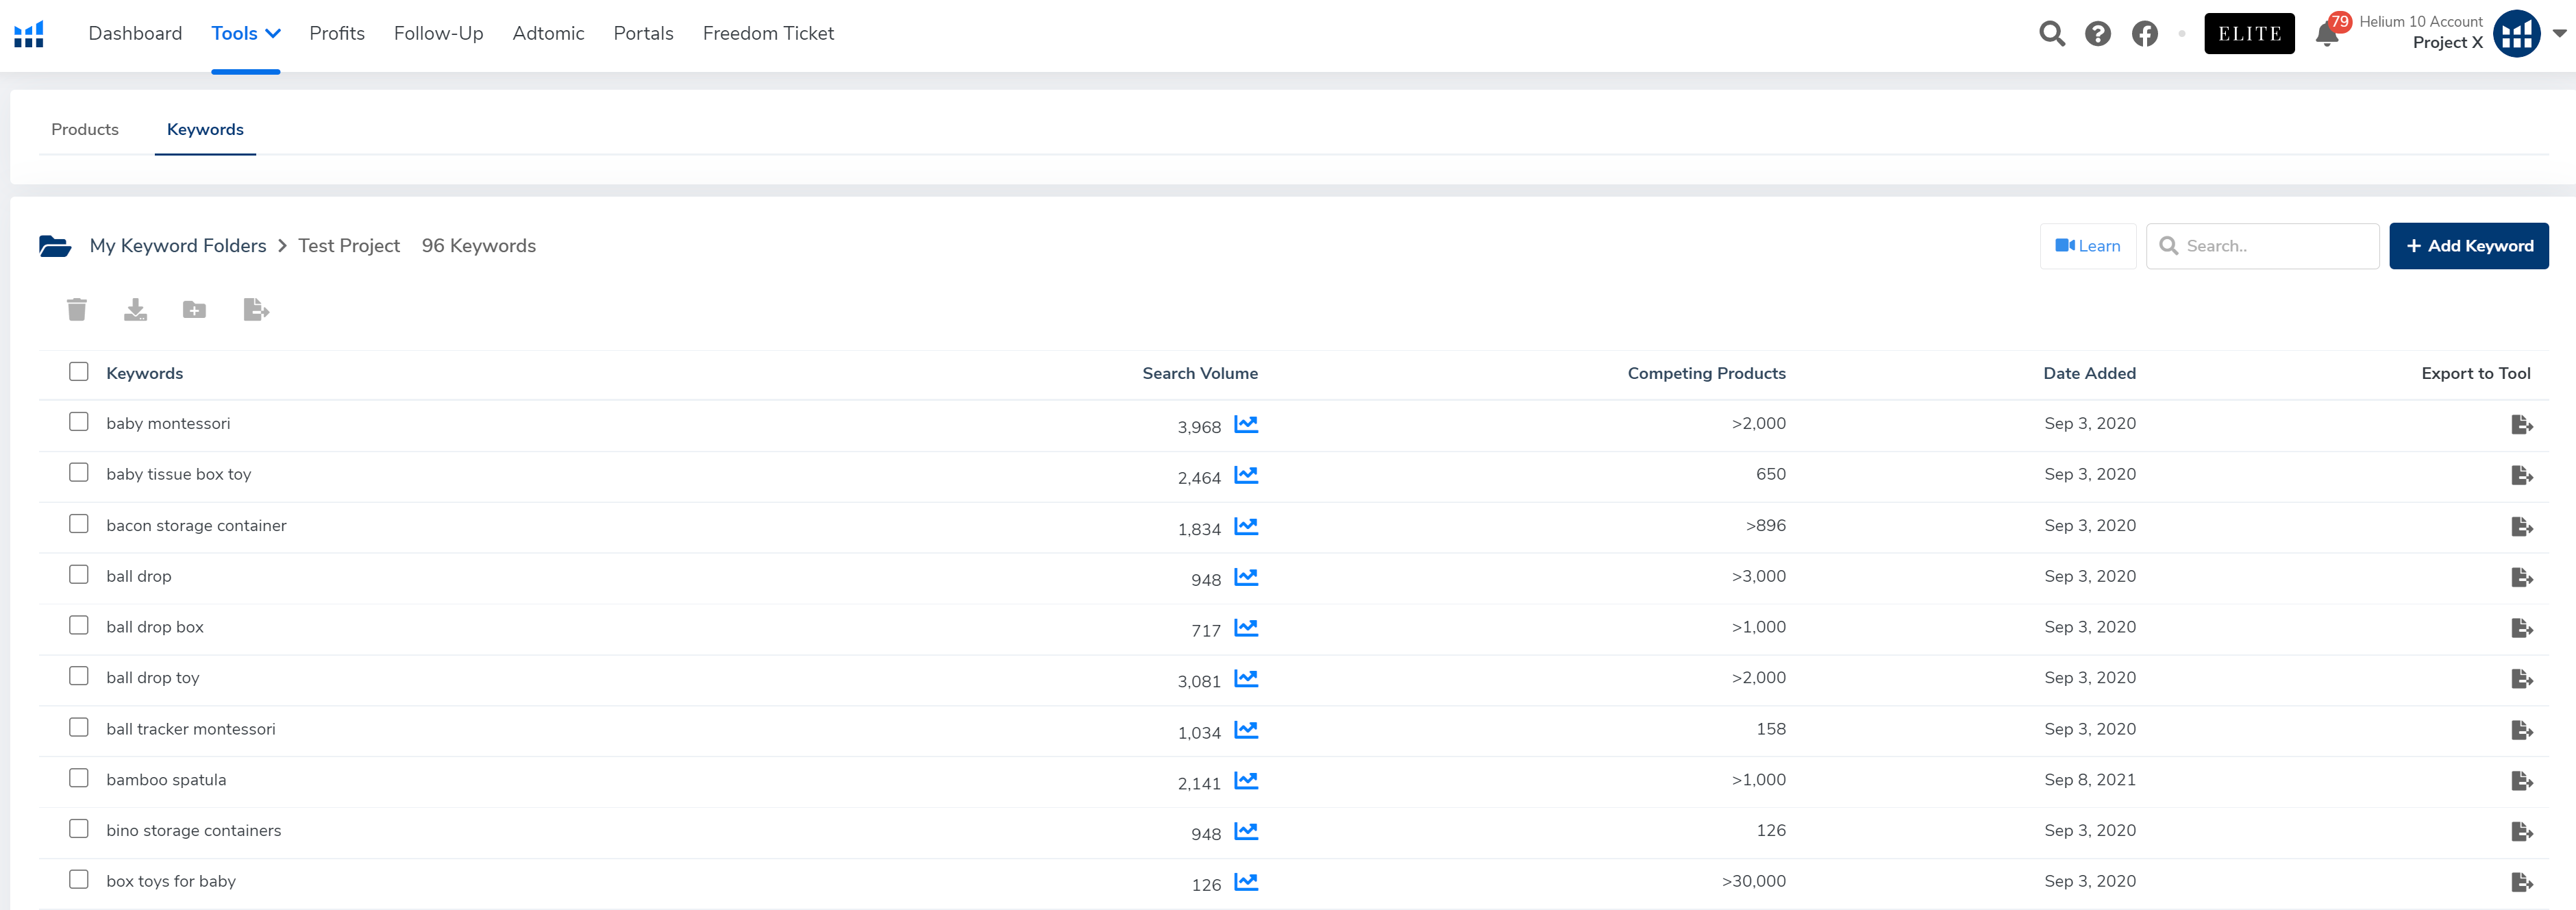
Helium 10 opens and displays the keywords for the folder you click, including their estimated search volume, number of competing products, and the date you added them.
13. If these are the keywords you want to add to your listing, simply navigate back to Listing Builder and click the + Add to Bank button. Listing Builder exports them to the Keyword Bank.
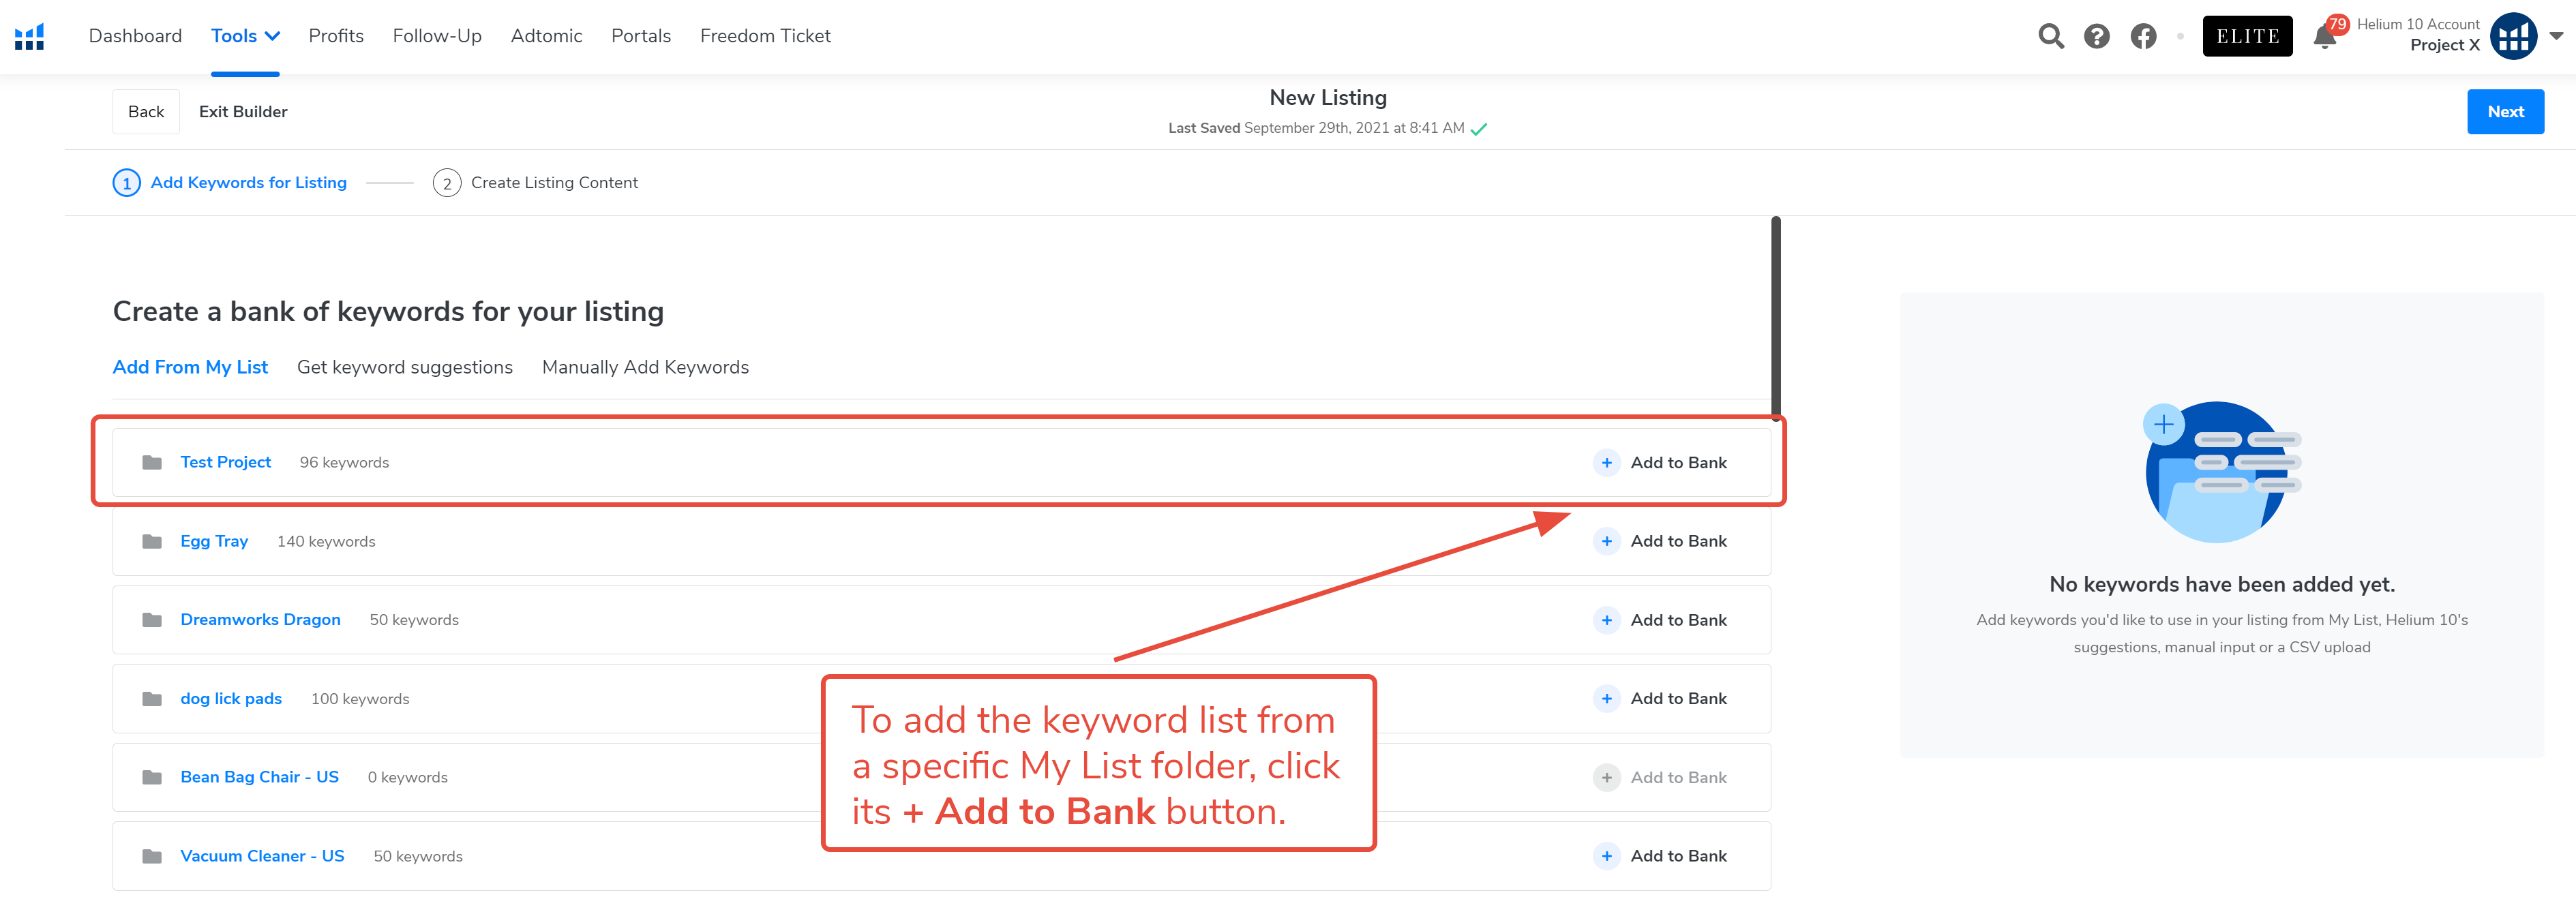
14. In addition to adding the keywords to the bank, Listing Builder displays the keywords’ search volume, the number of related products, and each keyword’s CPR (Helium 10’s estimate for the number of promotional products needed to rank at or near the top of a customer’s search results for that keyword). The bank also features a delete X function so you can remove any individual words you don’t want to keep.
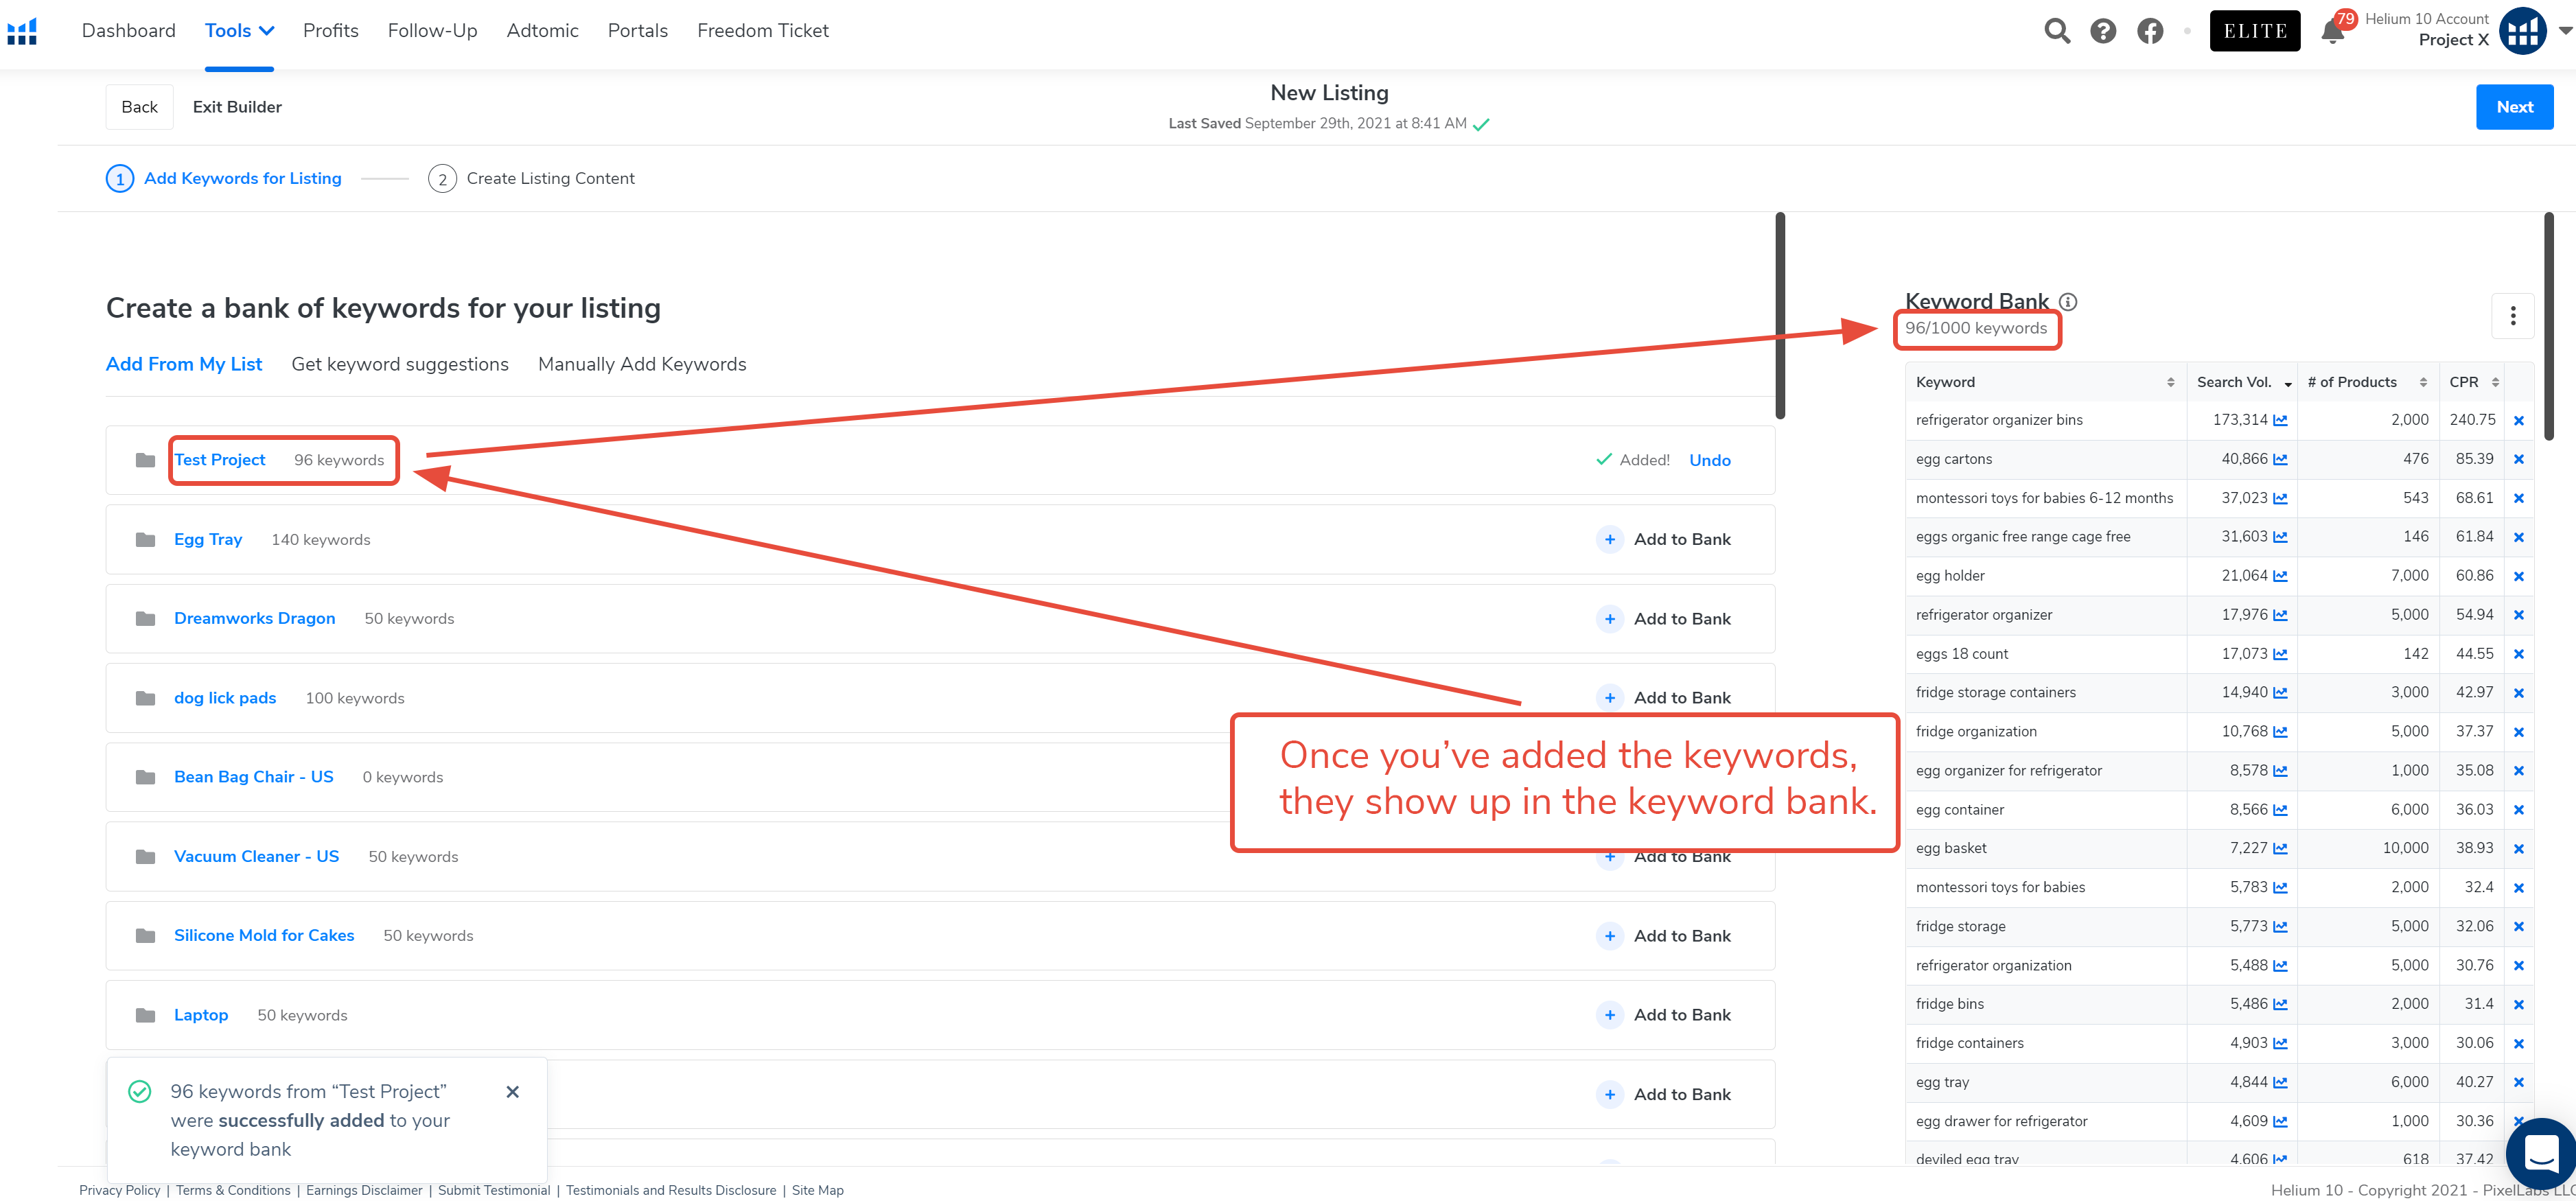
The Search Volume column includes the graph icon that allows you to open a window showing the estimated historical search volume for the keyword.
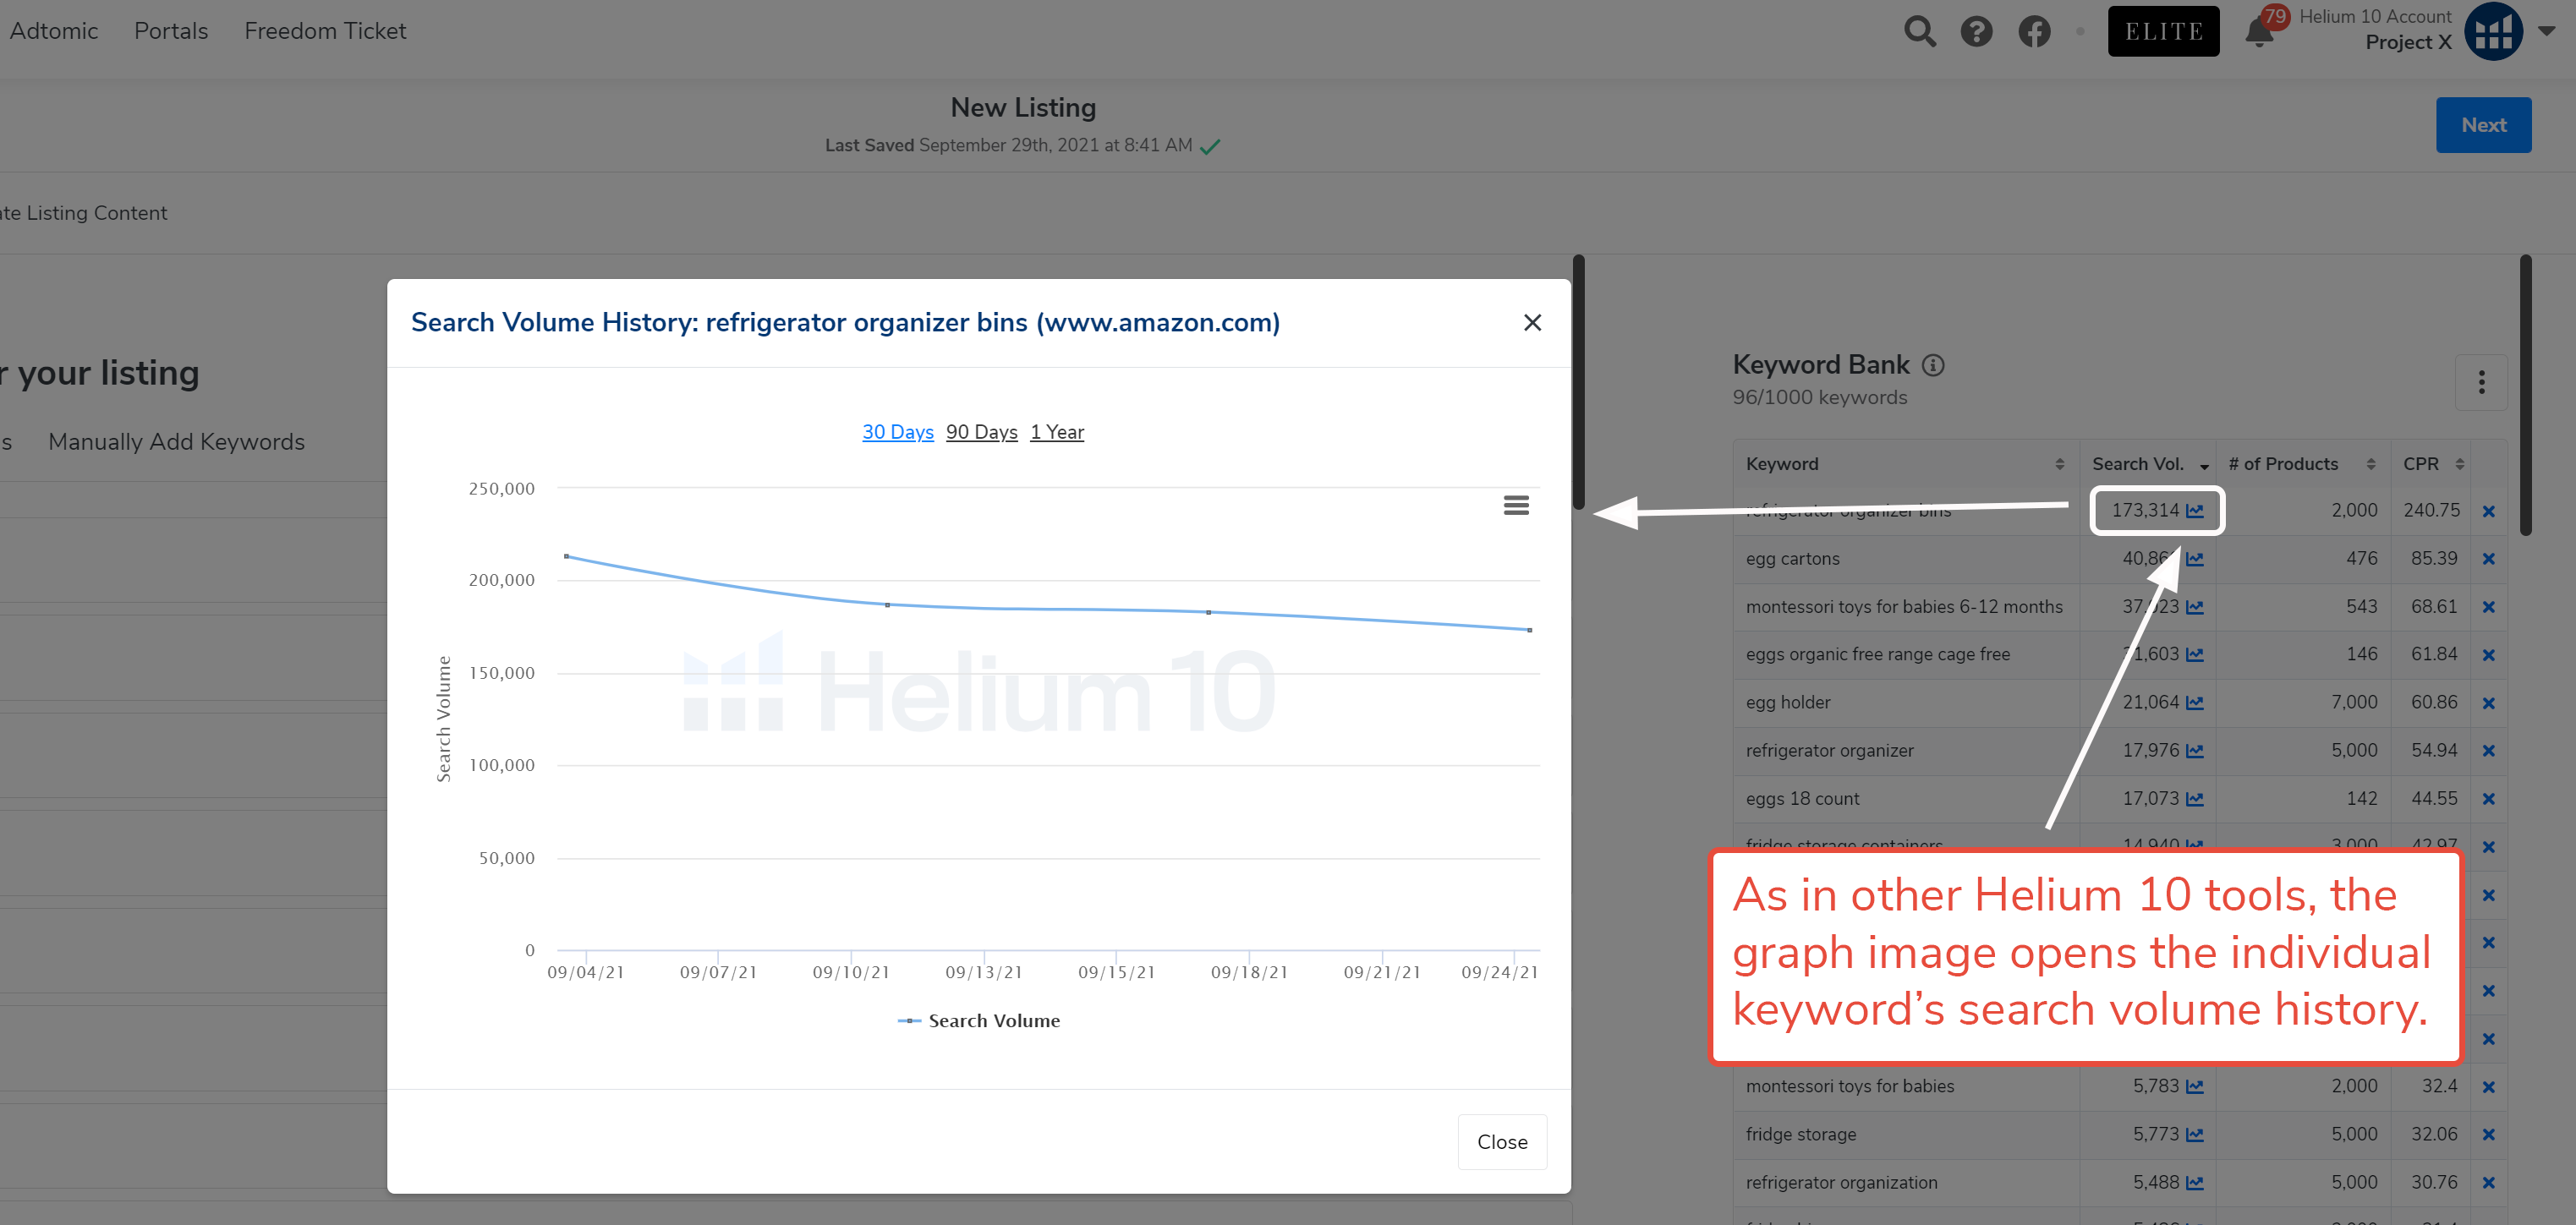
15. At any time, you can save the bank of keywords, either by copying them to the clipboard, exporting them as a CSV or XLSX file, or creating a new My List folder. Click the button at the top right of the Keyword Bank to open the options menu.
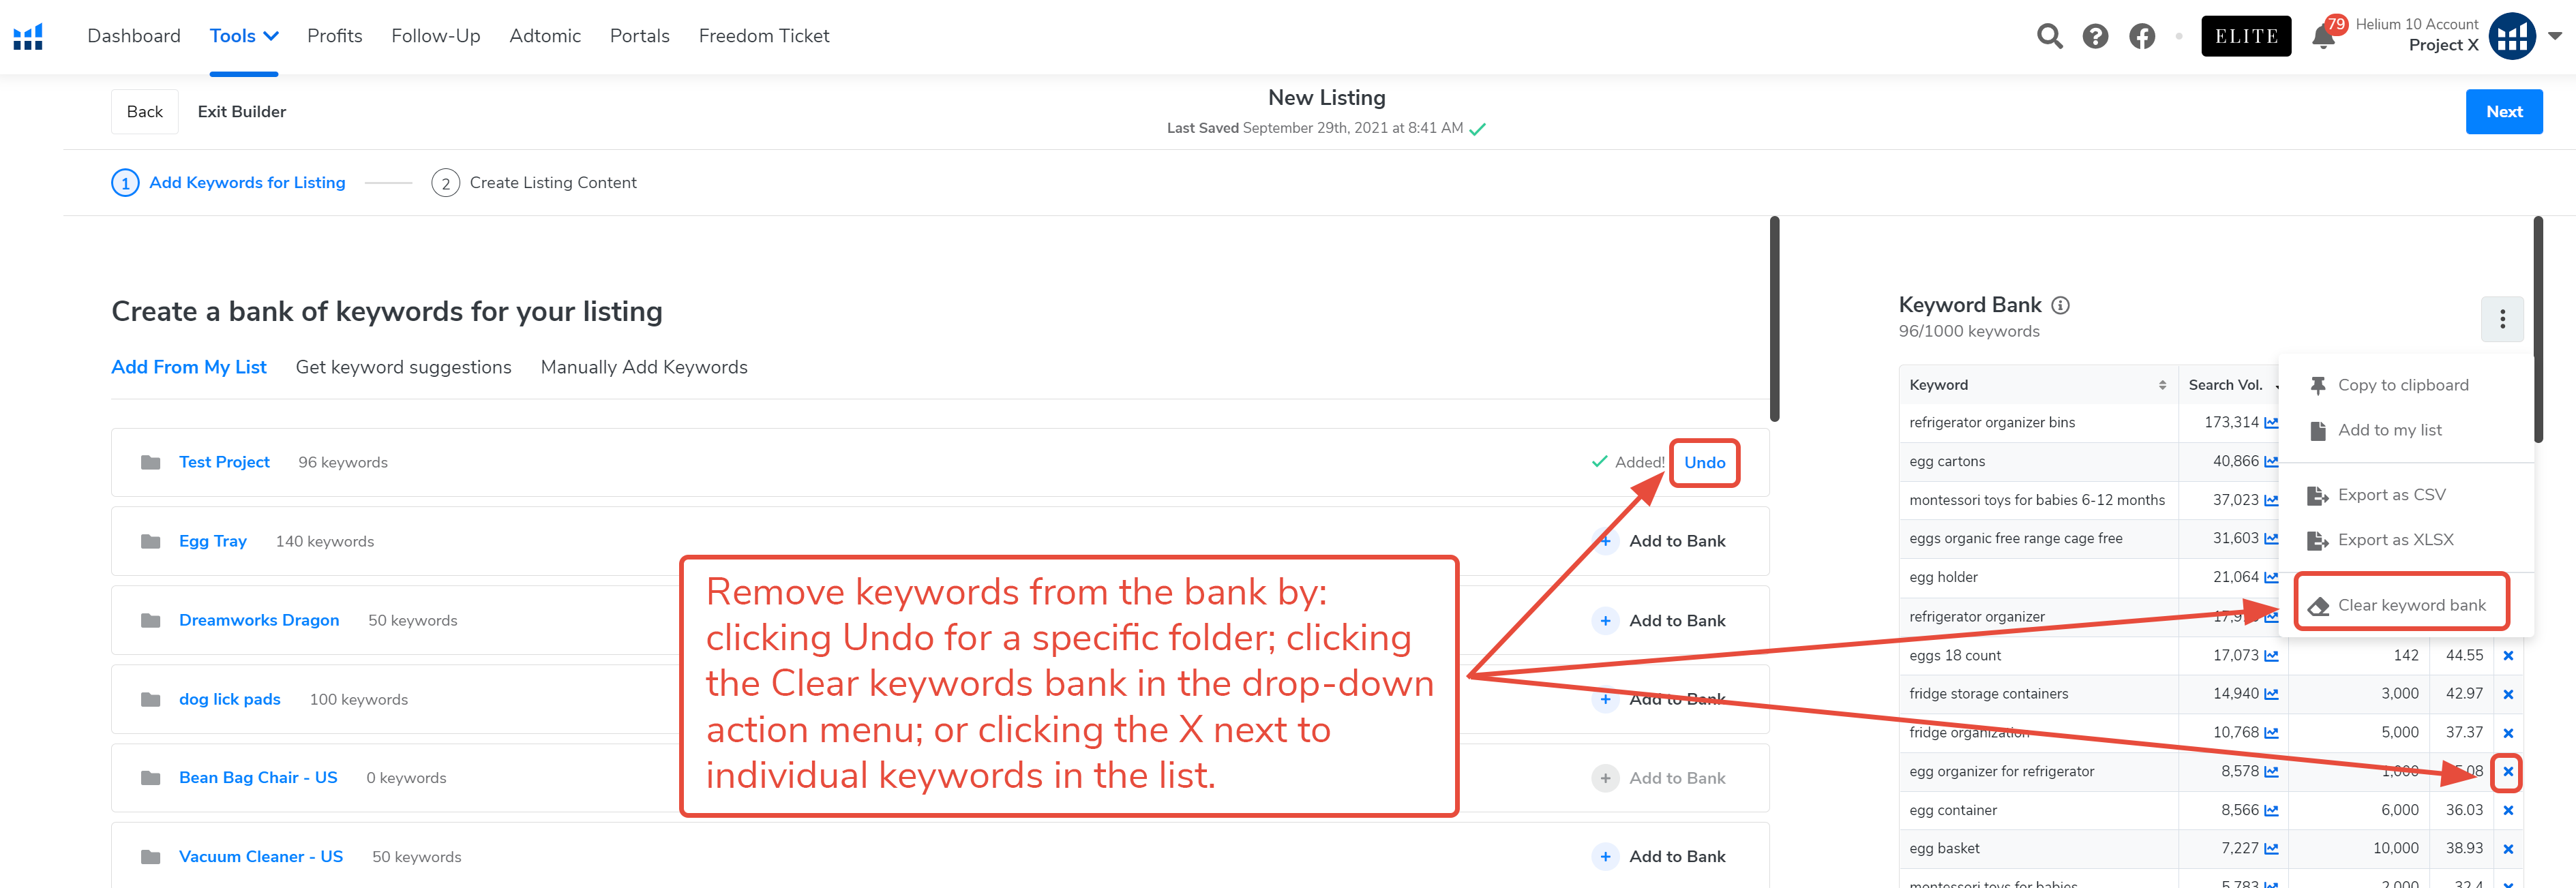
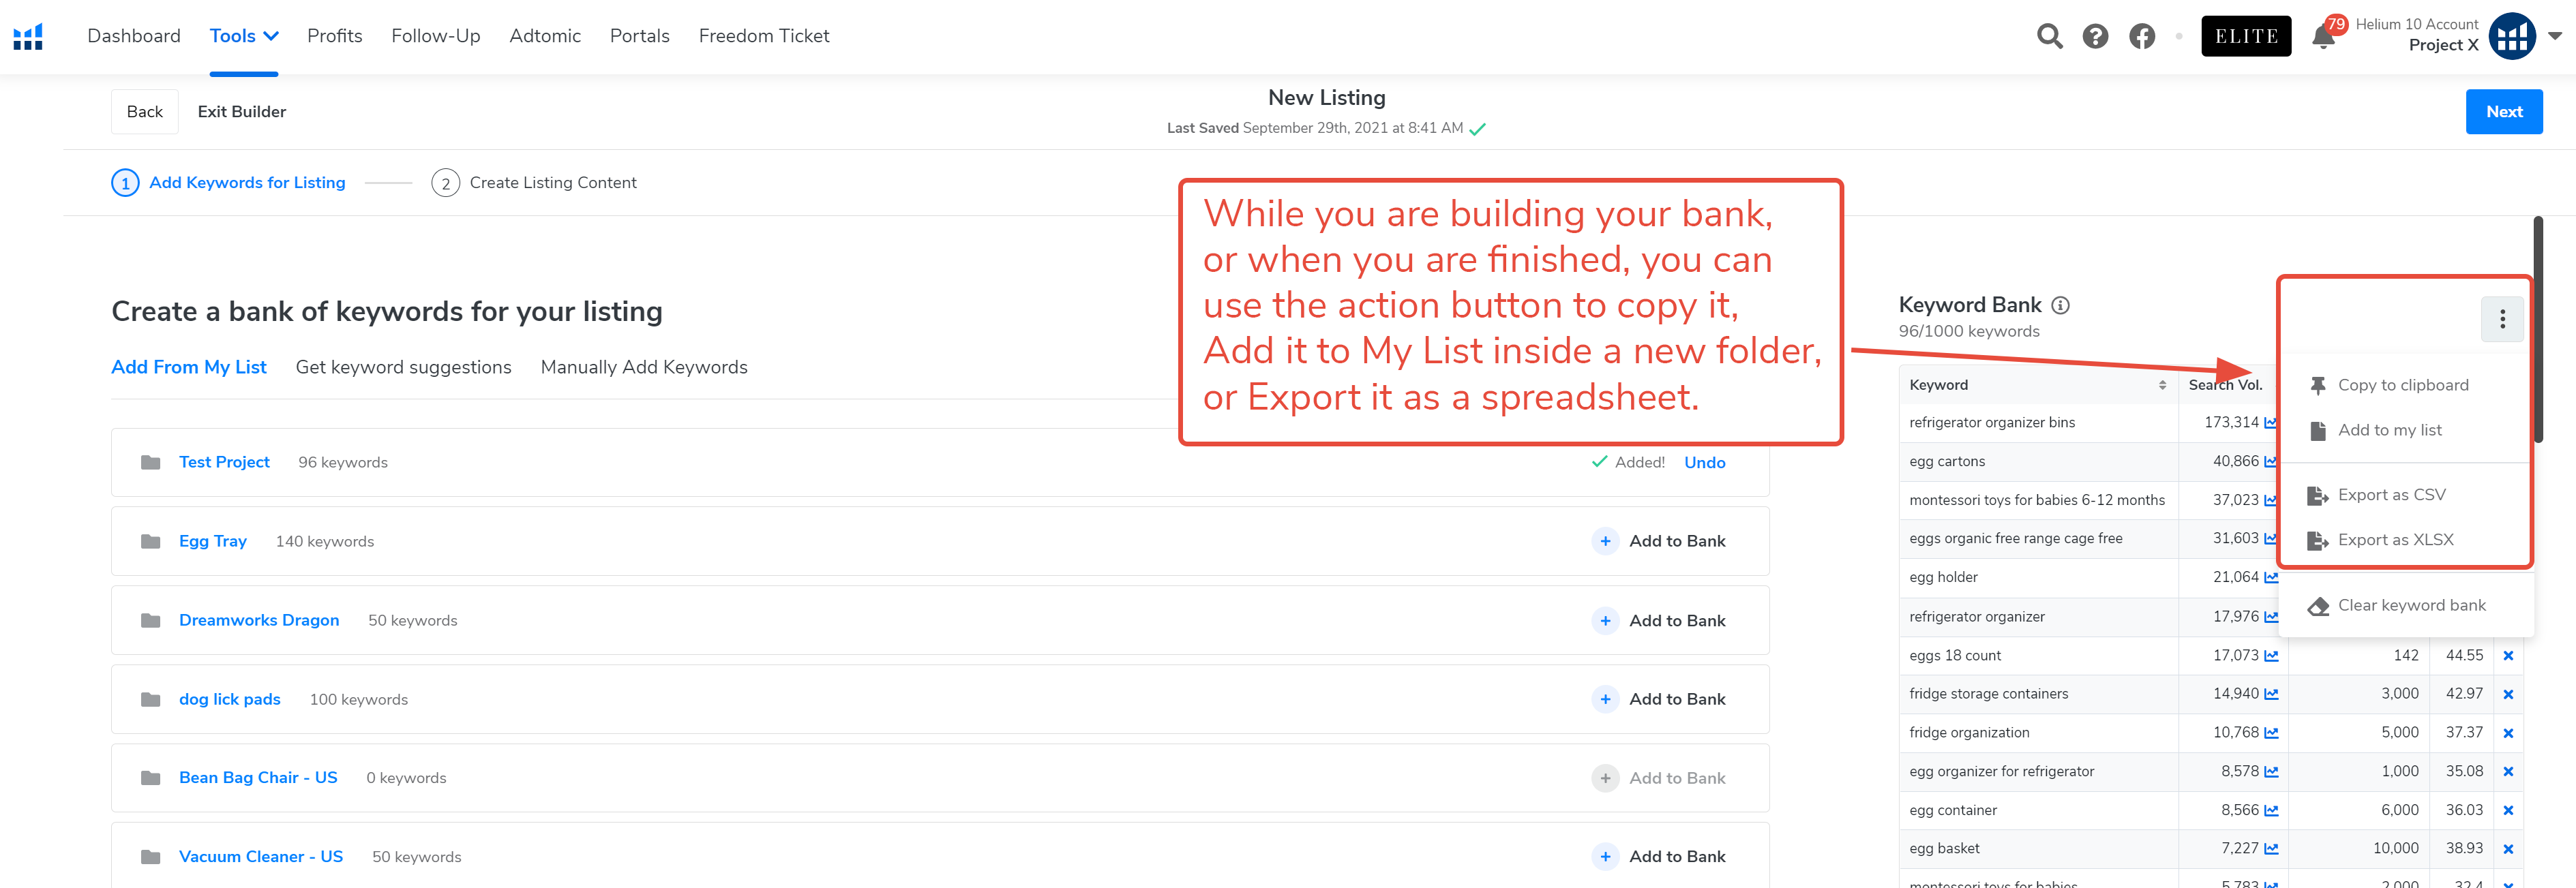 16. To remove individual keywords, click the word’s adjacent X symbol.
To remove keywords you’ve added from a specific My List folder, click the file’s highlighted Undo text.
To empty the keyword bank to start over, open the options drop-down menu and select Clear keyword bank.
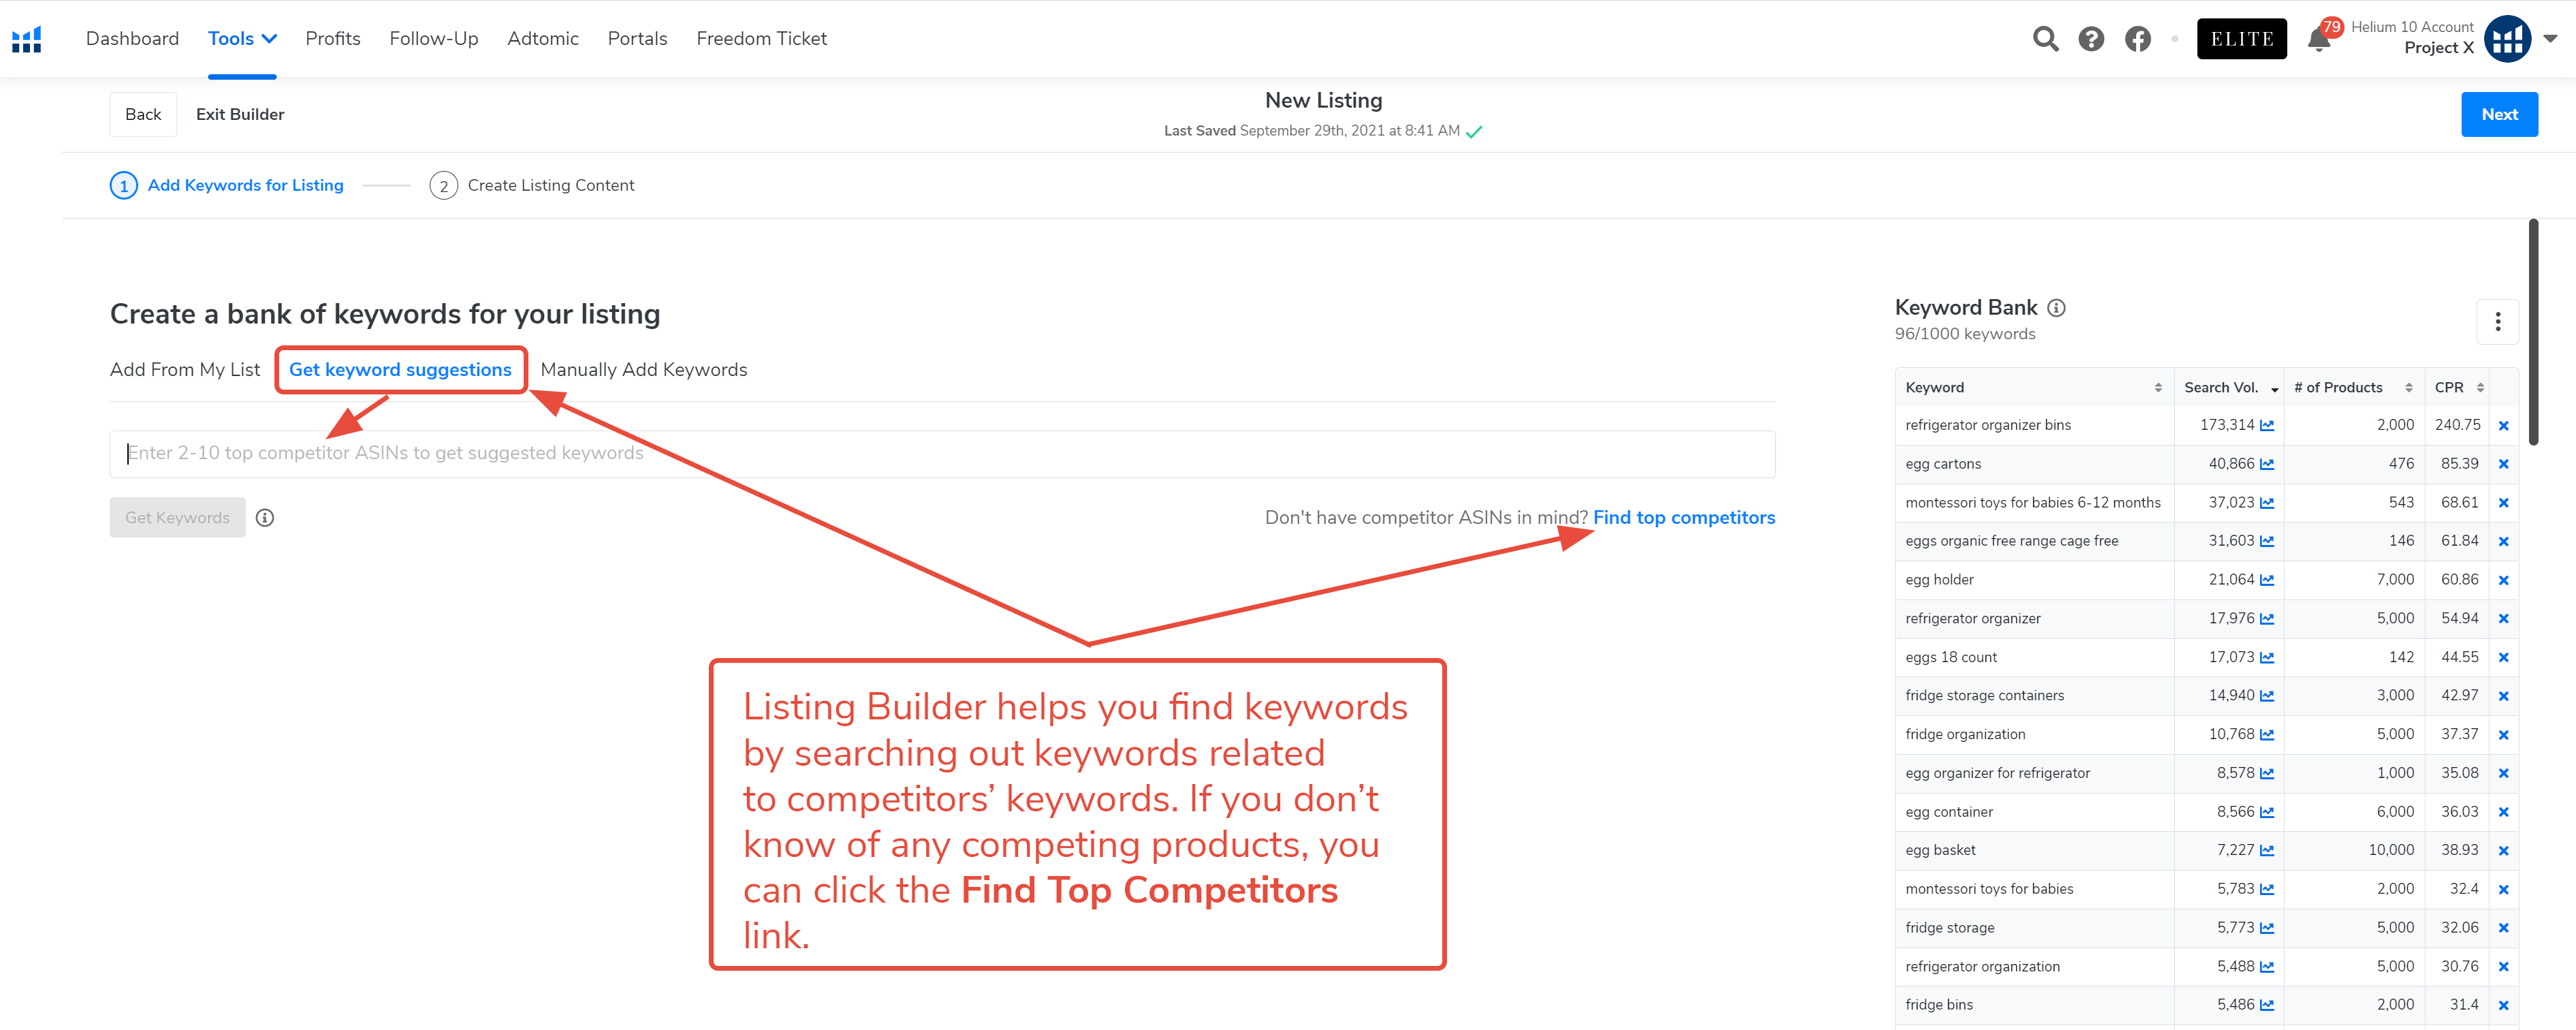
17. On the Listing Builder window for a New Listing, click the Get keyword suggestions tab. You will need at least two (2) and no more than 10 competitor ASINs to prompt Listing Builder to search for related keywords.
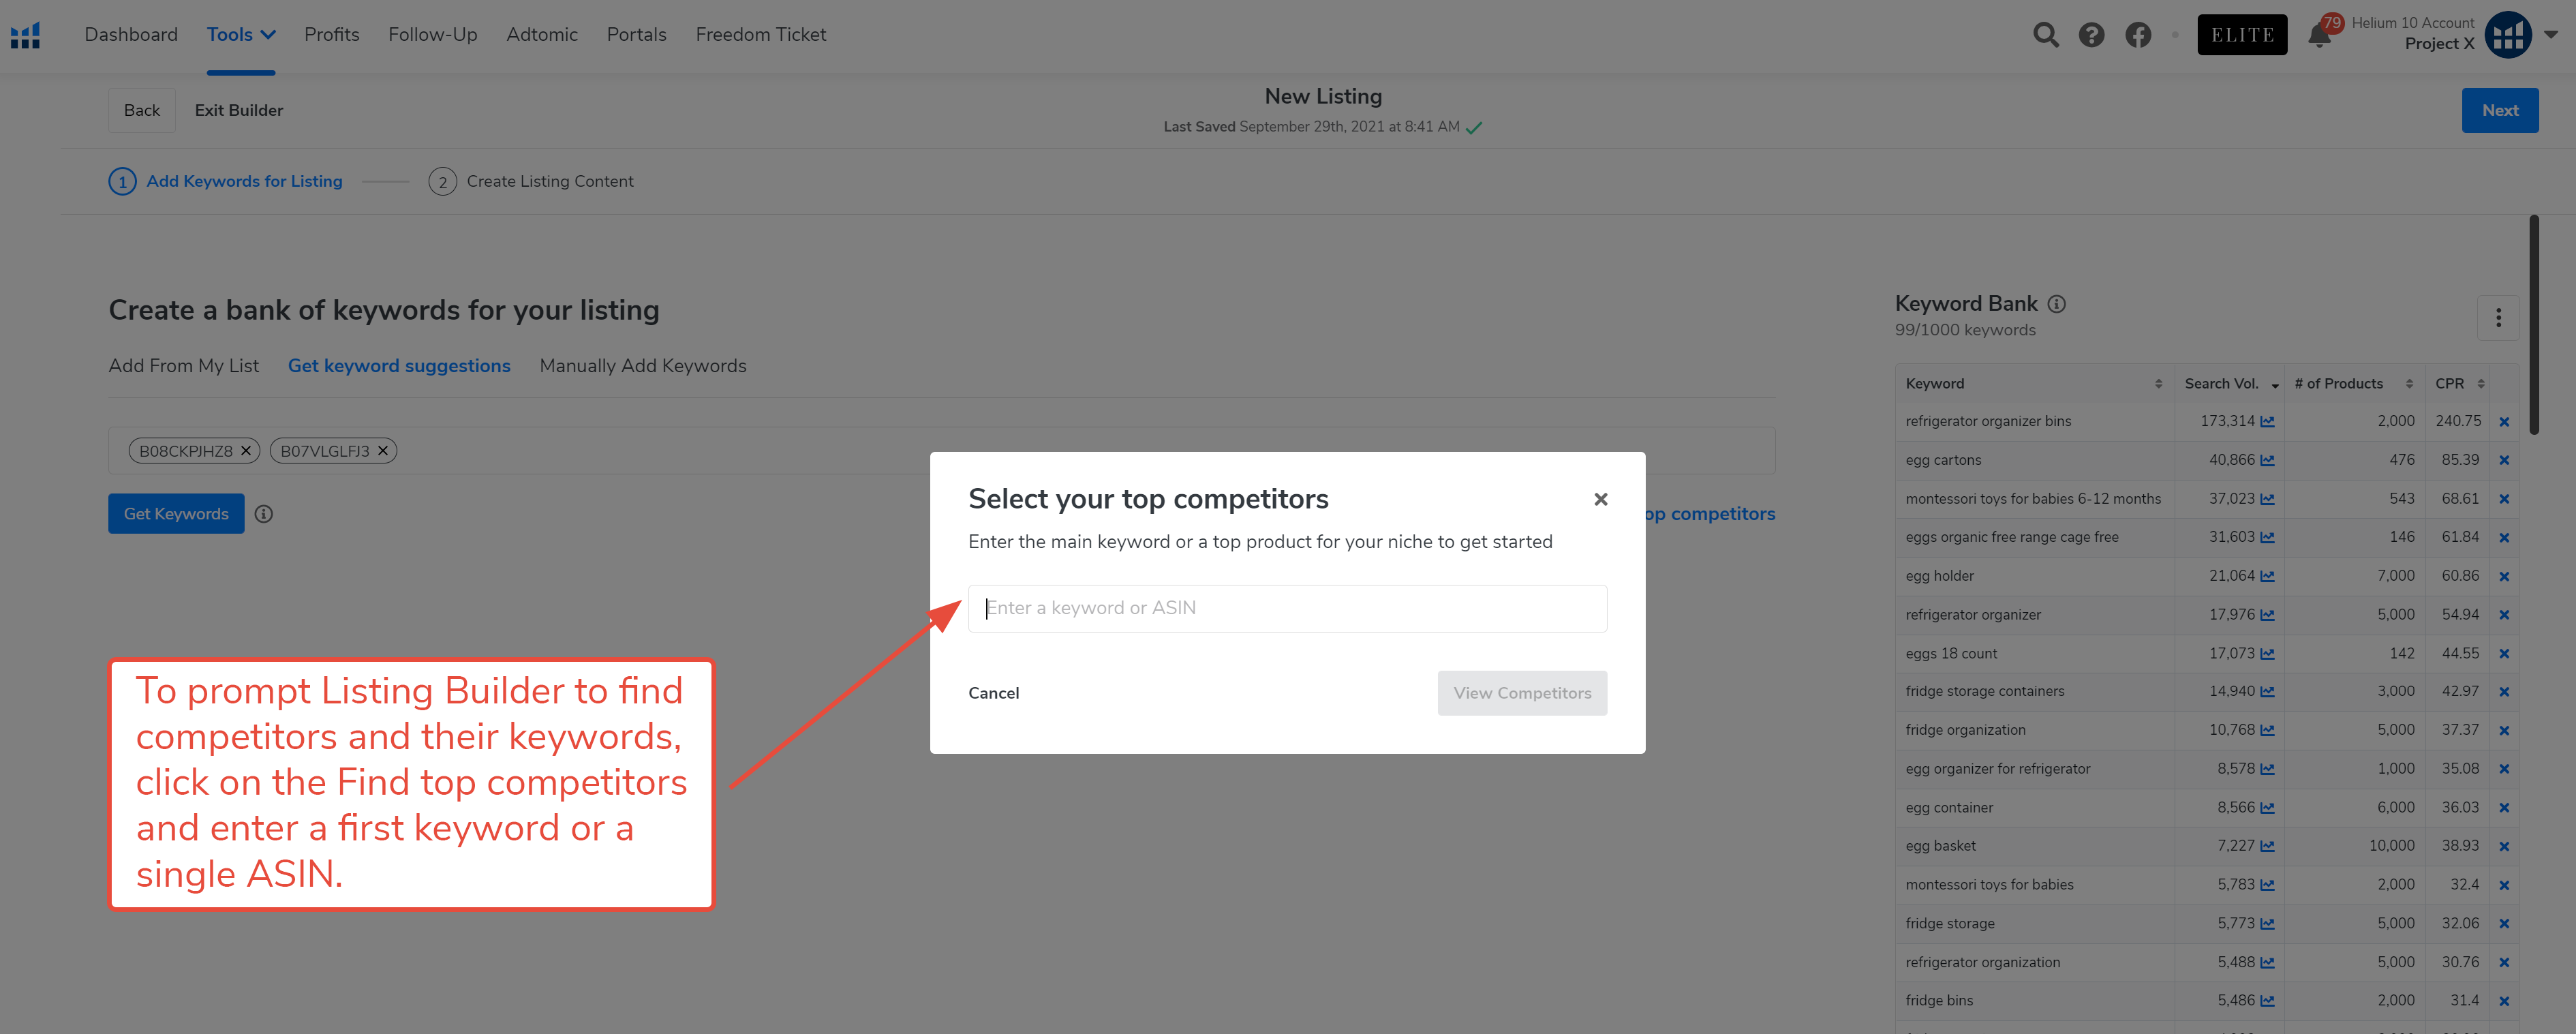
If you don’t have any competitor ASINs prepared, you can click the Find top competitors link on the right side of the search area, and then search for competitors using a keyword or single ASIN.
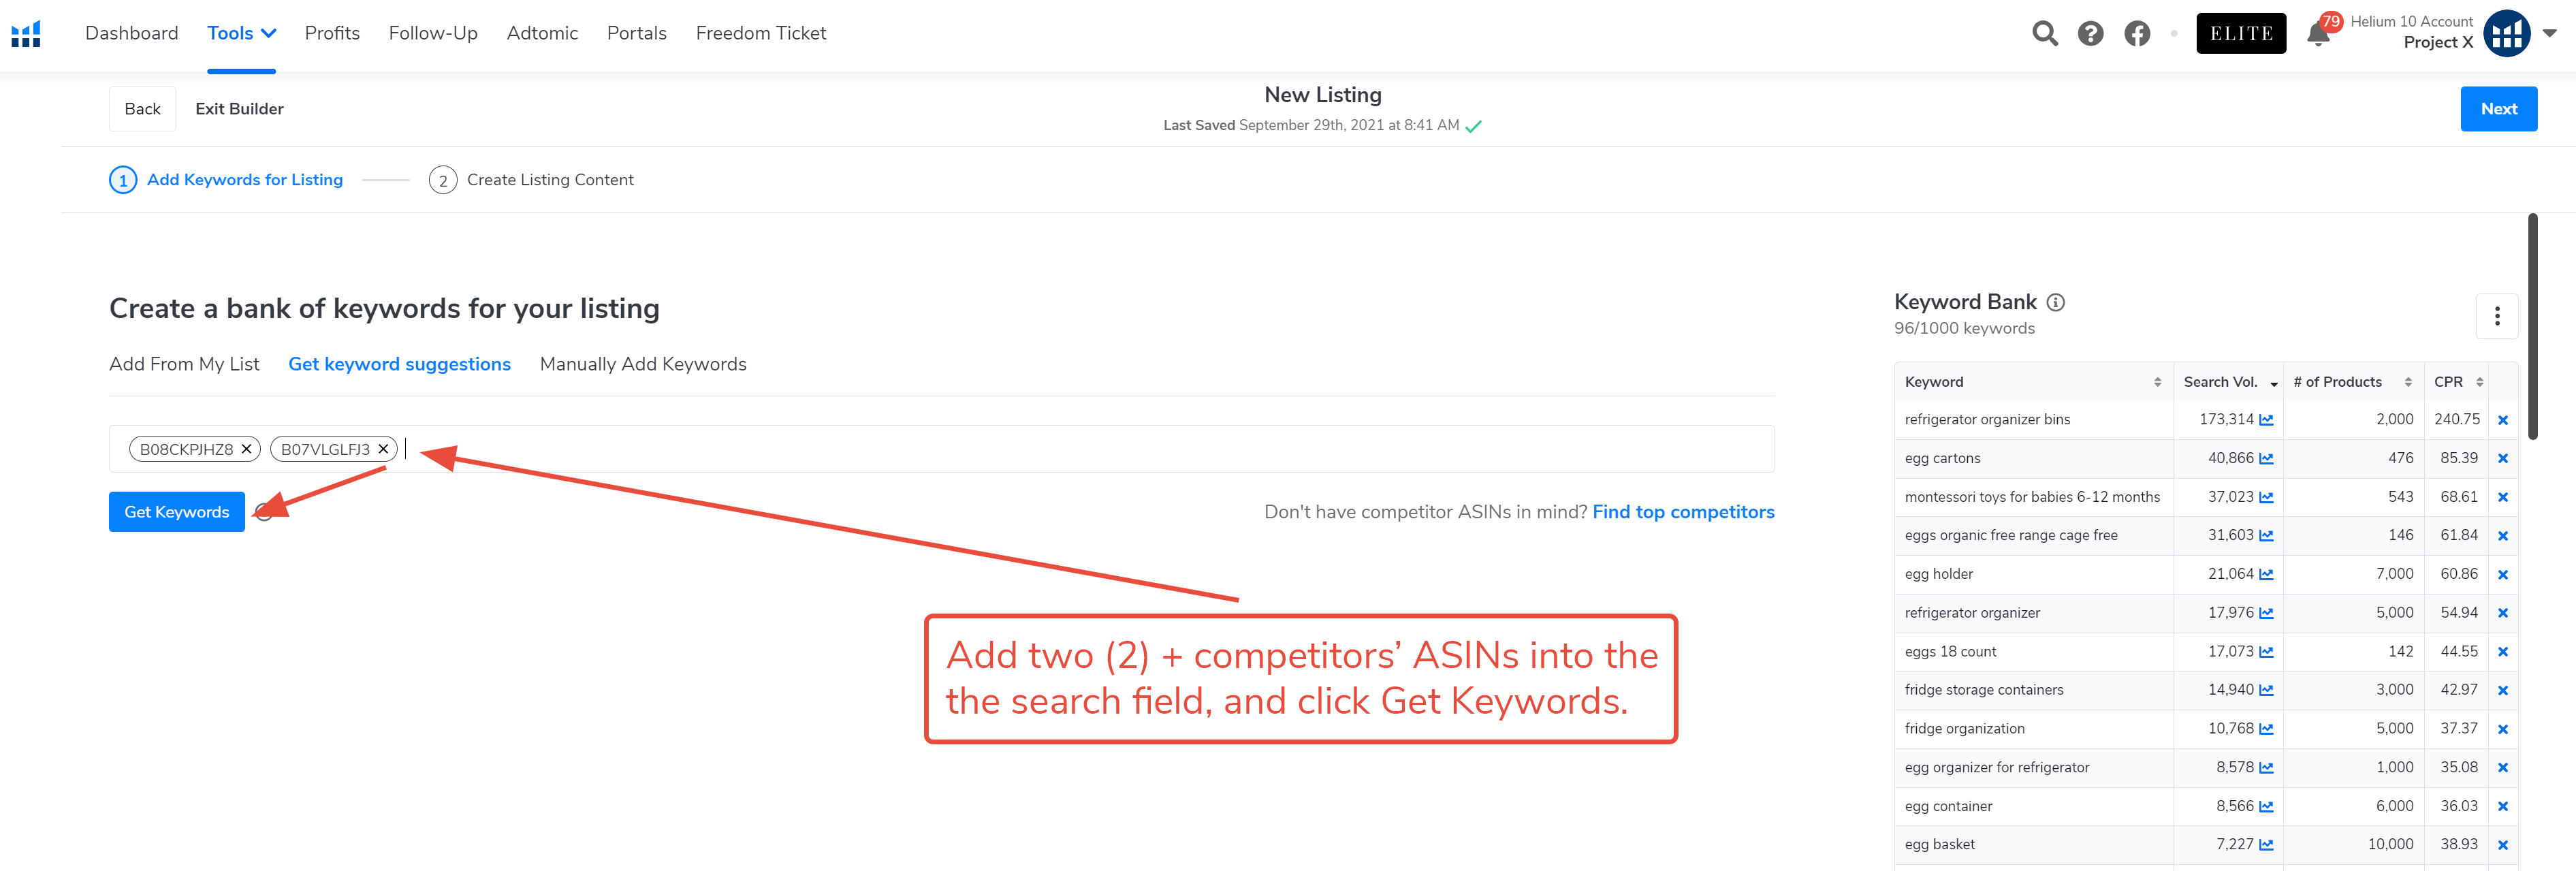
18. Type or paste two (2) or more ASINs into the search field, and click the blue Get Keywords button.
19. When prompted, the software displays a set of keywords related to the entered ASINs.
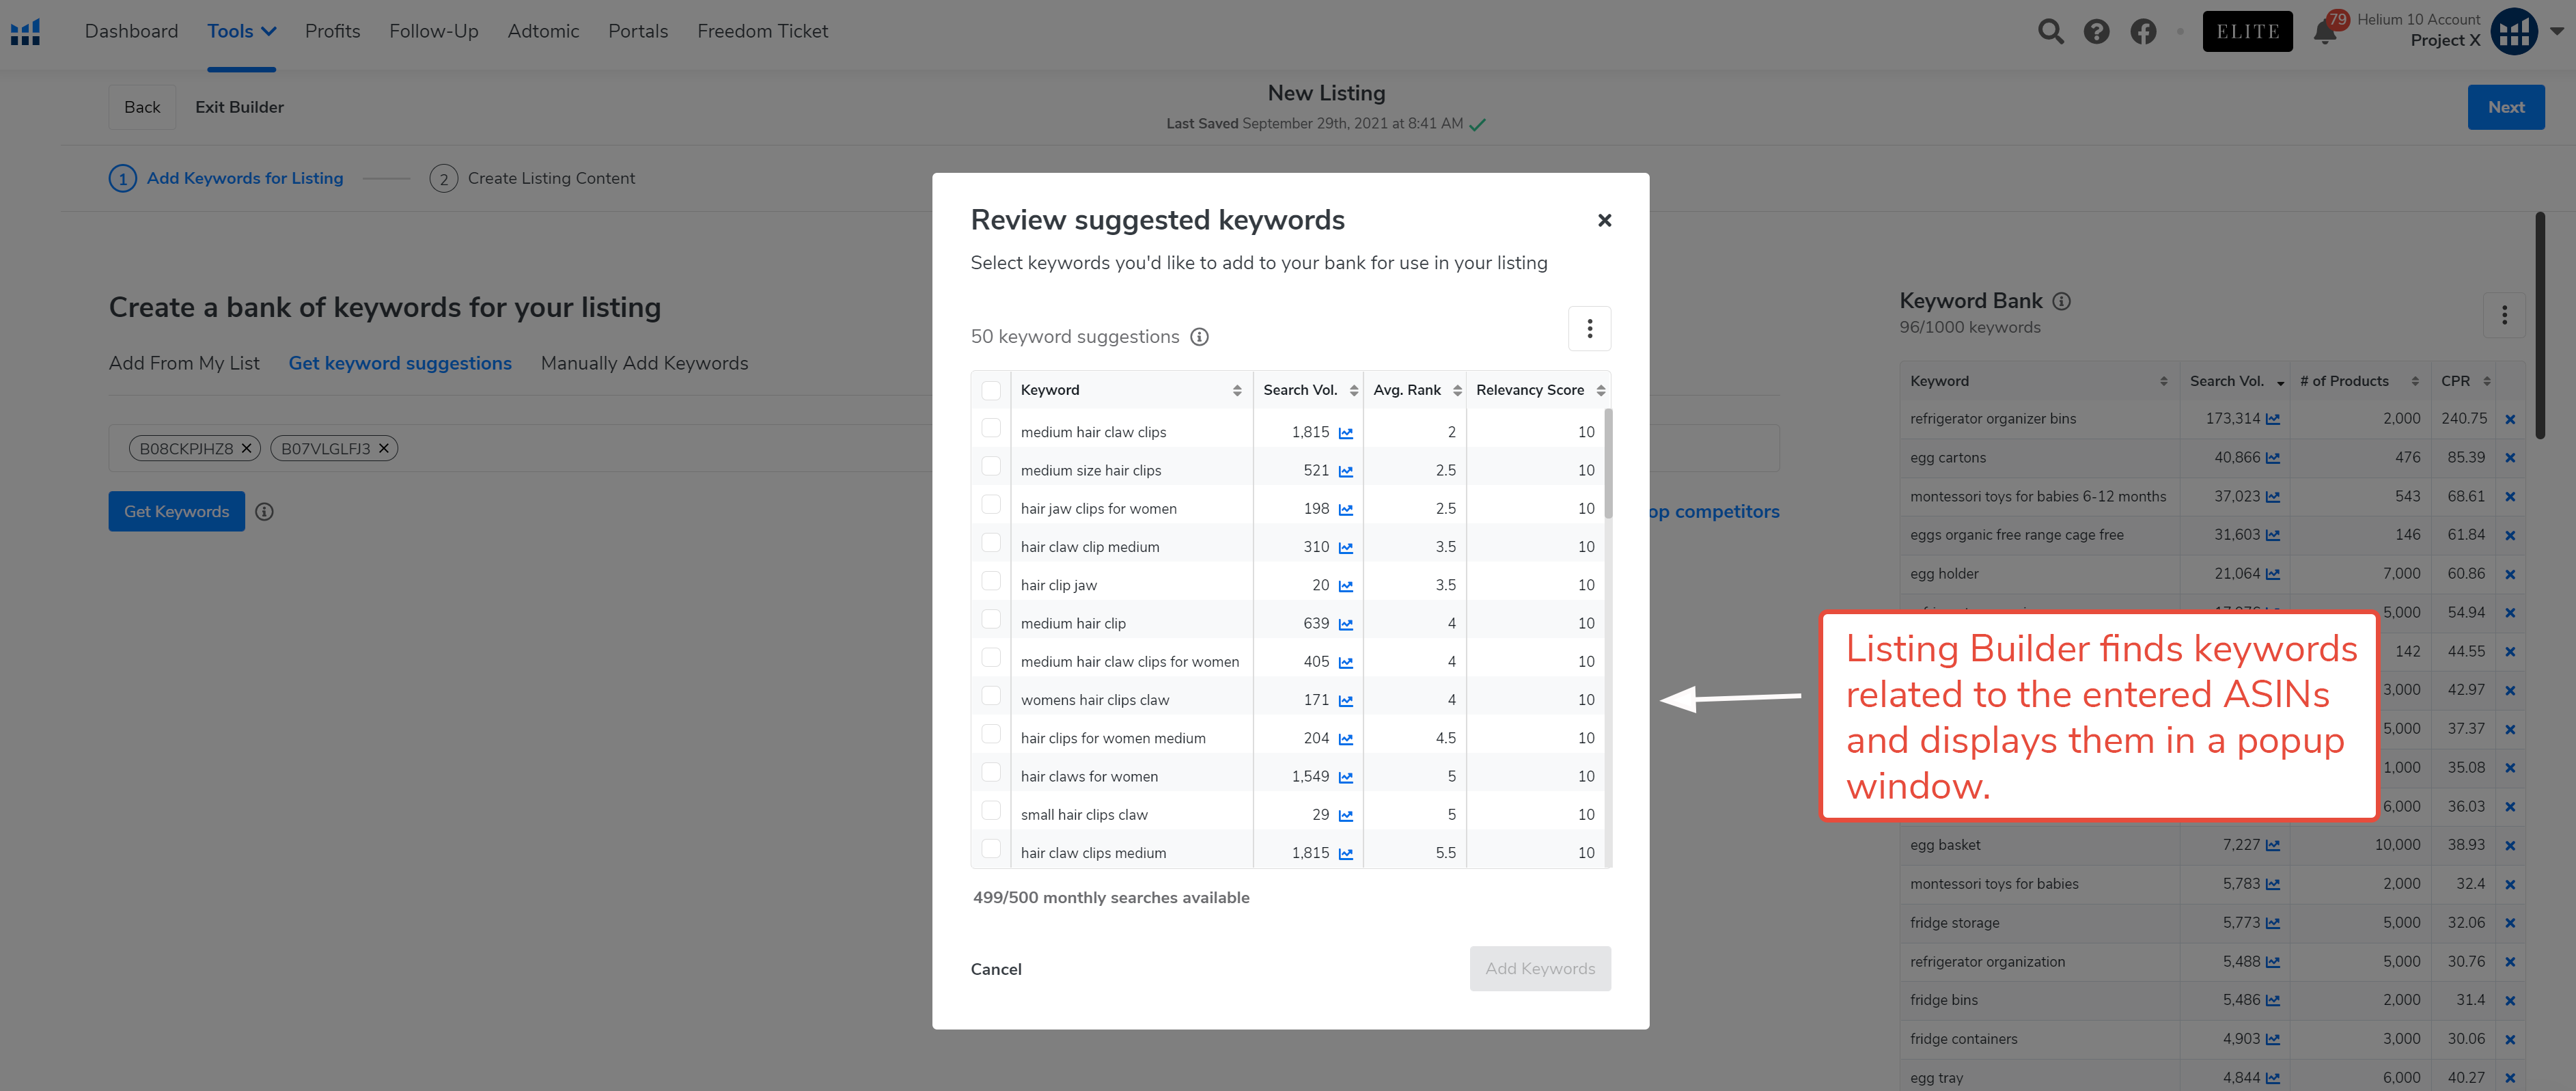
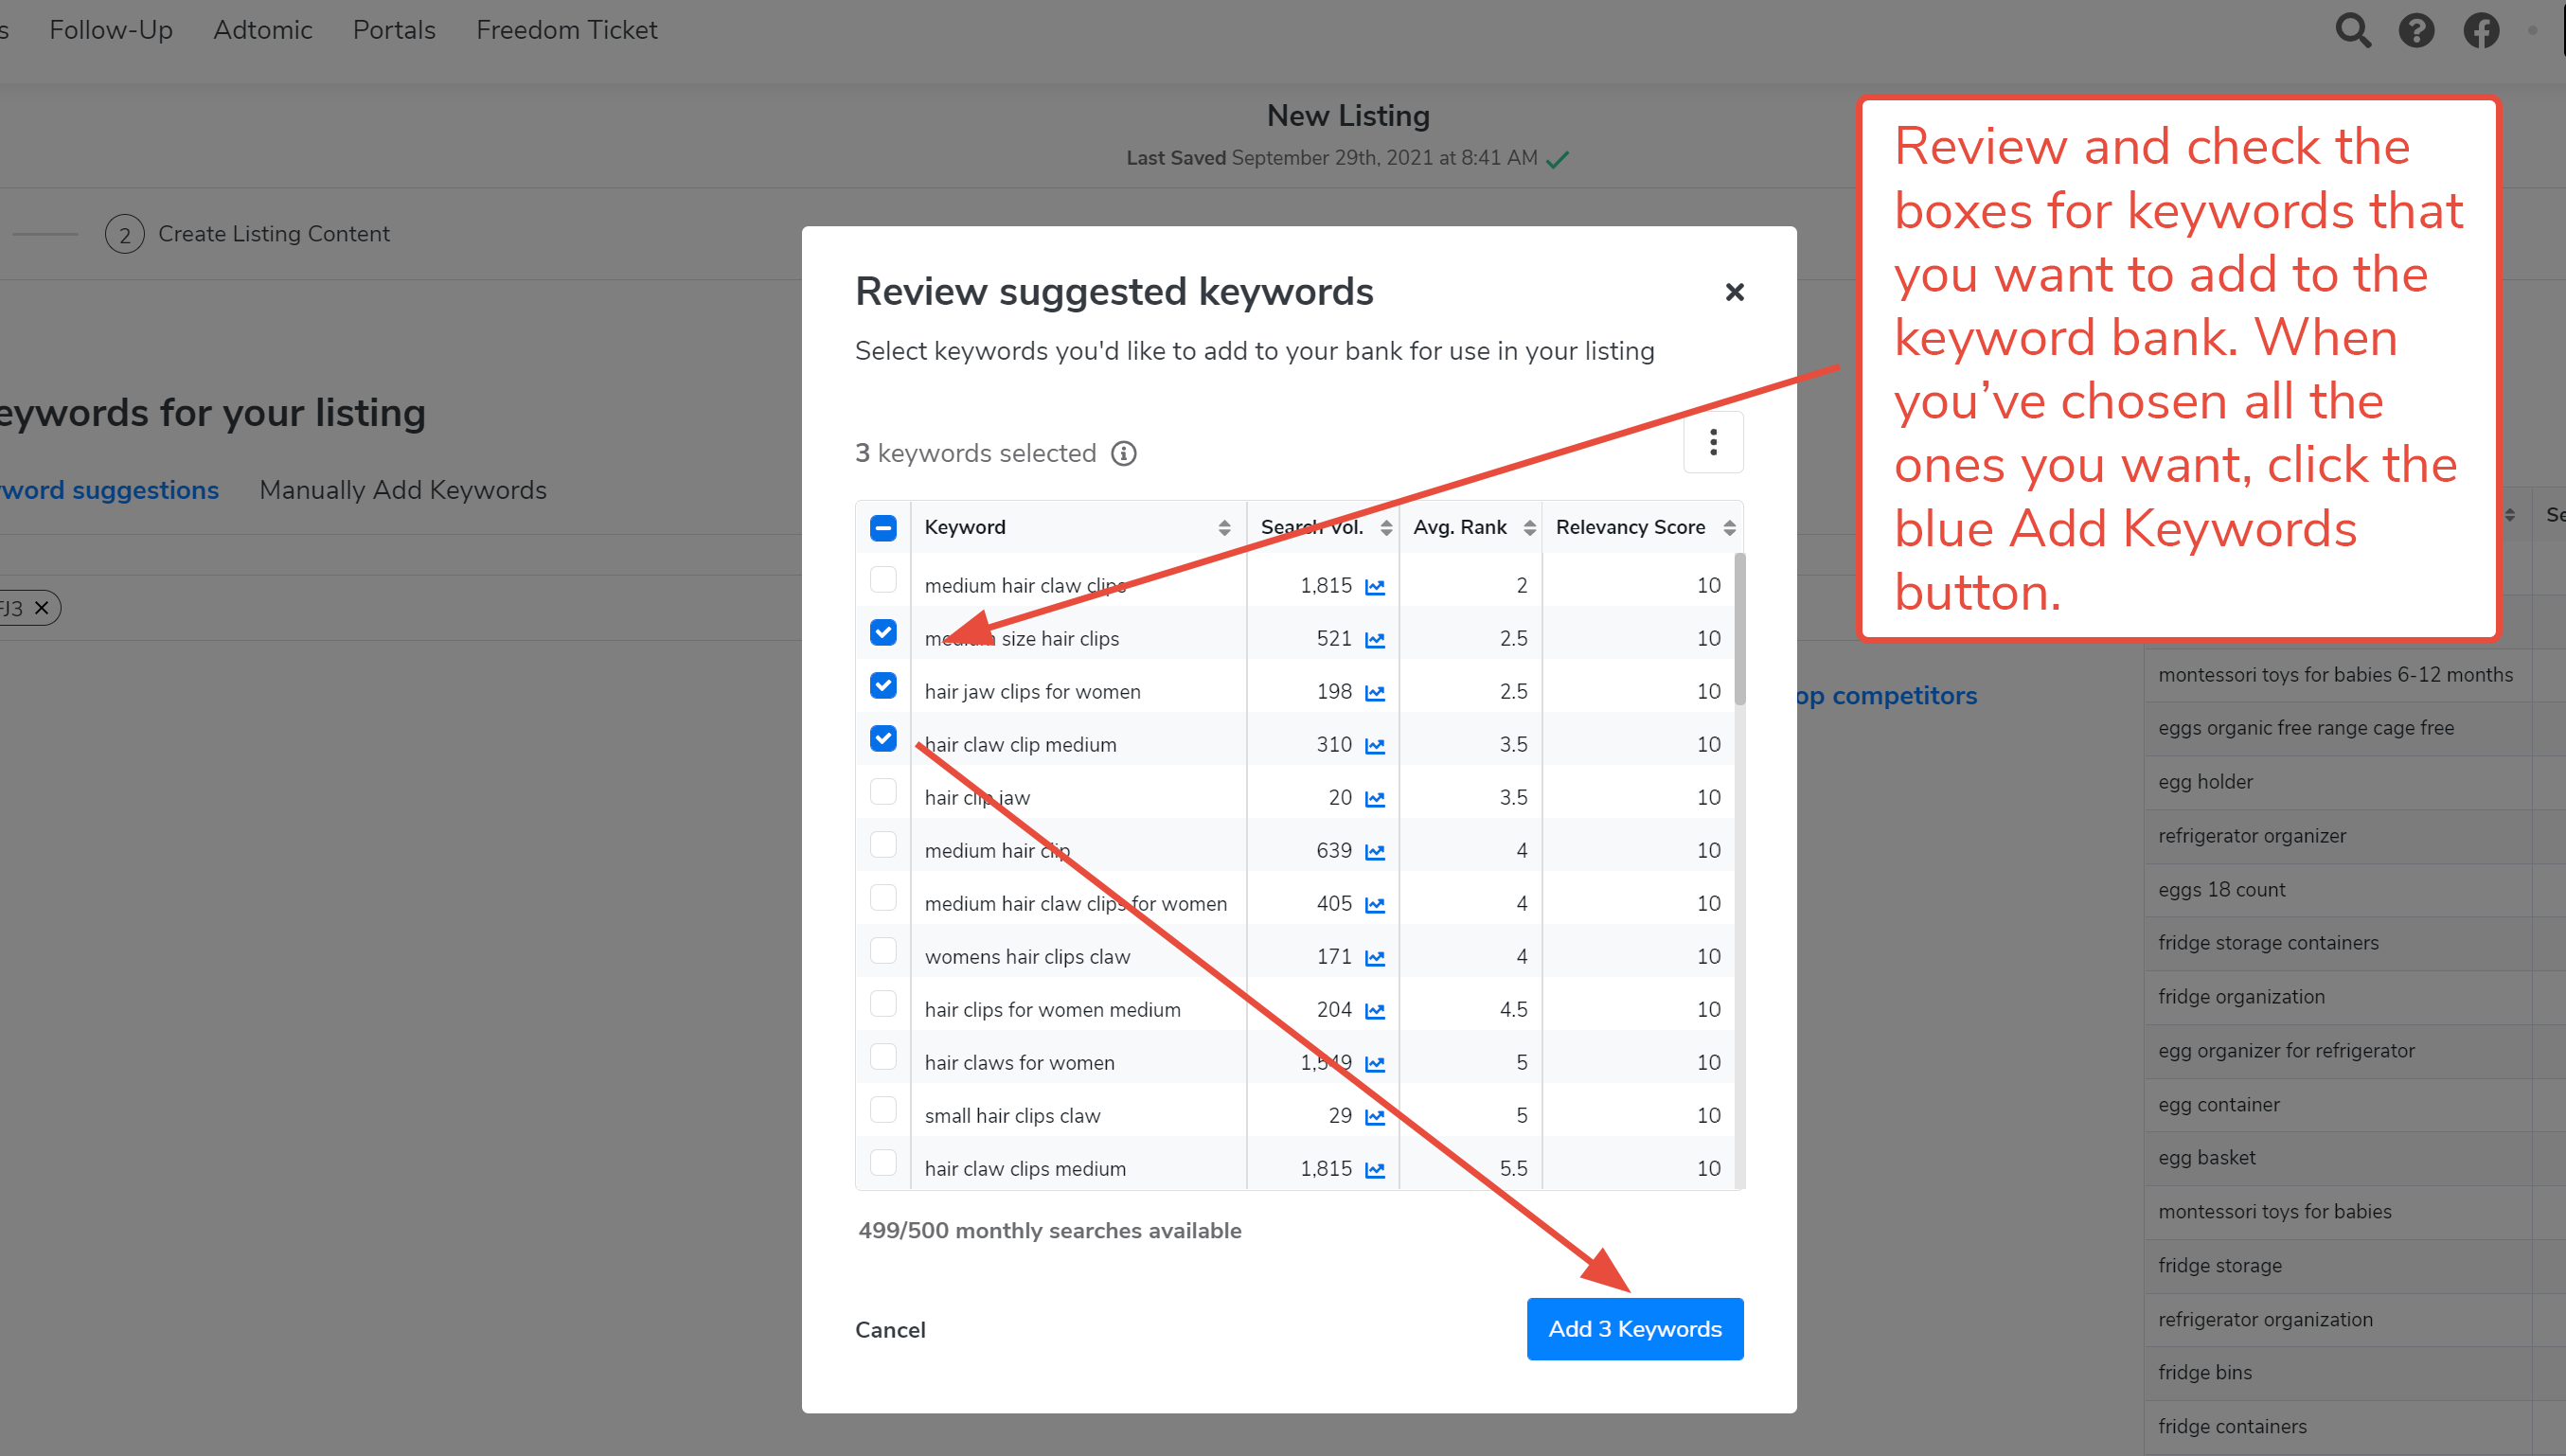
20. To select the keywords you want to add to the keyword bank, check the adjacent box. After checking all the keywords you want, click the blue Add Keywords button.
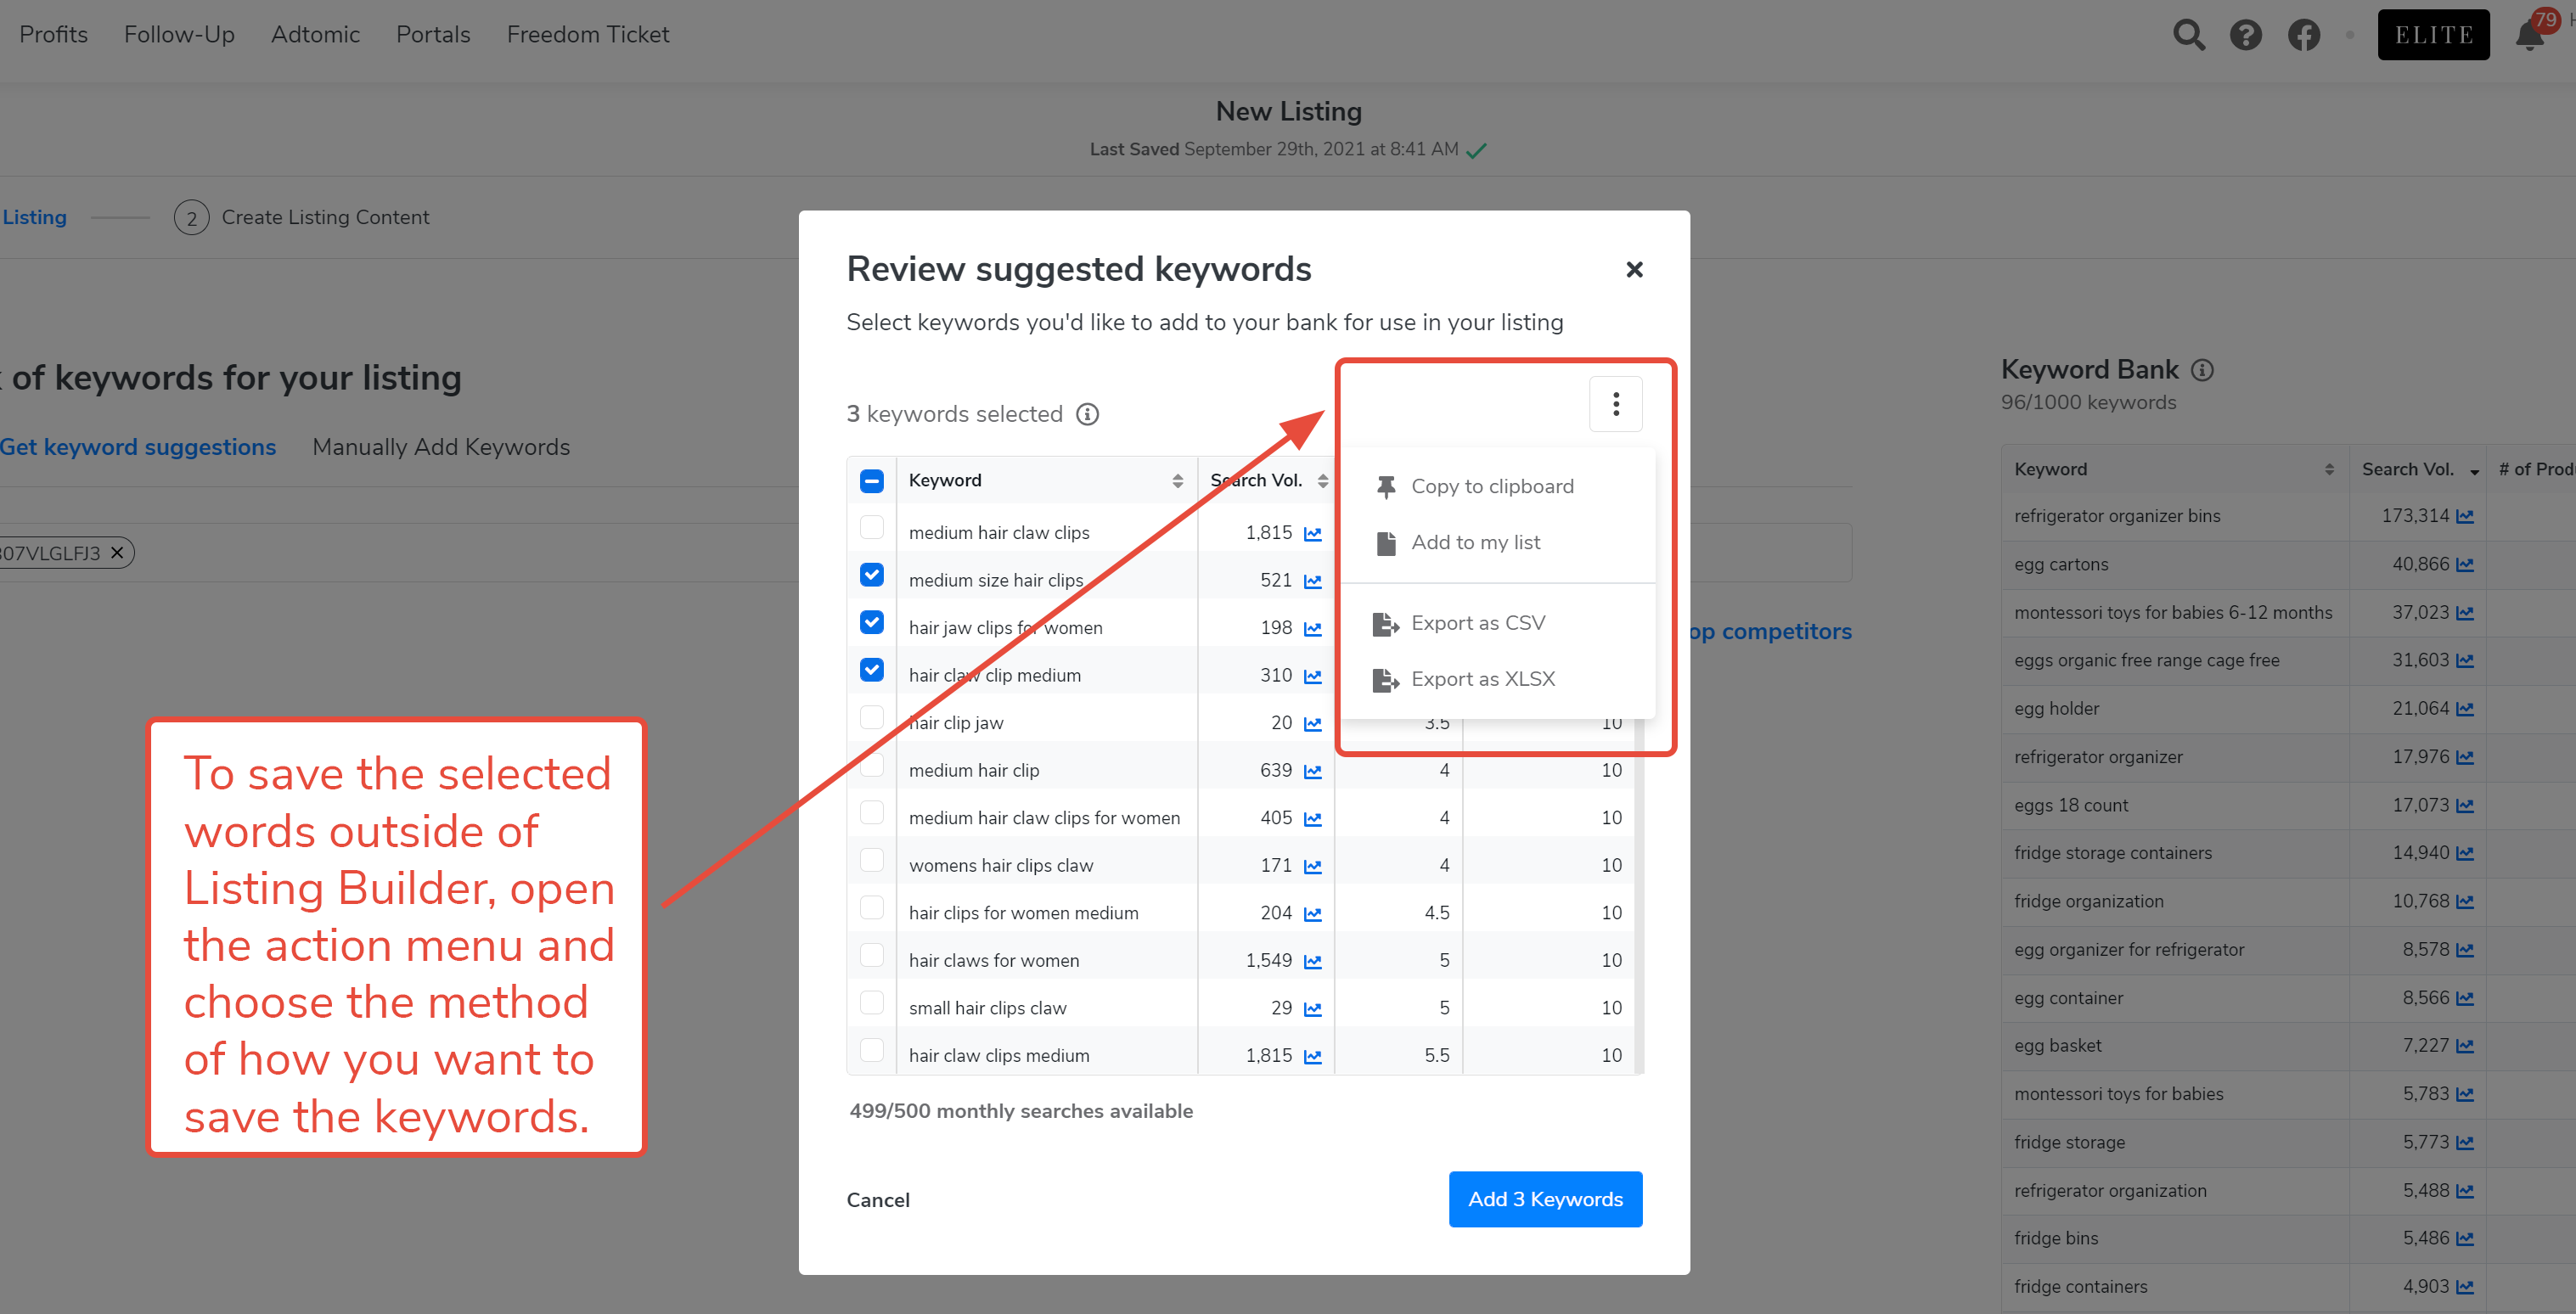
21. If you want to save the selected keywords outside of this specific listing, you can copy them to the clipboard, add them to My List, or export them to a spreadsheet. Access the actions by clicking the options menu button.
22. If you do not have a set of competitor ASINs ready for a keyword search, you can also search using a single keyword (or a single ASIN). Click on the Find top competitor’s link.
23. Click on Manually Add Keywords. Listing Builder will display an open text field in which you can type in or copy-and-paste keywords, separated by commas or lines.
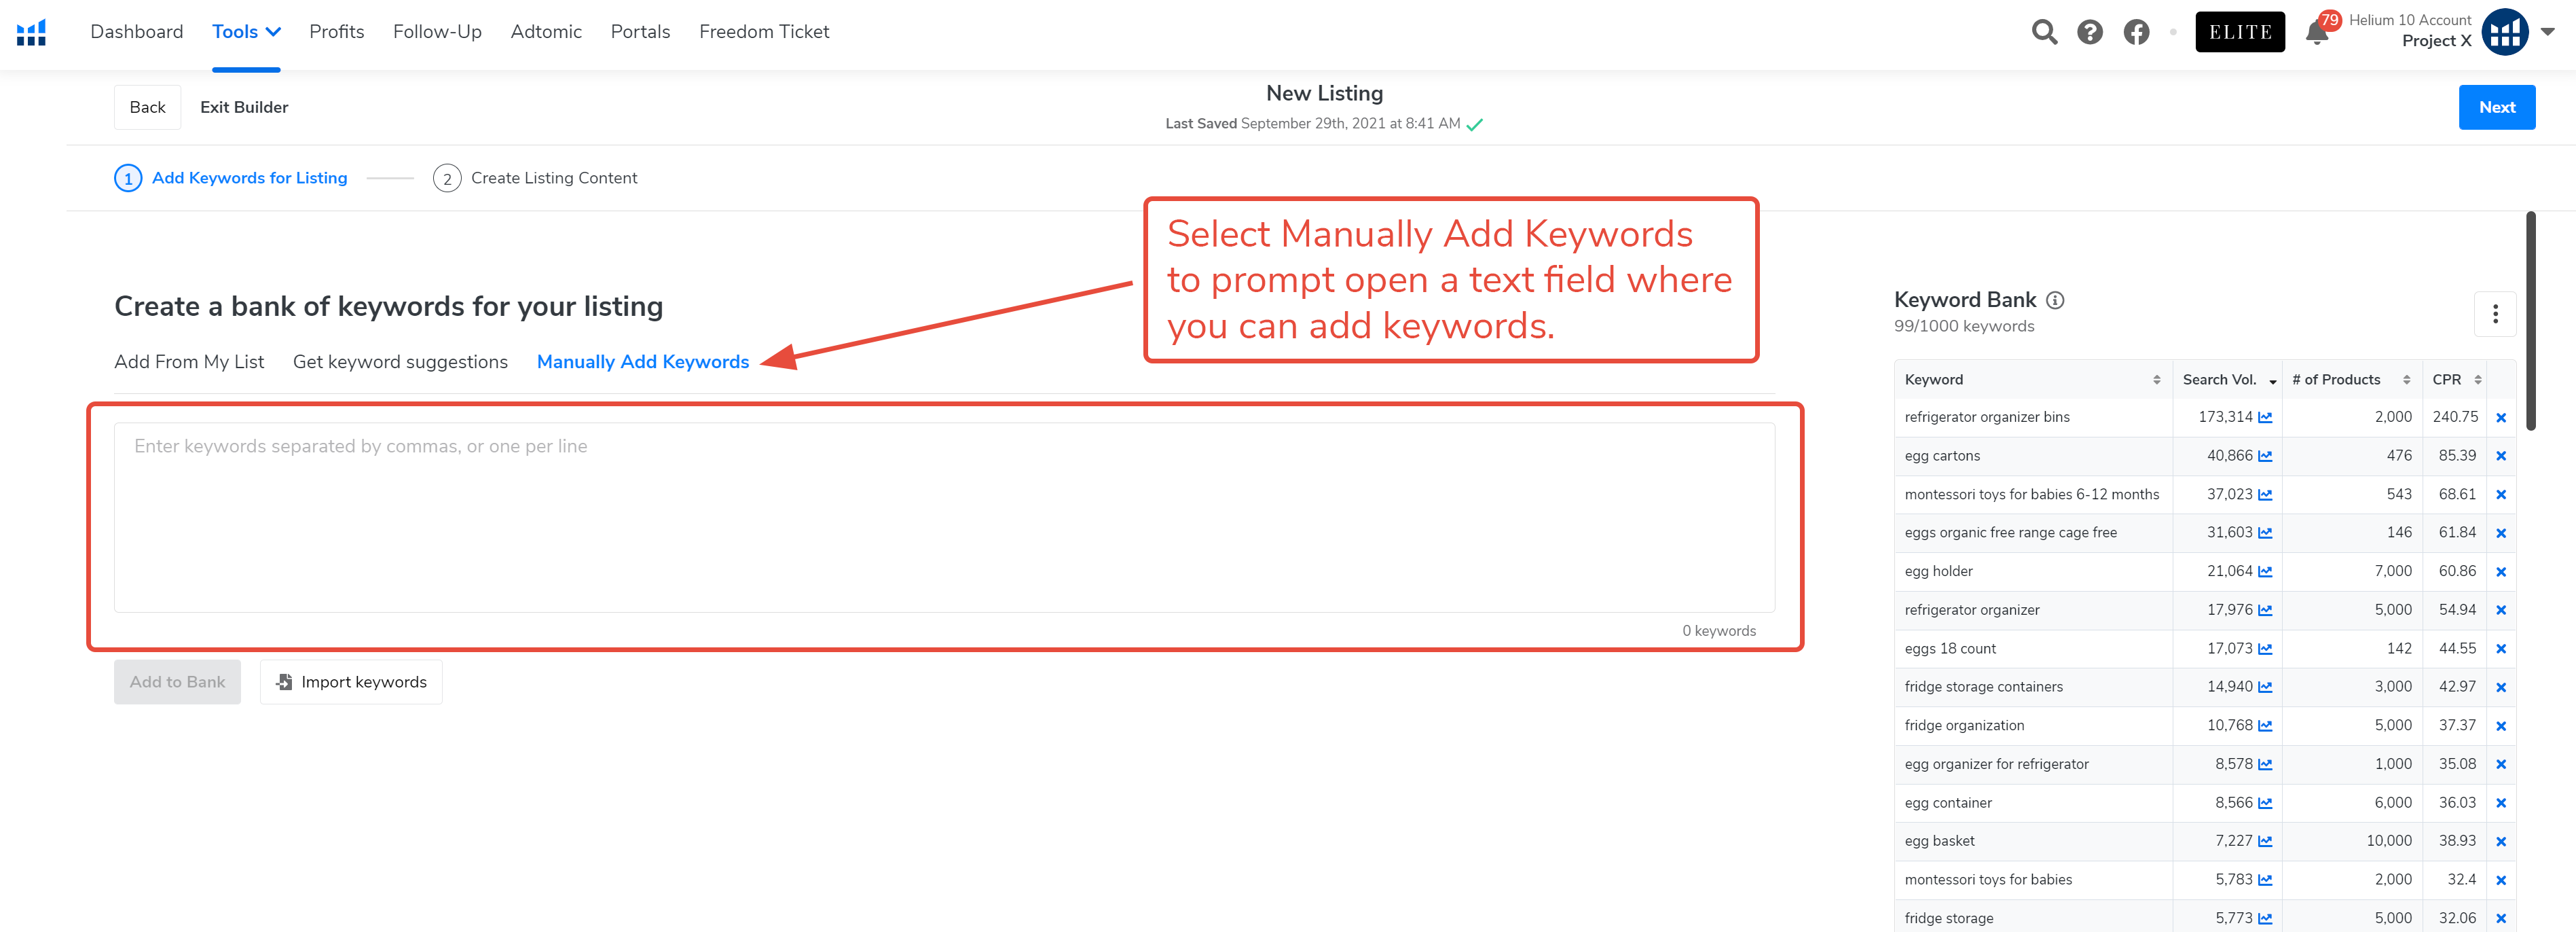
24. Copy-and-paste or type in your list of keywords.

25. Or click the Import Keywords button to upload a list from your computer.
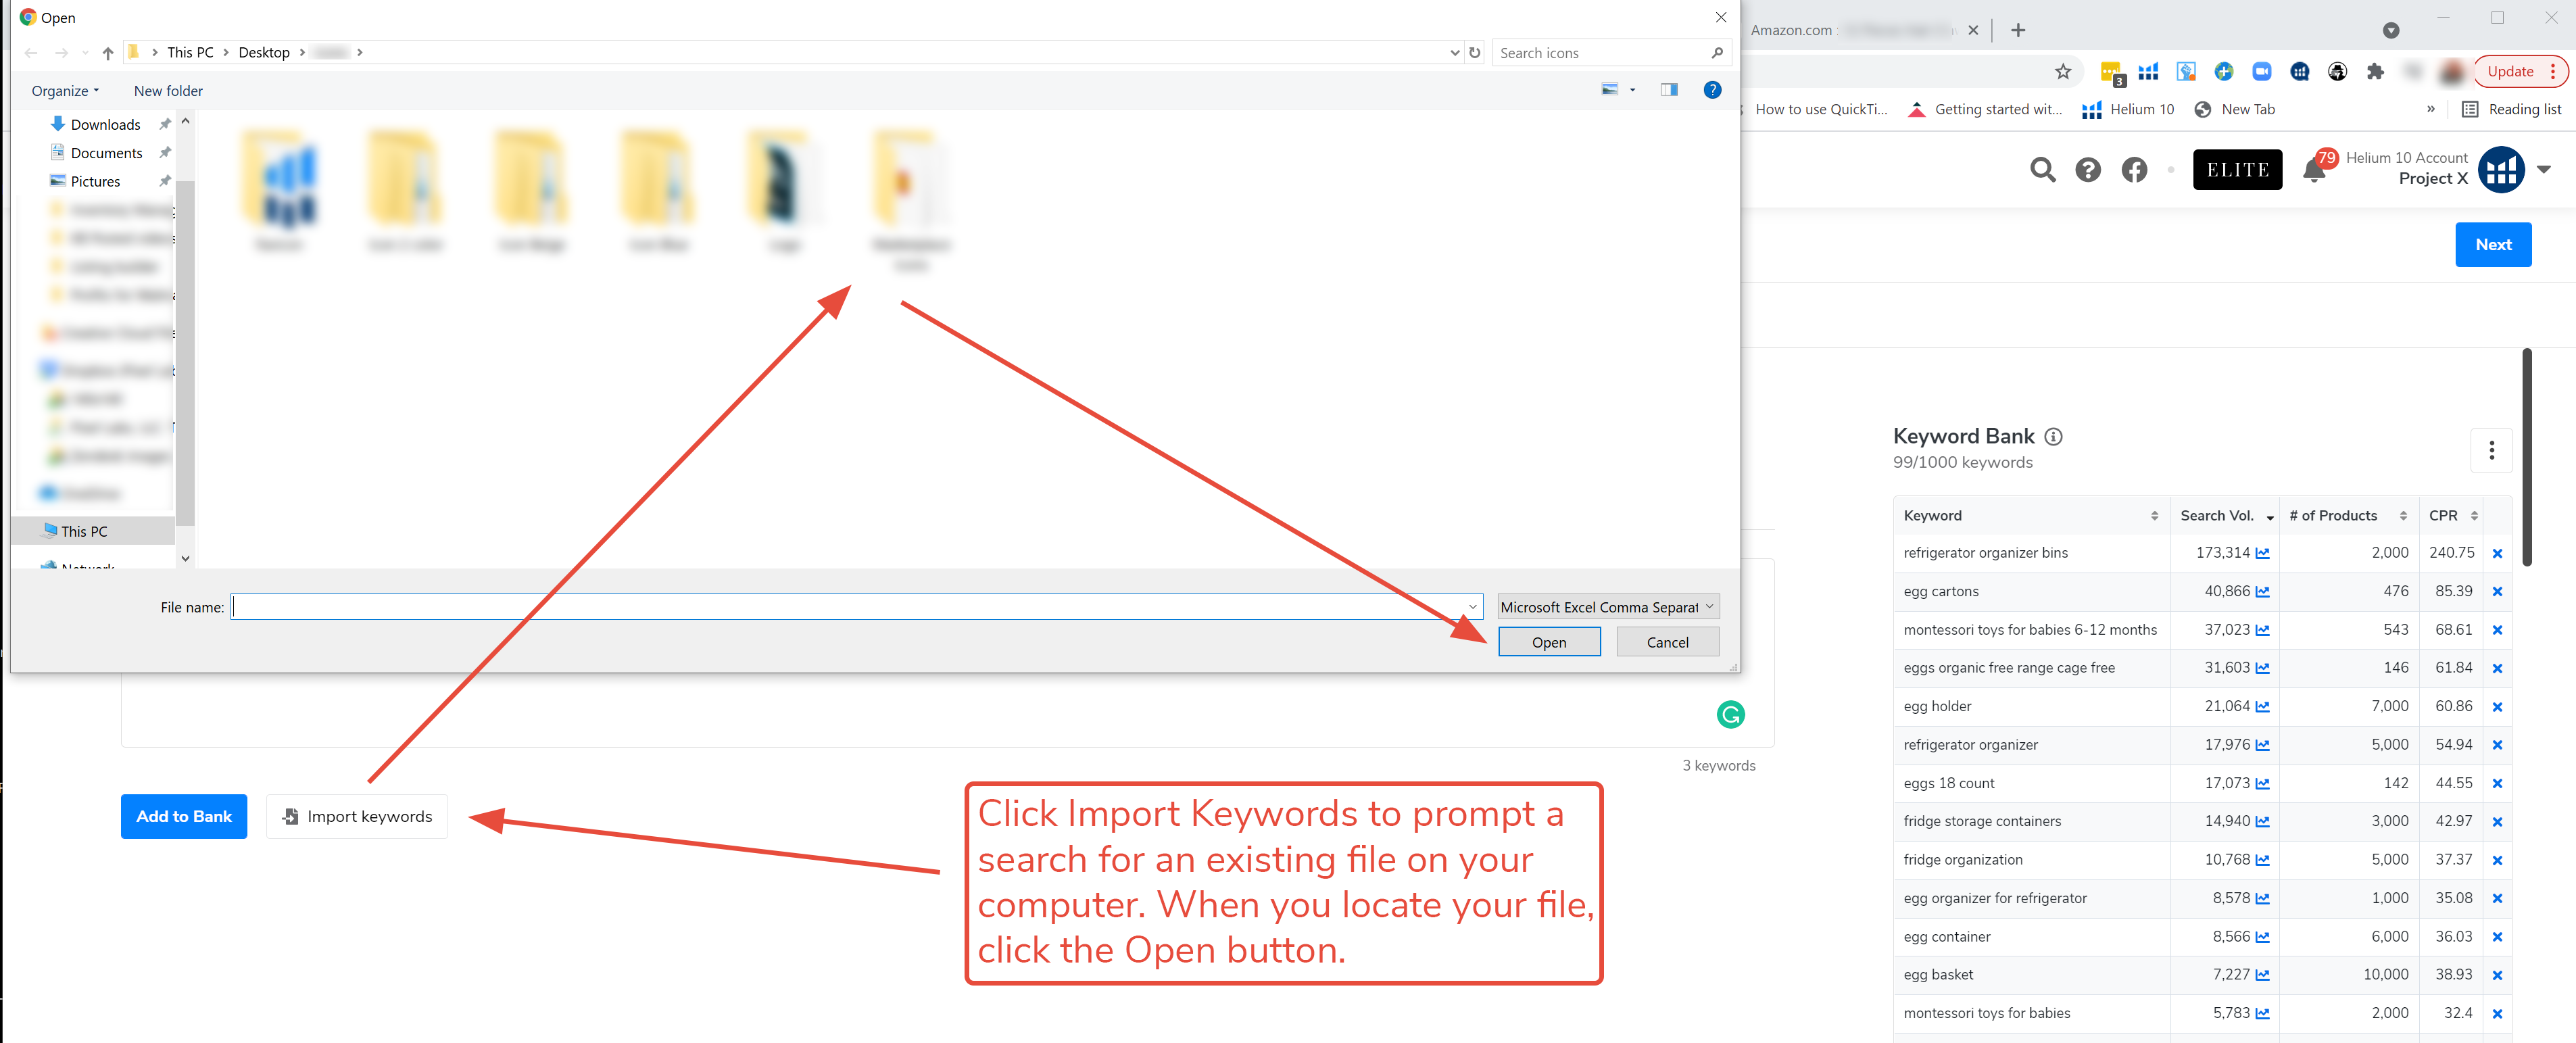
Now that you have created a Keyword Bank, you are ready to create your listing. If at anytime, you want to remove all of the words from the bank, you can activate the drop-down action menu and select Clear keyword bank.

Or if you want to clear your keyword bank, revert to another version or download the keyword list, you can also use the drop-down menu on the Create Your Listing window, to remove all the words in the bank.

Listing Builder’s Create Listing Content window places all the essential data and information on one screen for you to use to draft your Amazon listing. It includes your keyword bank, the individual sections of the listing ready for content, and a helpful Listing Analysis tracker.
26. To create your list, review the keywords in your bank, and type in your content. Keep track of the number of characters you are using to stay within Amazon’s general guidelines.
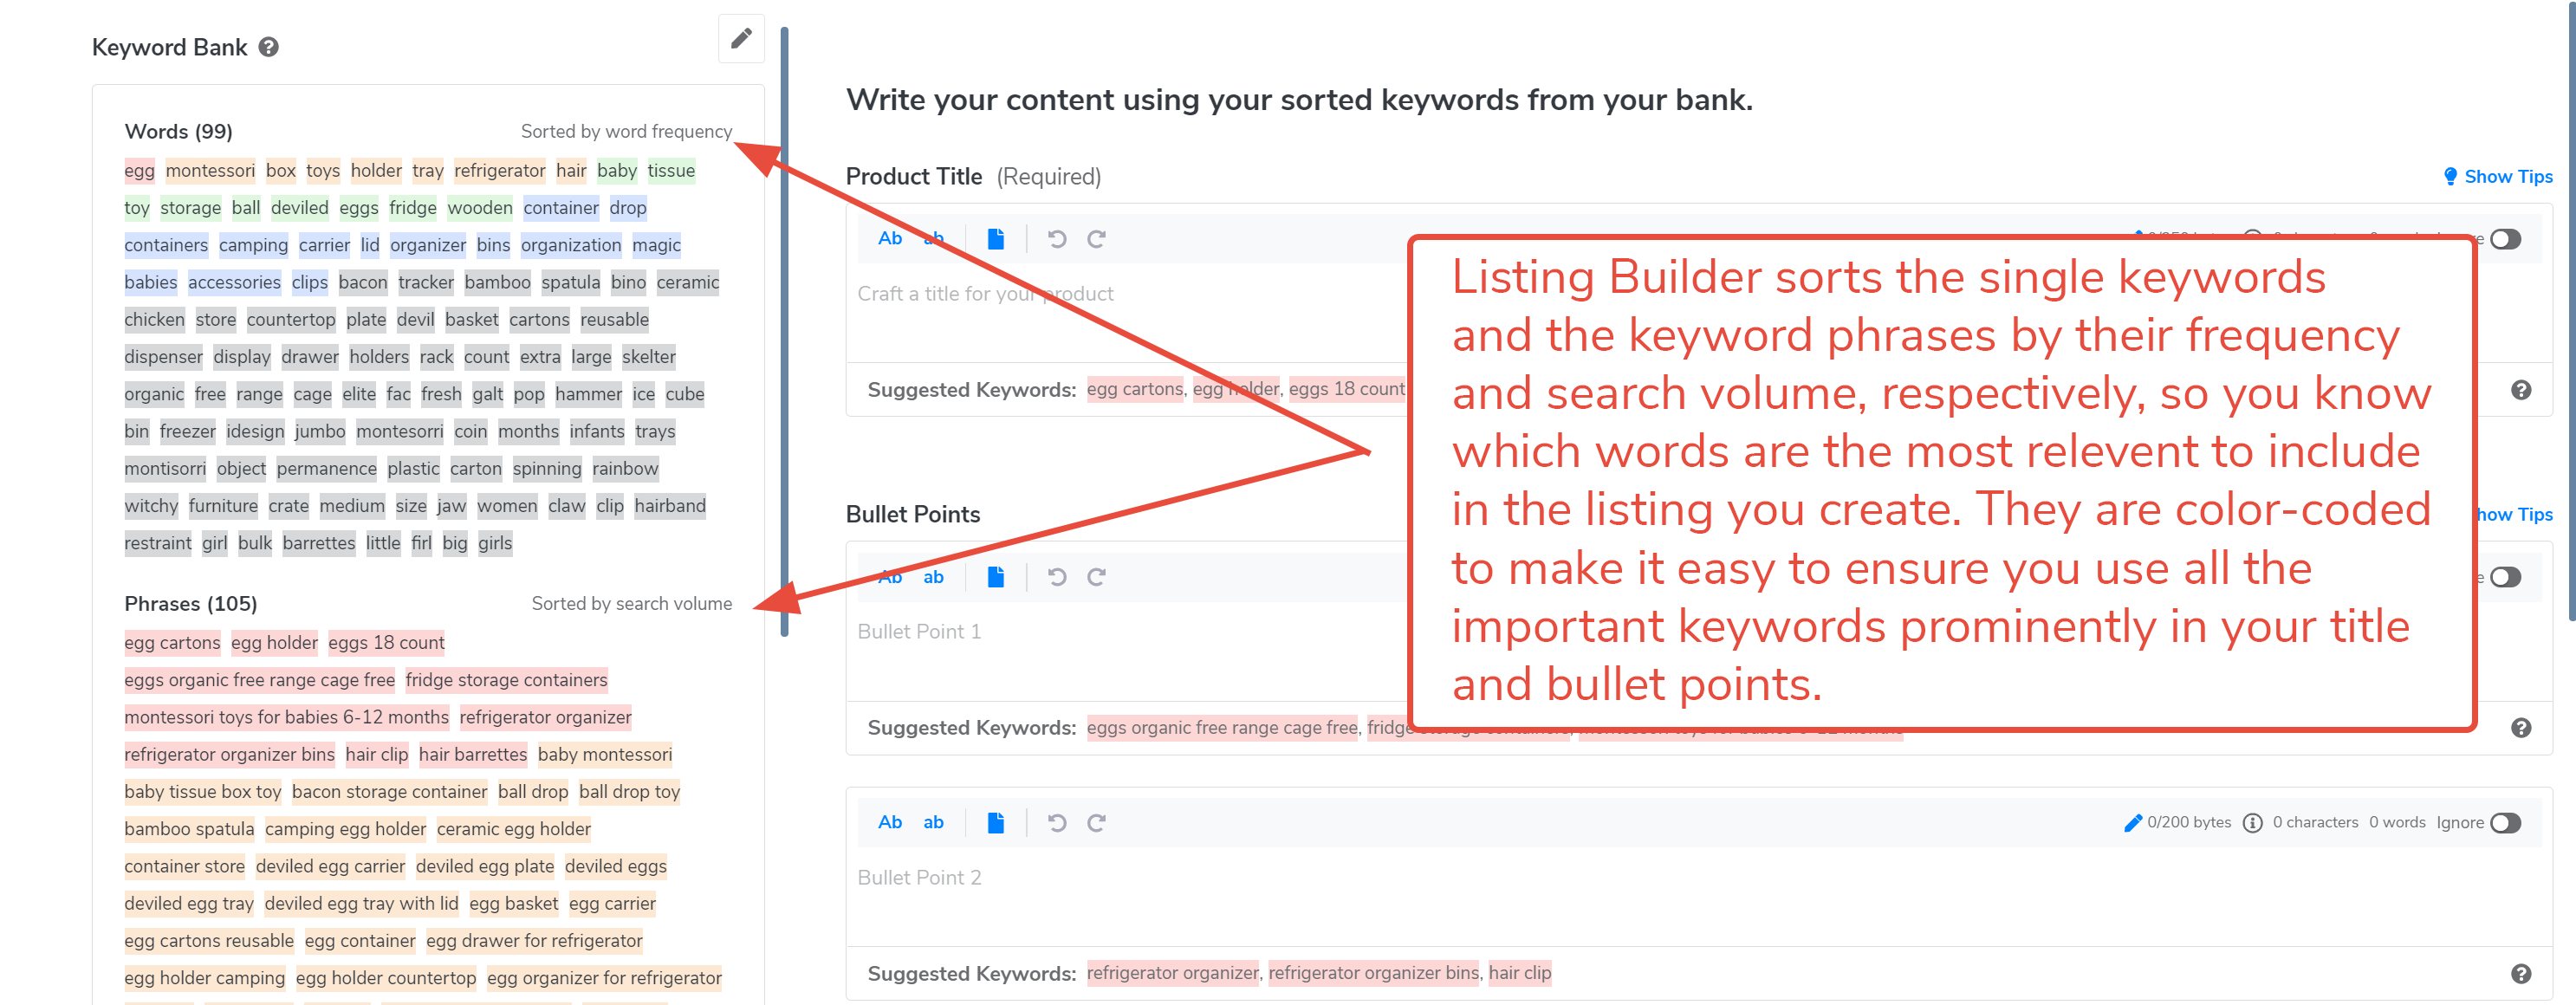
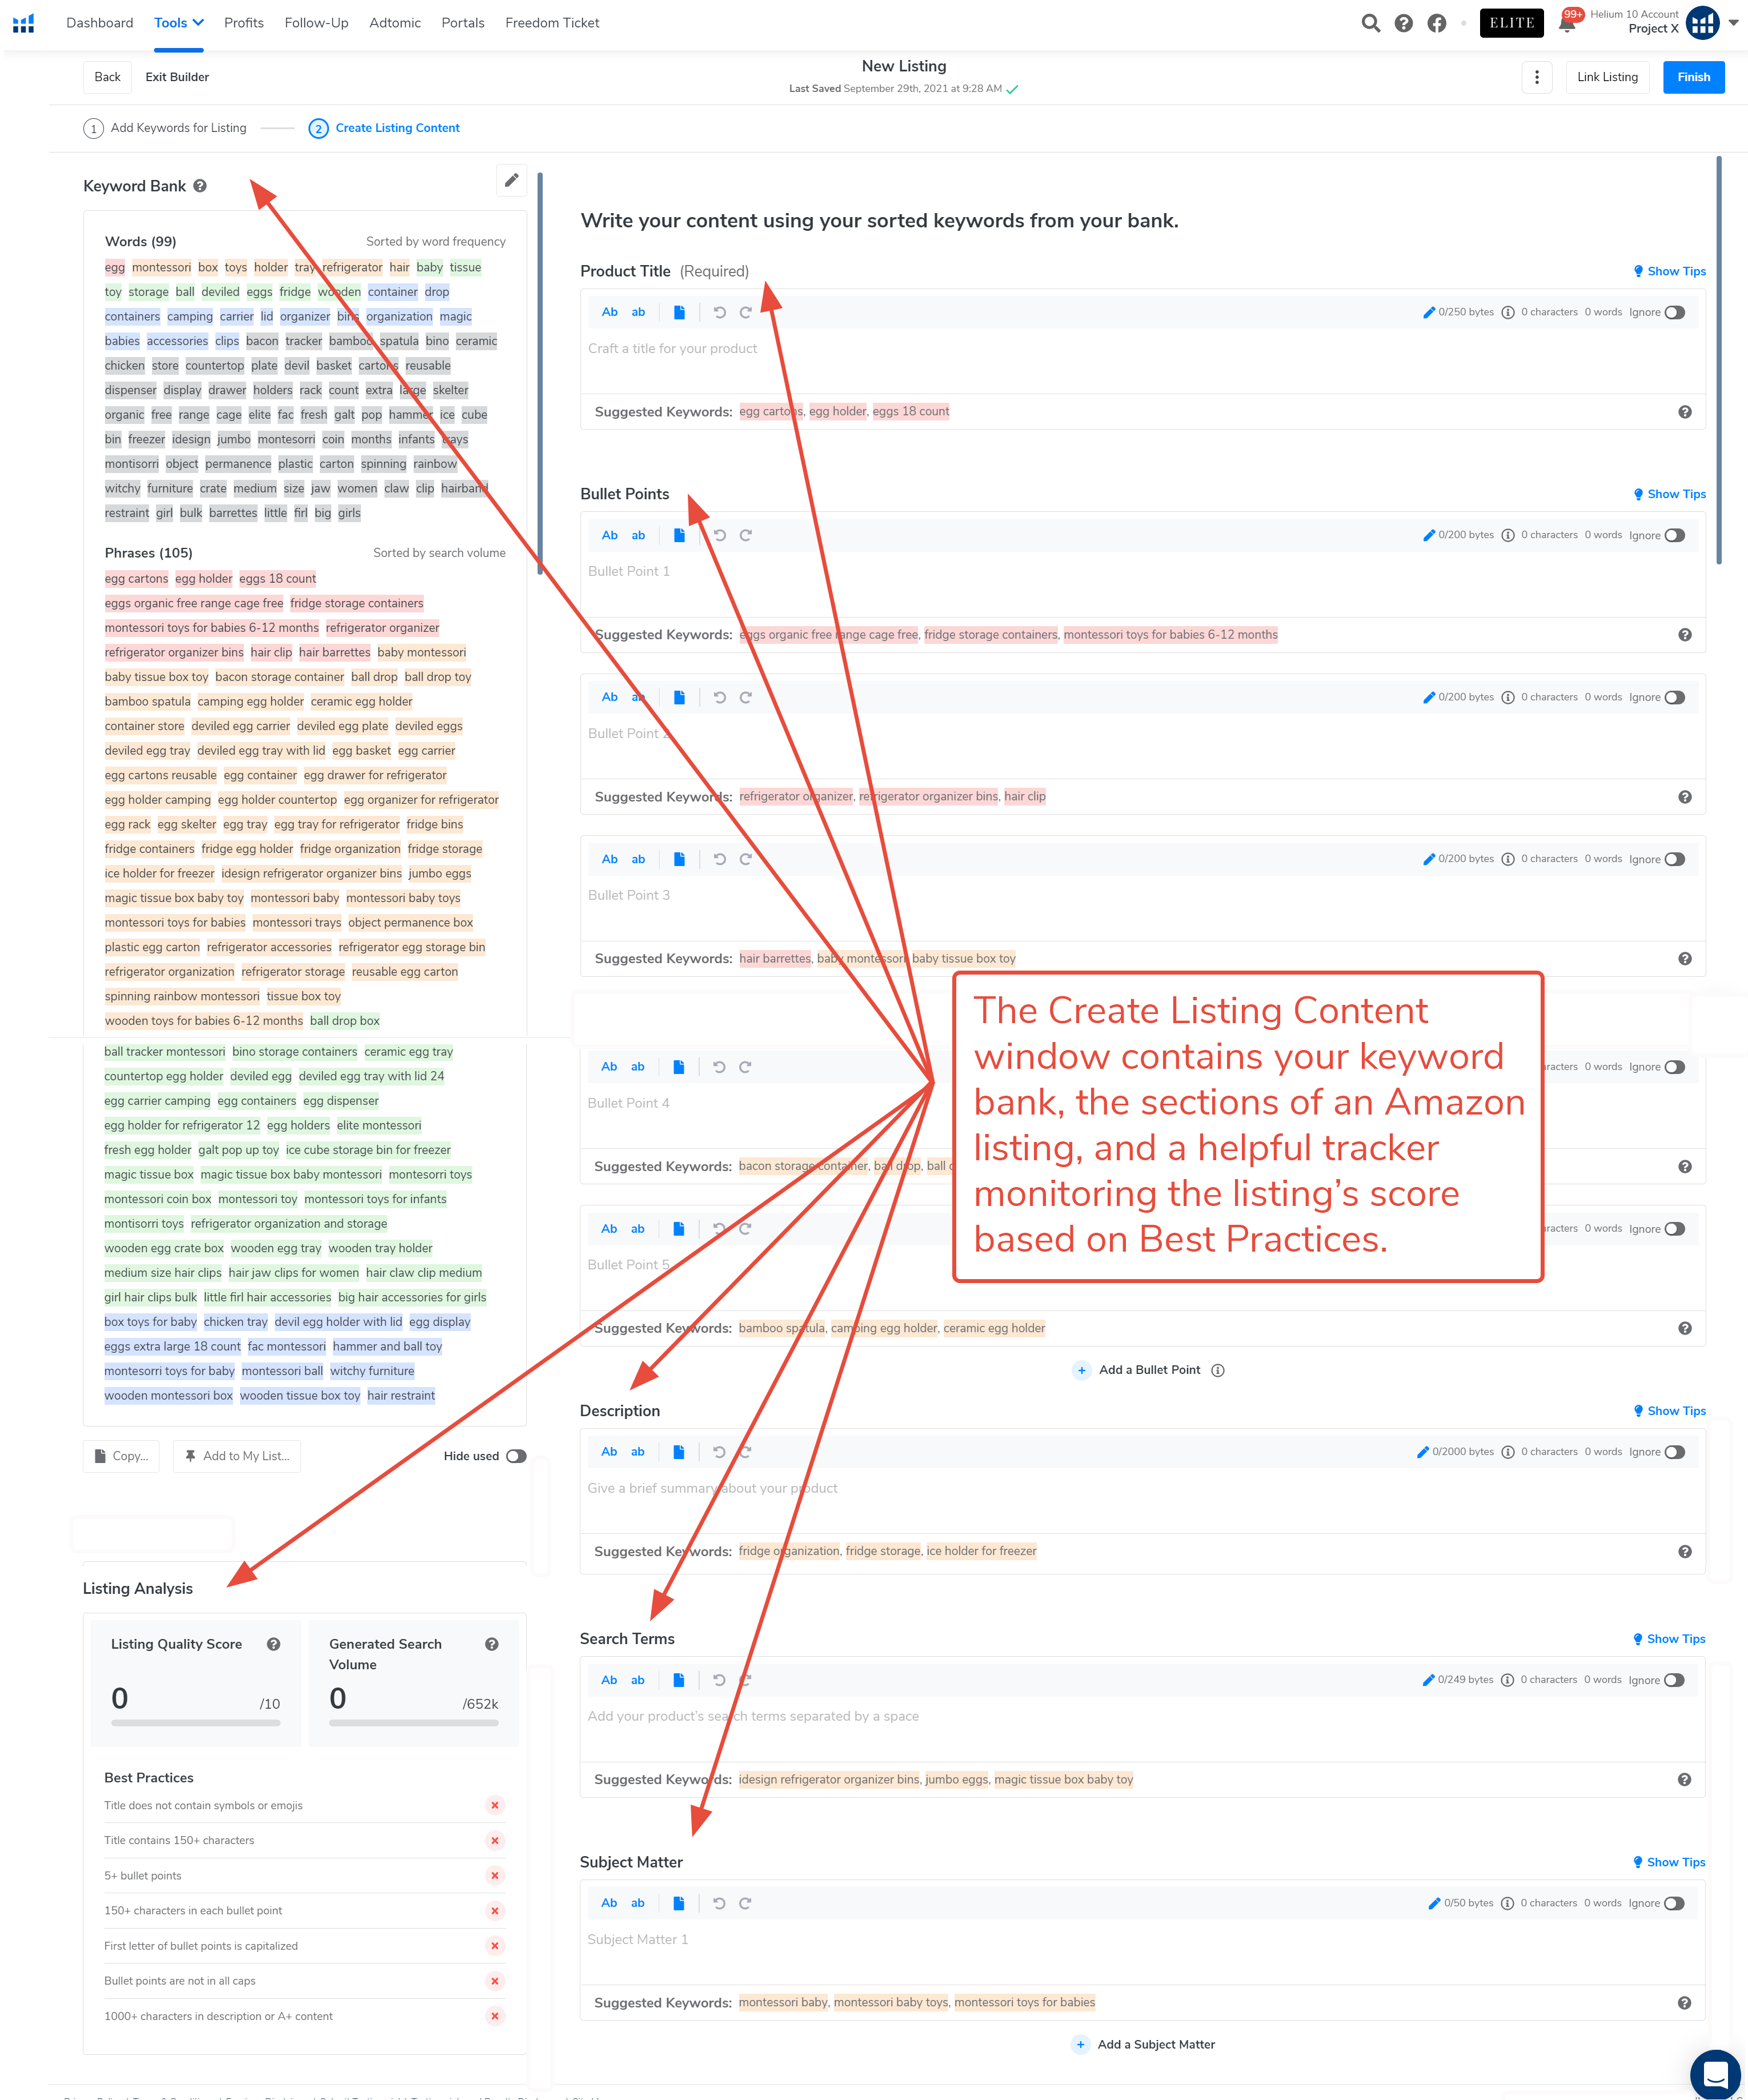 27. On the top, left side, the Keyword Bank organizes the keywords words into two sections, one for individual keywords, and one for keyword phrases. Both sections color-code the words by their relevance. Red and orange mean the words are “hot” or highly relevant, while green, blue, and grey represent their diminishing relevance.
The individual words are listed in the order of their frequency, high to low, while the phrases are listed in the order of highest search volume to lowest search volume.
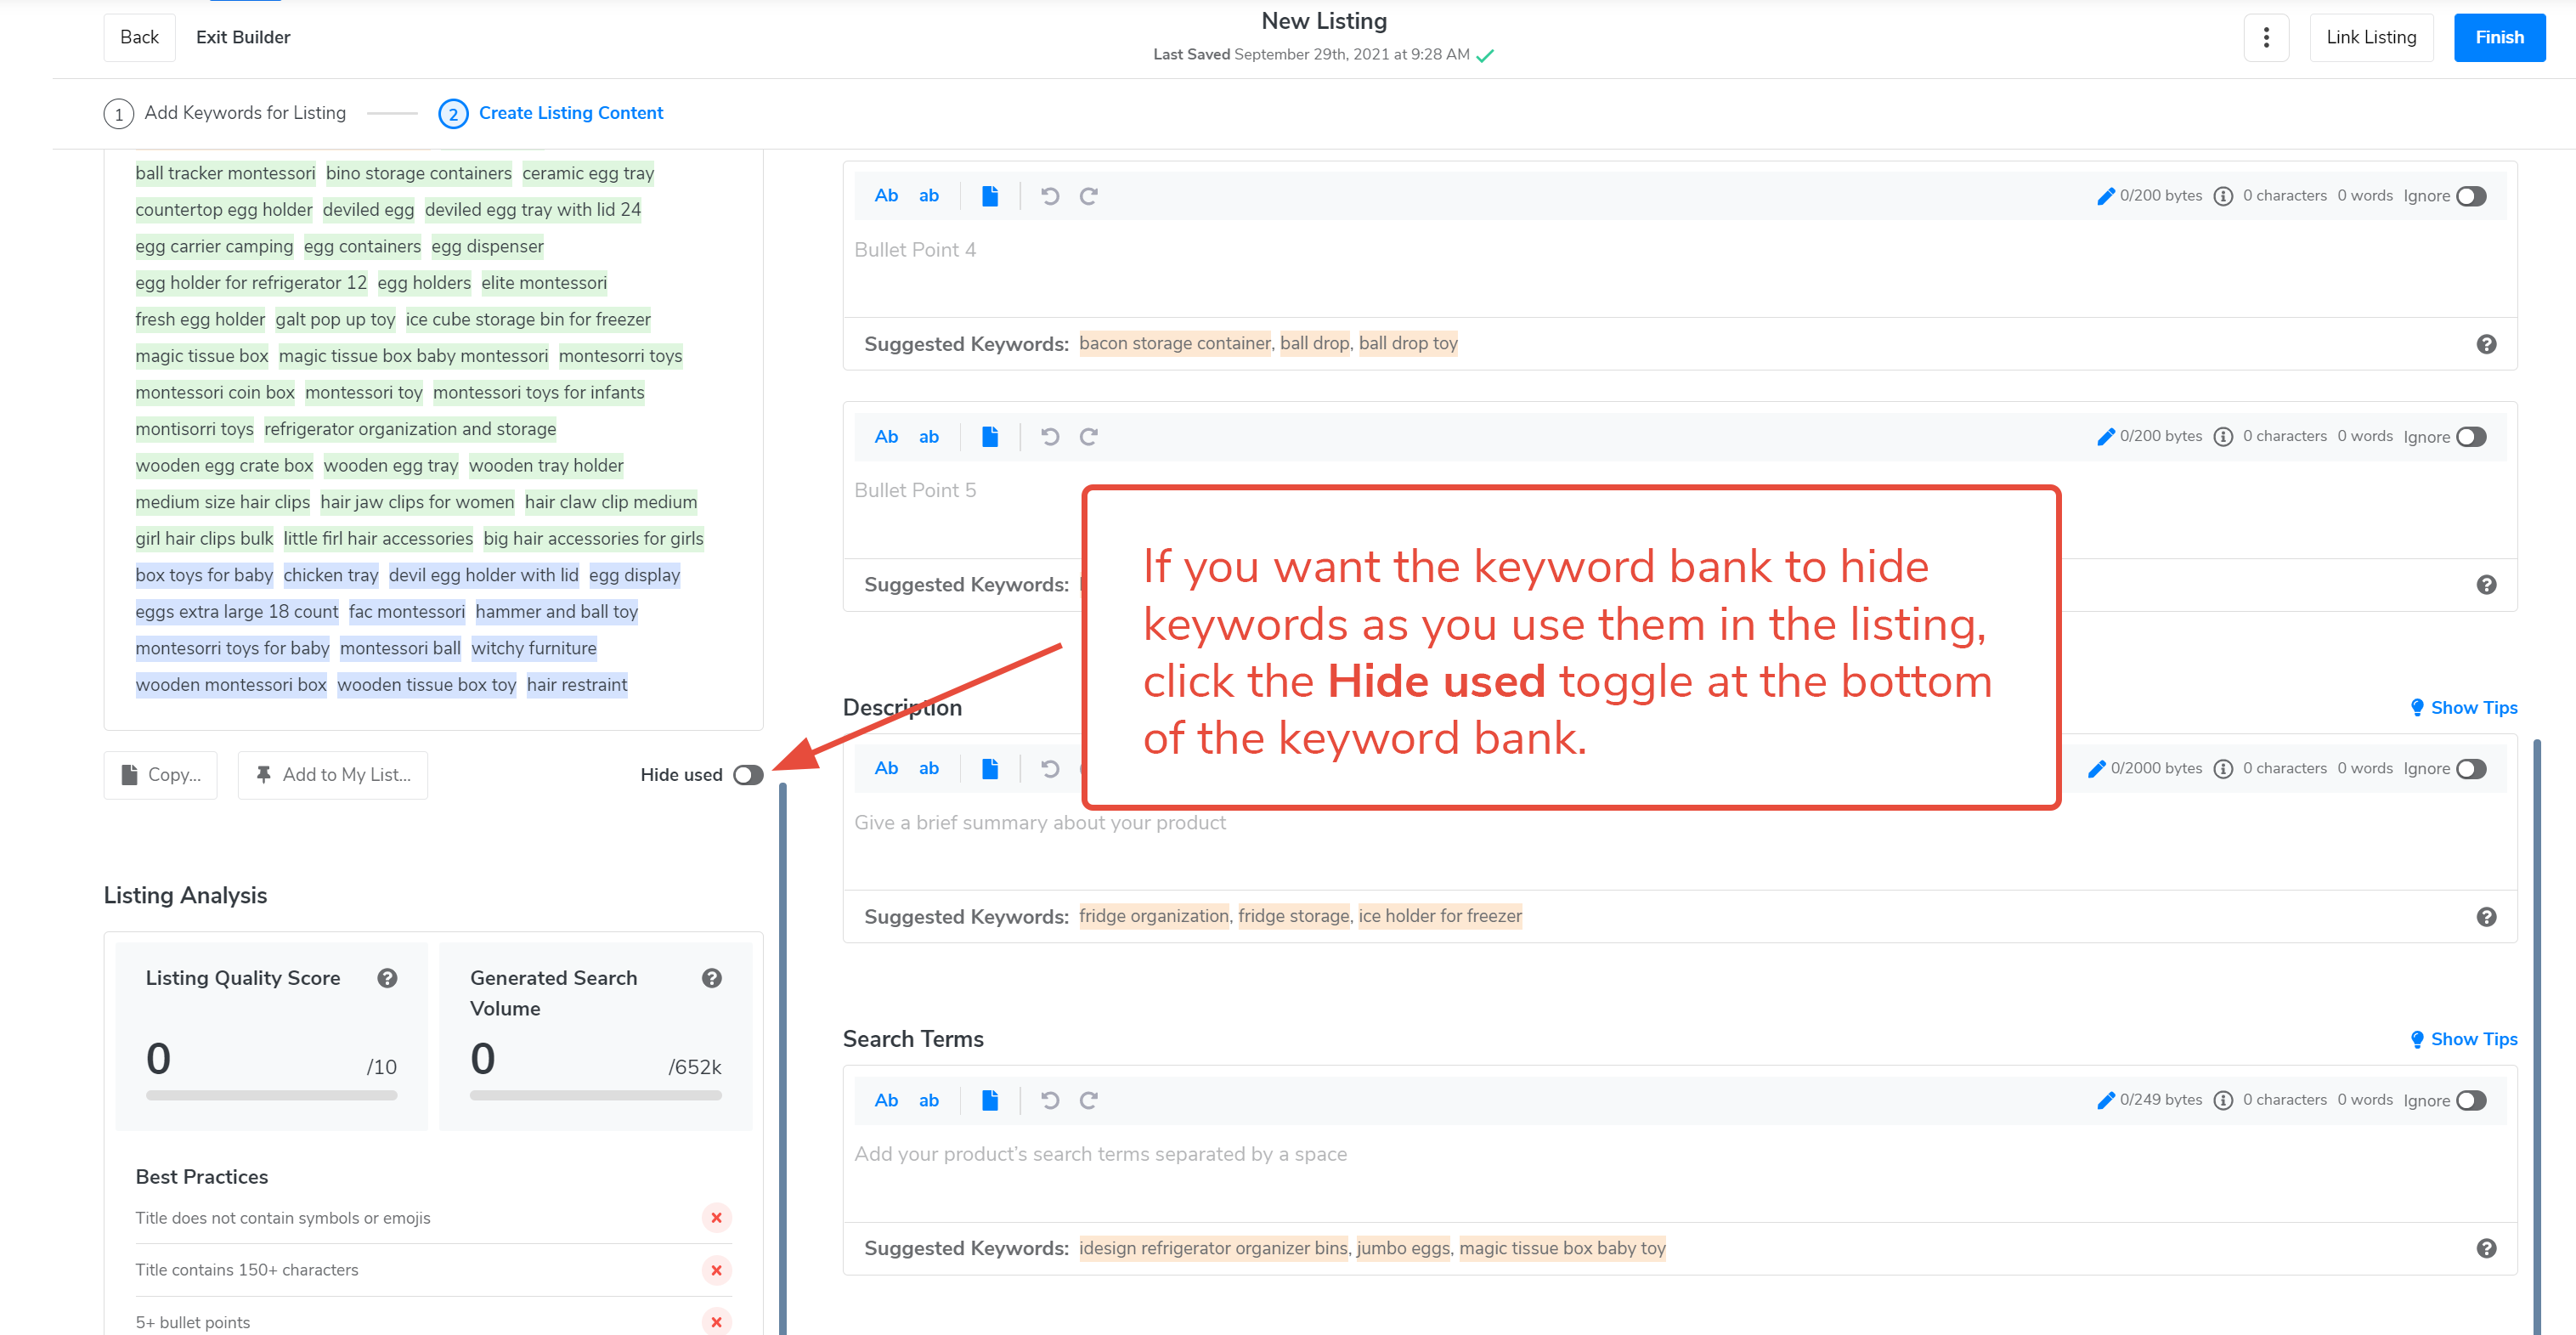
28. You can continue to edit the list by clicking on the Edit icon in the top right corner of the section, or copy the list or Add to My List using the buttons at the bottom left of the section.

You can also tell Listing Analyzer to hide keywords as you include them in the listing sections to the right. Click the Hide Used to toggle the function on or off.
29. On the top right side of the window, the individual sections of an Amazon listing are laid out and ready with empty fields into which you can type your content. Each section includes suggested keywords, suggested character and byte limits, and formatting buttons. As you type the content, the characters and bytes used are tracked so you can see if you are staying within Amazon’s recommended limits.
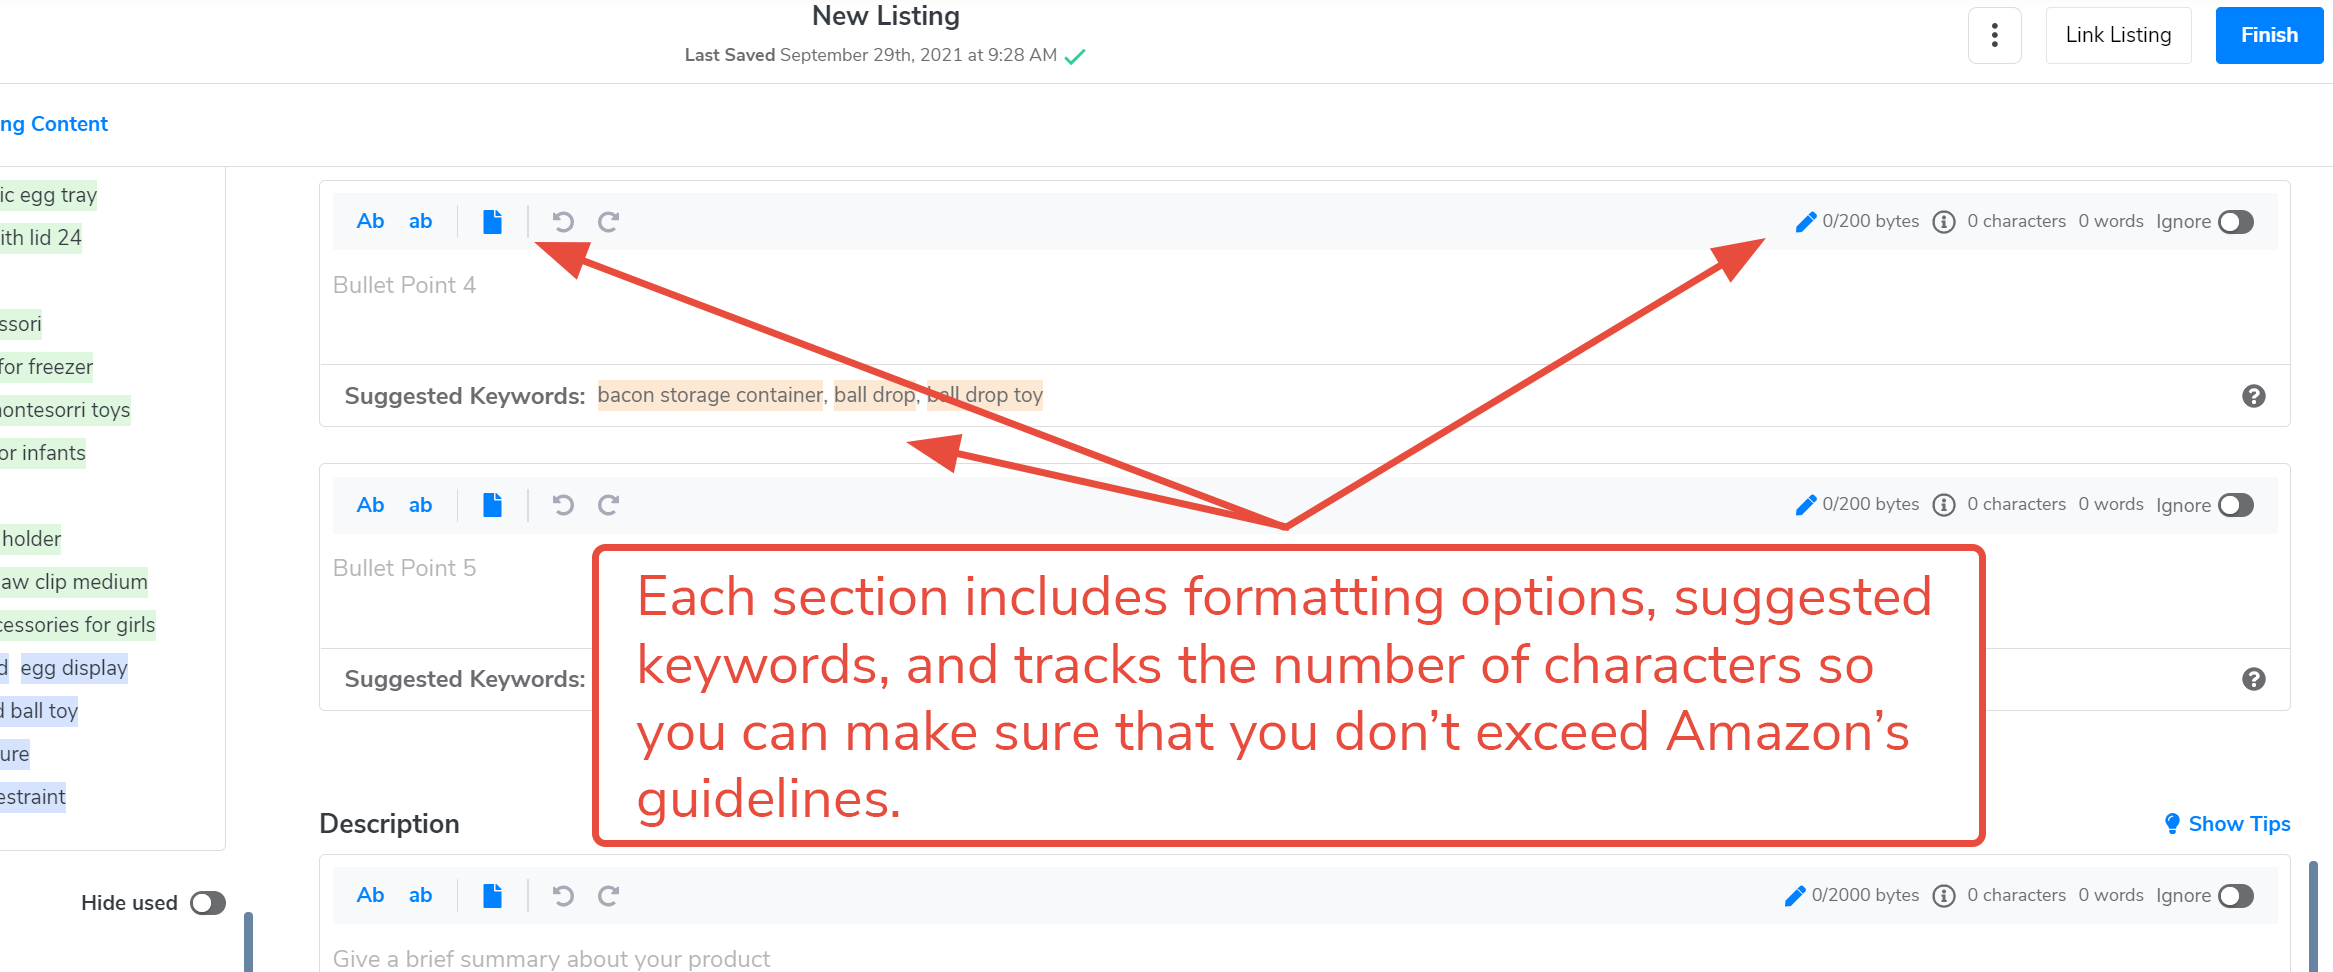 30. Listing Builder defaults to five (5) Bullet Points, but you can add more using the + Add a Bullet Point button.
*Special care is urged in creating the Bullet Points if you are planning to export this listing directly into Seller Central. Amazon only allows the software to transfer five Bullet Points.
If you are creating a new listing, you will need to manually copy-and-paste any additional Bullet Points to the listing in Seller Central. If you are overriding a listing that already has more than five current Bullet Points, it will cause the deletion of your additional Bullet Points in Seller Central. Helium 10 recommends using the sync feature only for new listings. If you have more than five bullet points, manually add the additional points in Seller Central after you have transferred the rest of the listing.

31. When you sync your listing to Amazon, the last section, Subject Matter, is still imported into Seller Central, even though it can no longer be added to a listing while in Seller Central.

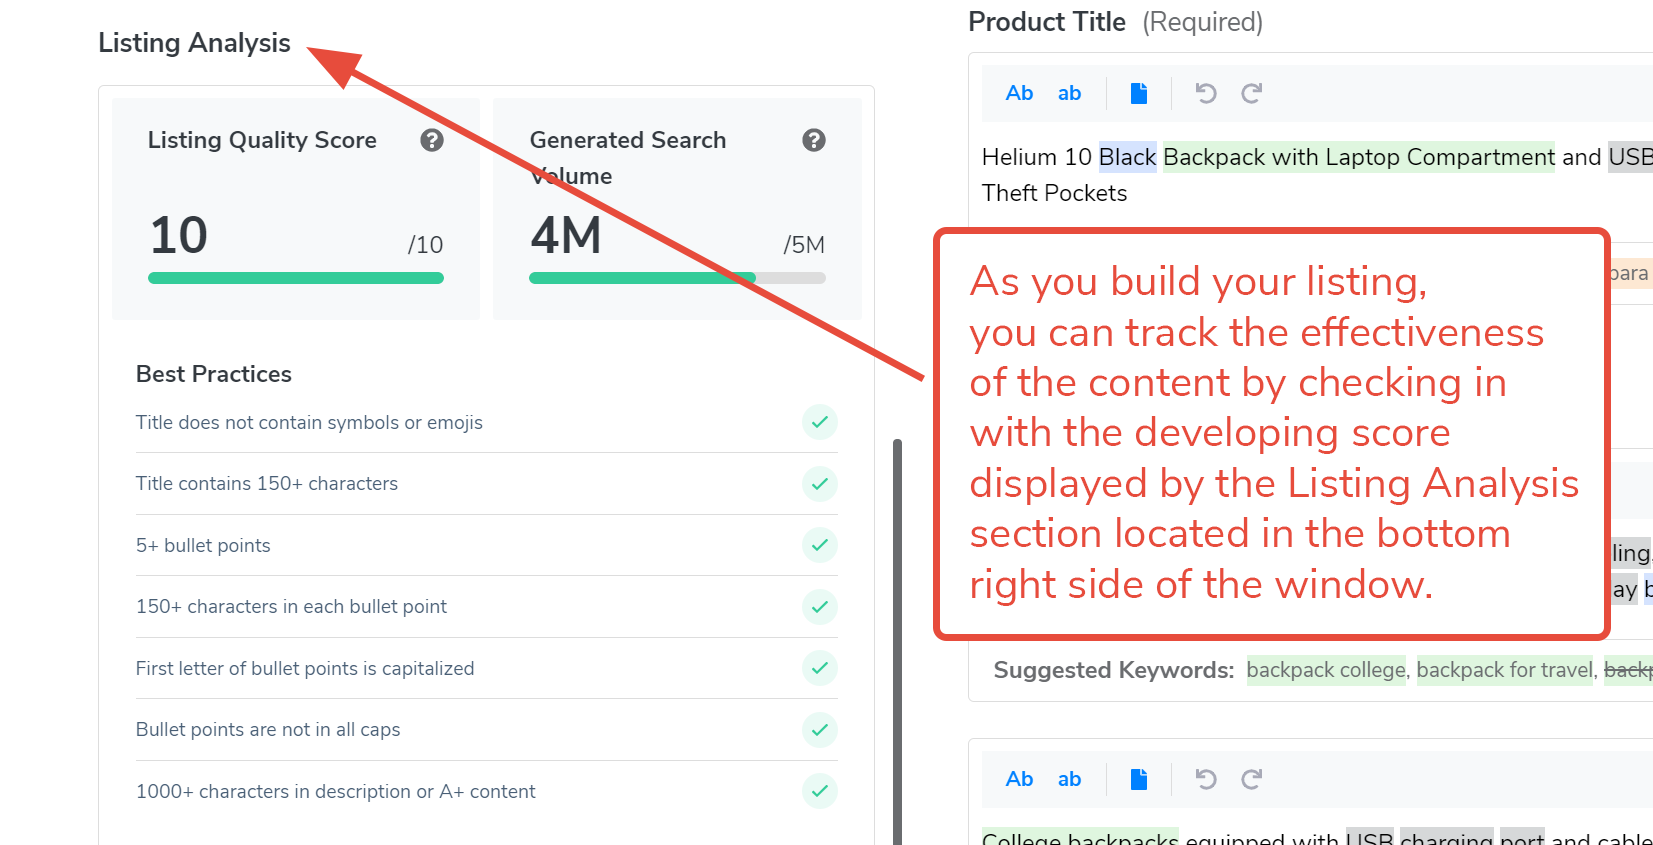
32. Track the quality of your content using the Listing Analysis section located in the bottom left corner. This feature tracks the effectiveness of your listing as you create it. It predicts what the Listing Score will be, and what the monthly search volume will be, collectively, based on the keywords you include in the draft.
33. While you are drafting your listing, you can click on the Link Listing button in the top right corner of the window anytime to link it to an existing product.

34. Listing Builder will present a list of all your products available on Amazon in a pop-up window. Click the light blue Link button to choose the product you want to link to the listing. While you can draft multiple listings for one product, or develop multiple versions of a listing for one product, you can only connect one listing to an existing product.
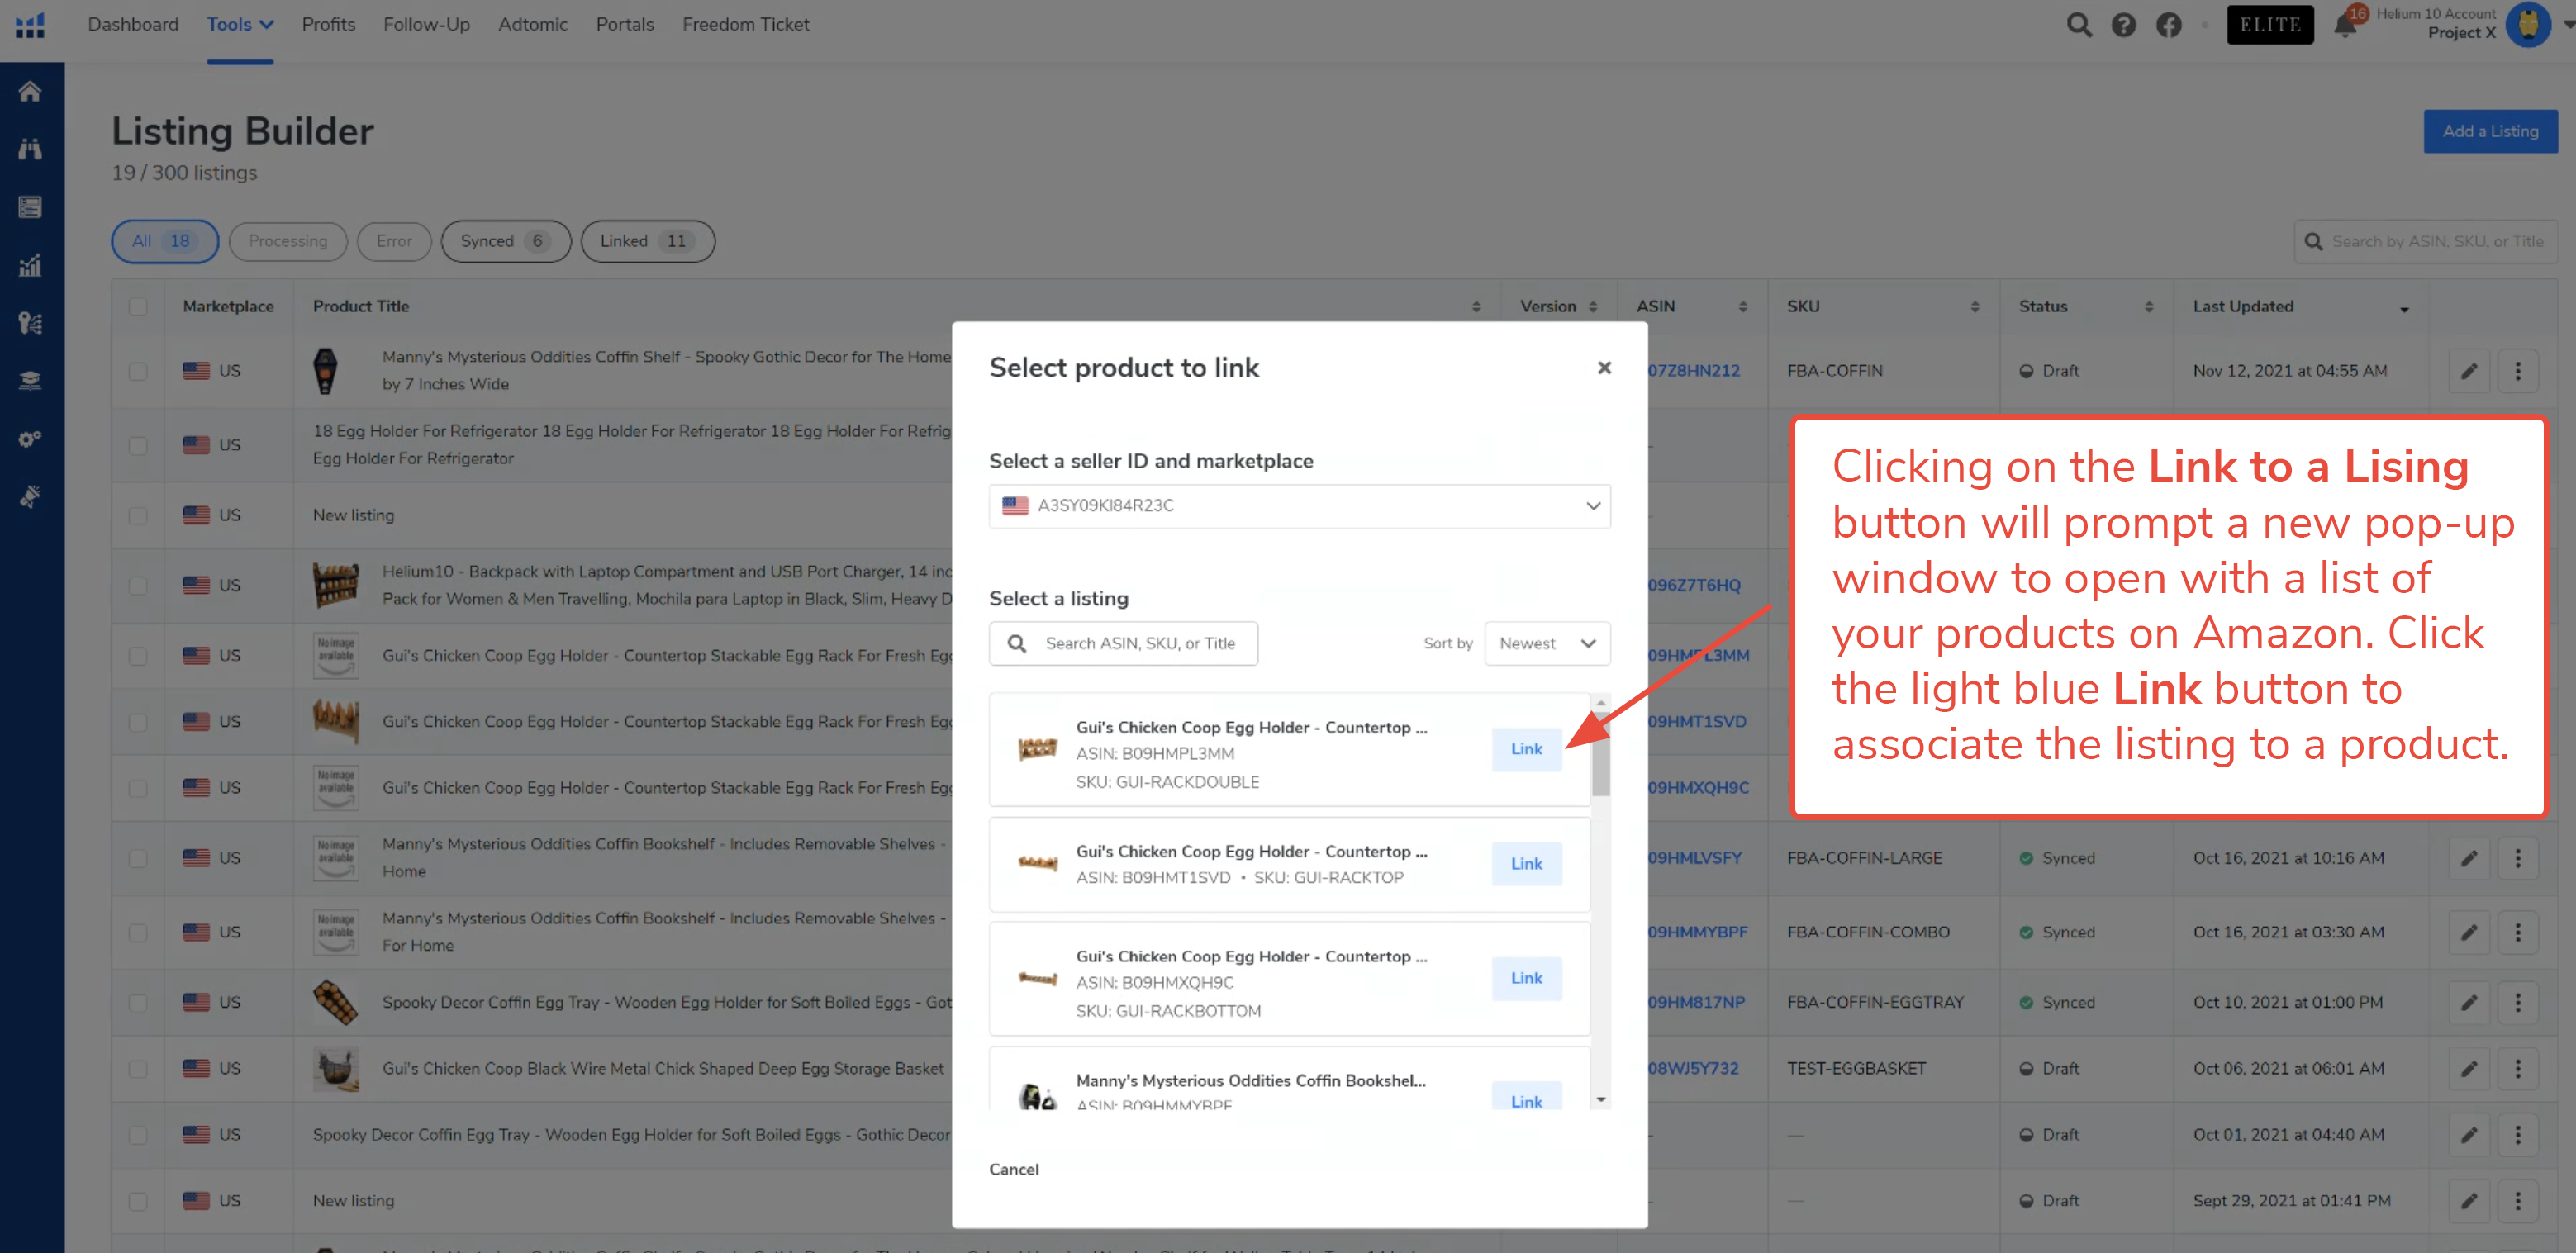
You can also link a listing to a product from the Listing Builder dashboard by following the steps in section 10.
While you need to have your MWS token connected to sync Listing Builder and Seller Central, you can import an existing listing from Amazon without having the token connected.
35. From the Listing Builder dashboard, click Add a Listing.

36. From the “Create and Optimize your listings” window, click on the Optimize your Listing button.
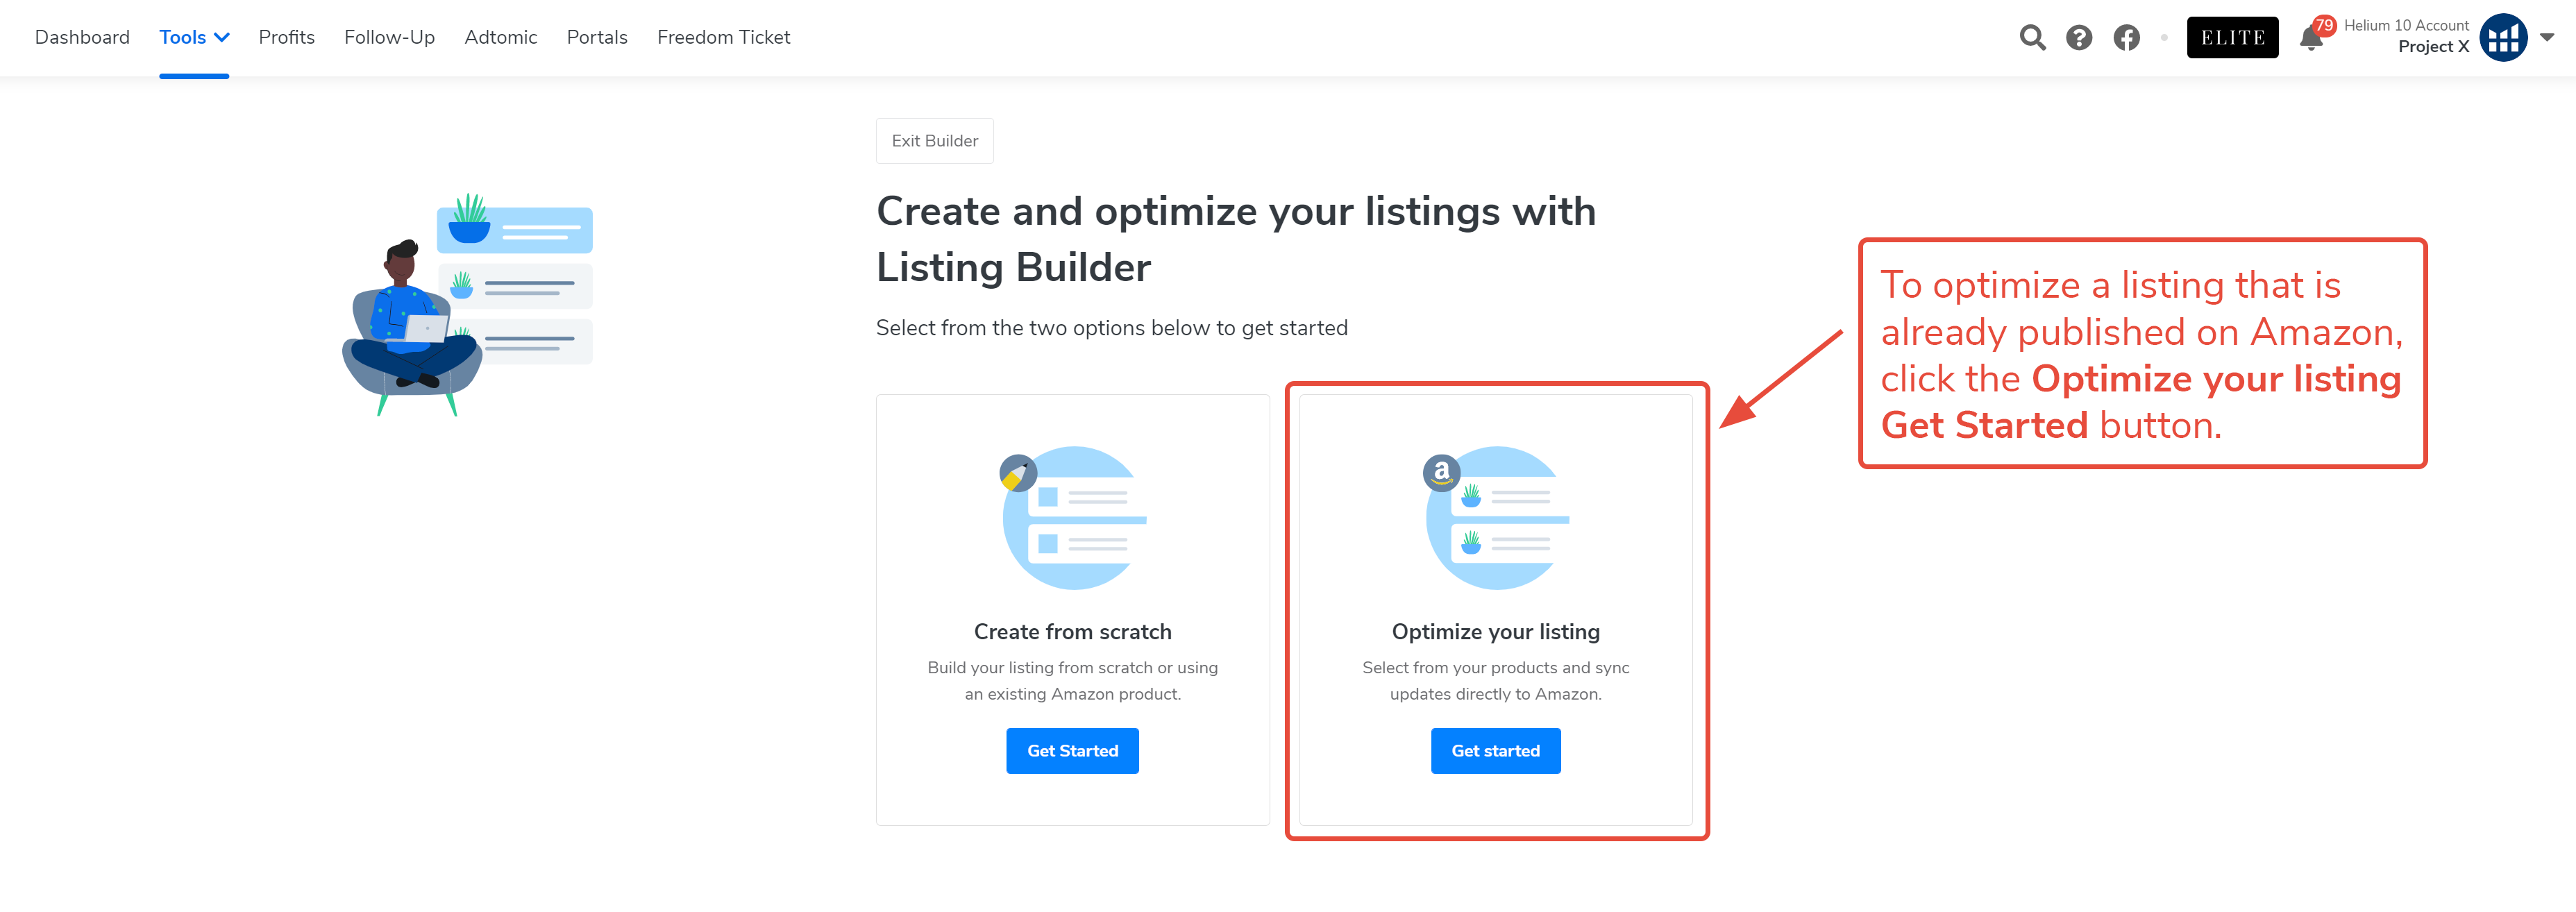
37. On the next window, select the correct marketplace or Seller ID from the drop-down menu and search for the product with the existing listing you want to optimize. You can also use the search field to find a specific product.
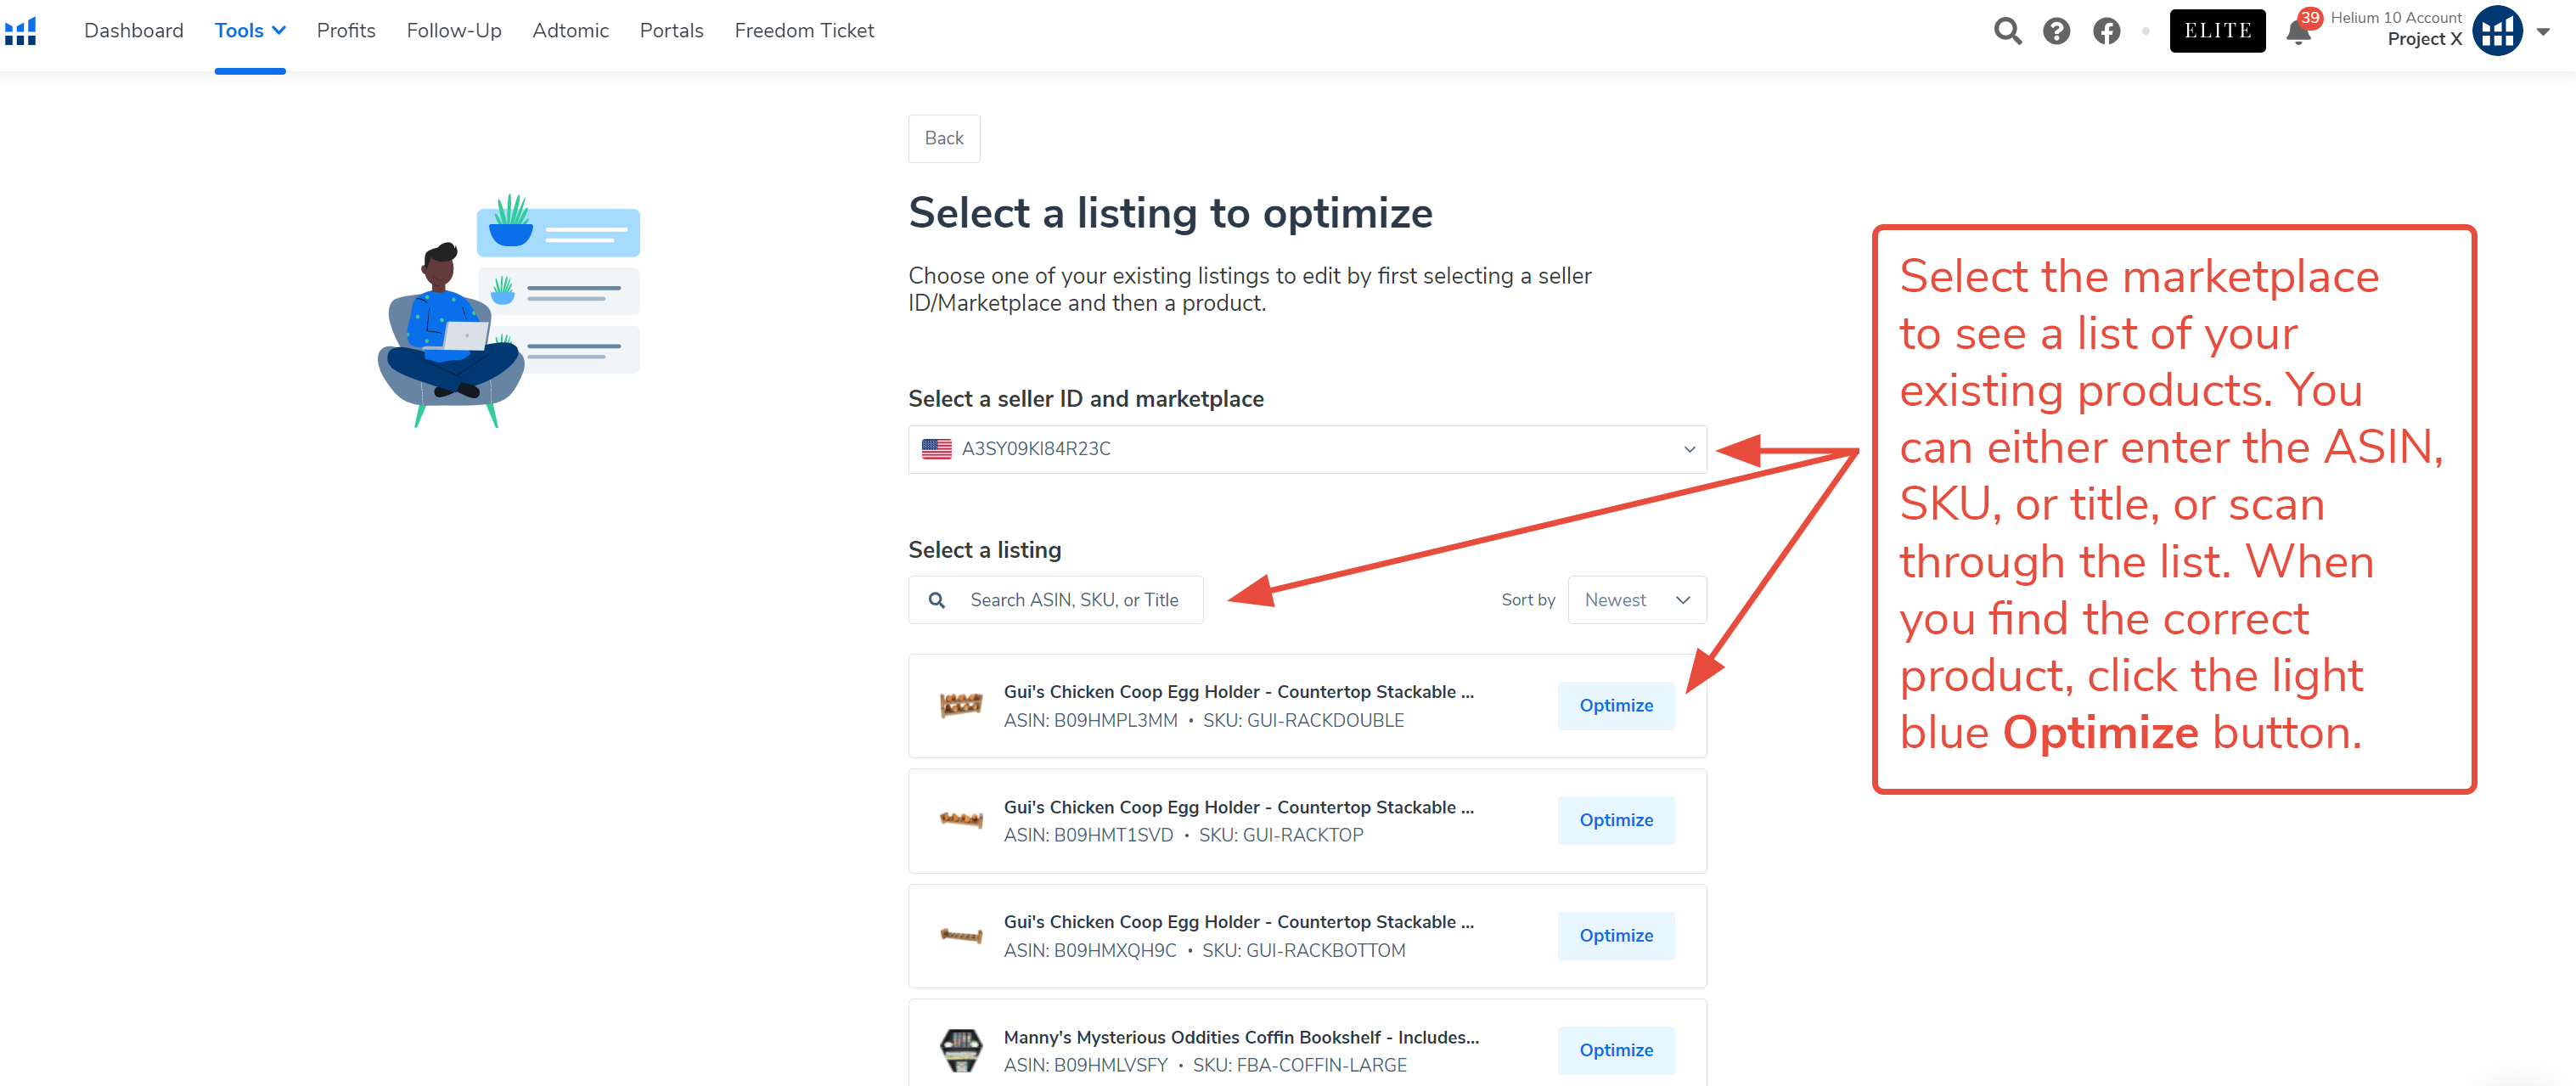 38. Listing Builder will locate your listing in your Seller Central account and import the existing written content from Amazon into Listing Builder.
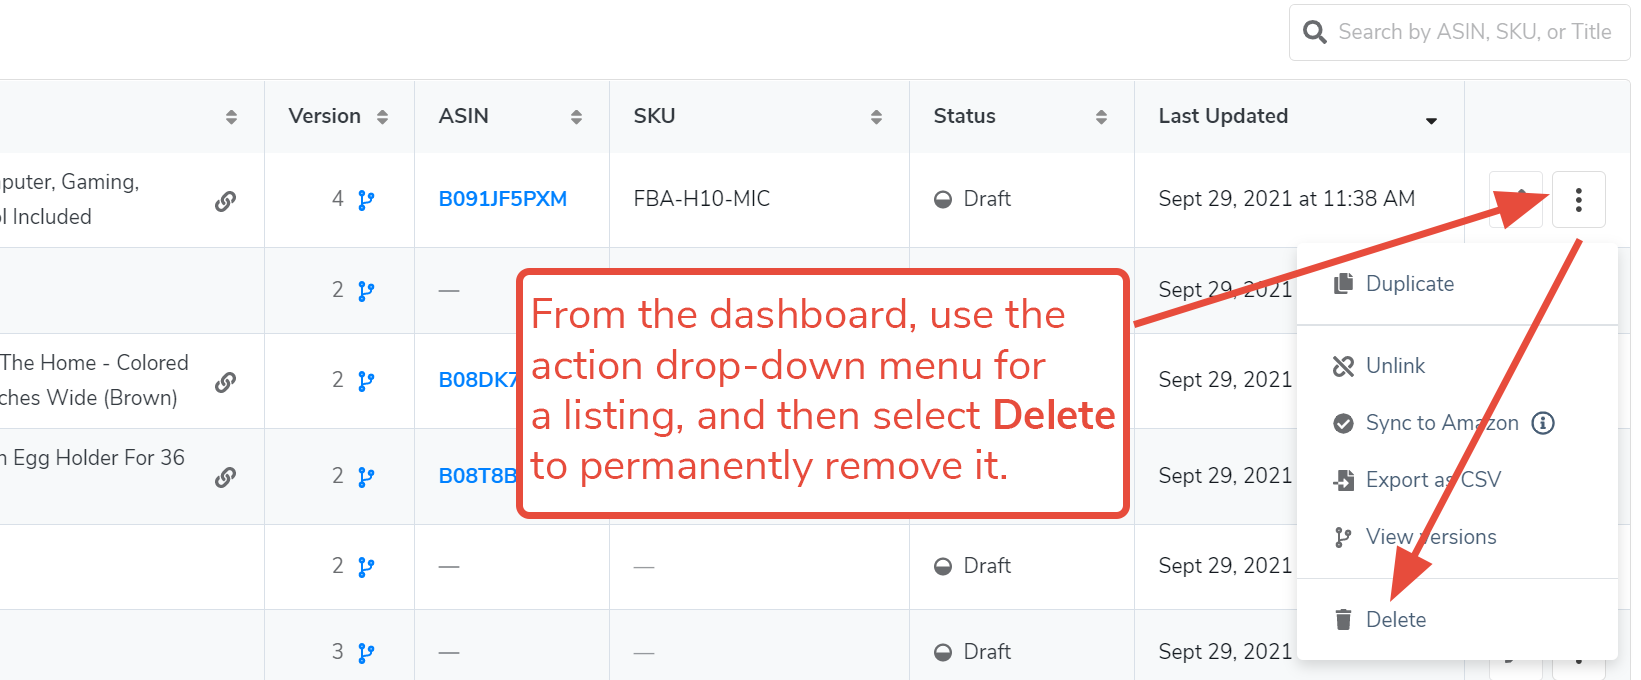
39. To delete a listing, while on the Listing Builder dashboard, use the action menu in the far right column for a listing, and choose Delete. Once you delete a listing, you cannot recover it.
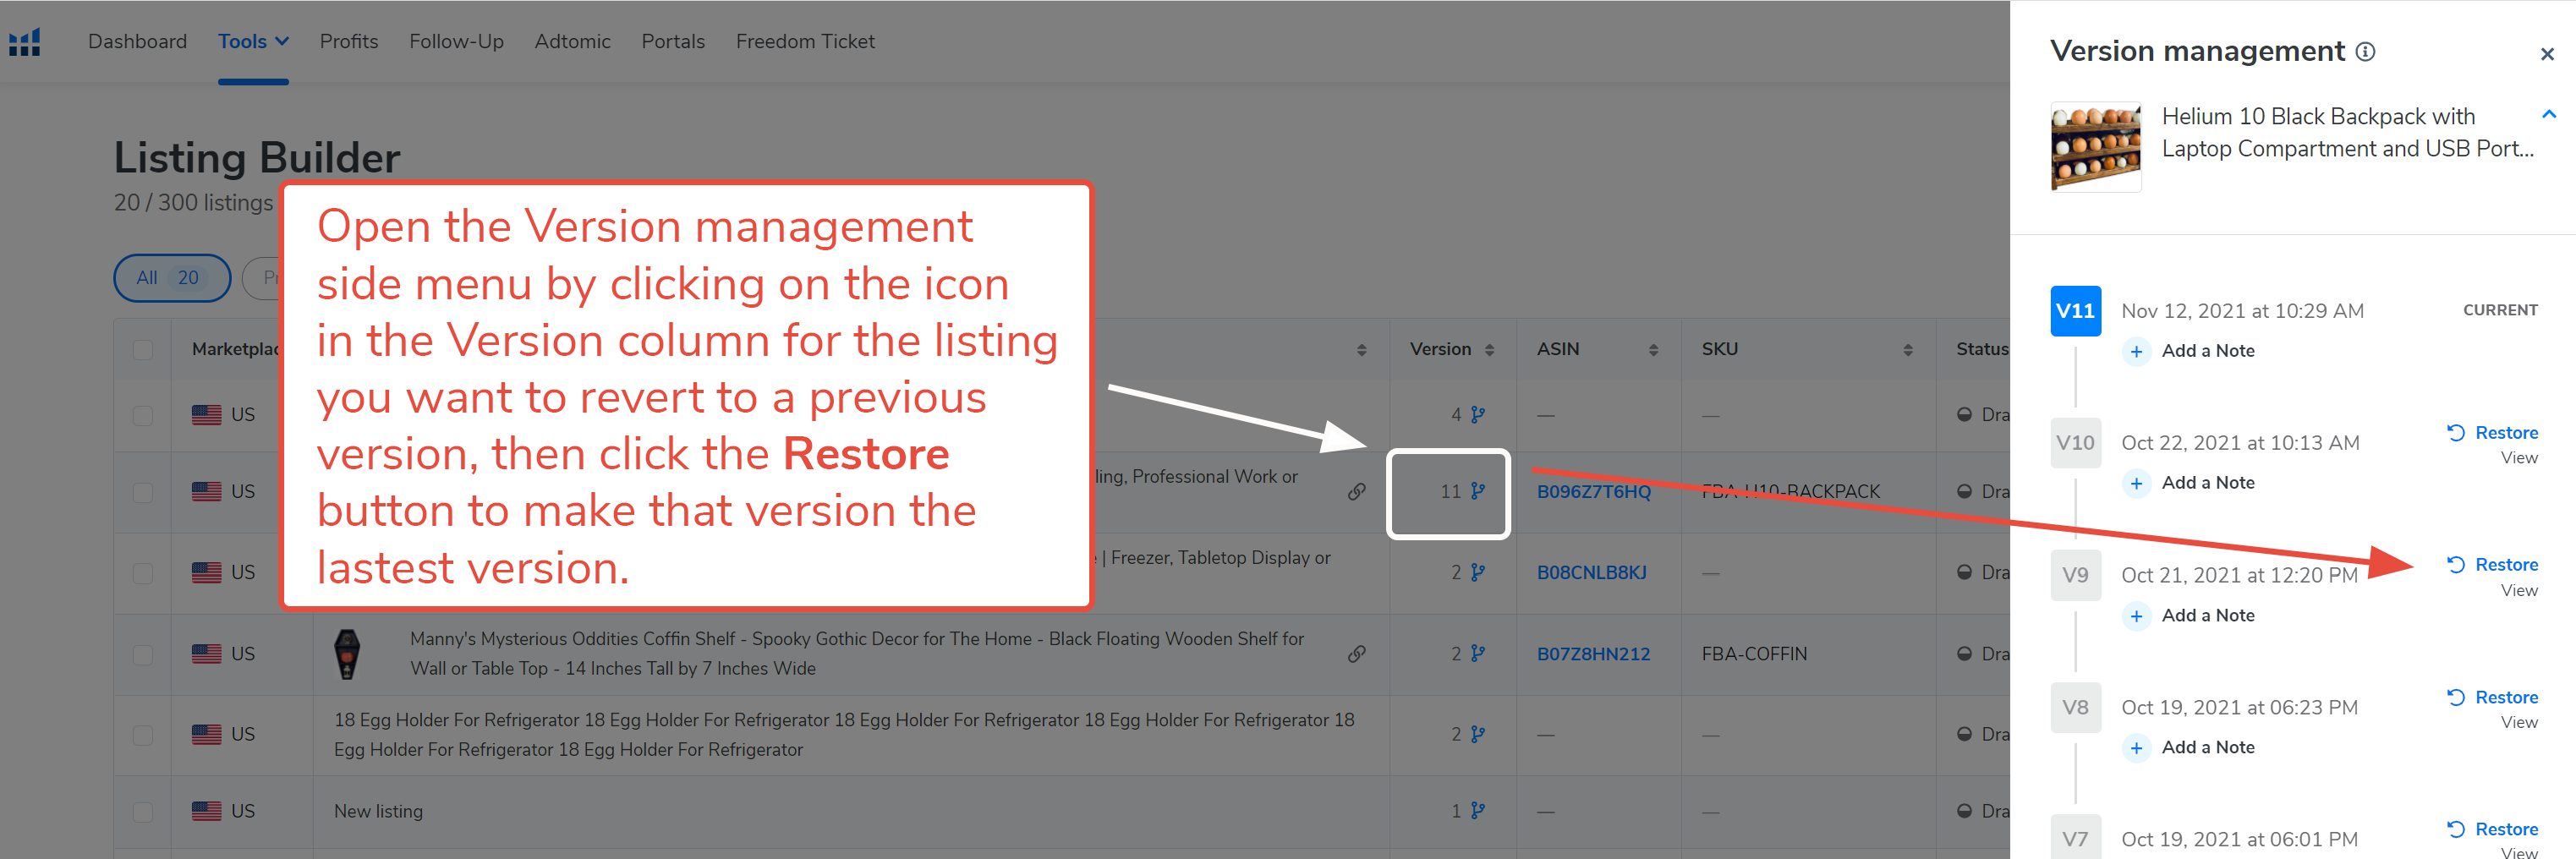
40. To restore a previous version of a listing, while on the dashboard, click on the version icon in the Version column. A side menu will appear on the right with a list of all the drafted versions. Click Restore for the version you want to set as the final or latest version. If you want to view the version first to make sure it is the one you want, click the View link first.
Listing Builder includes the functionality to push a listing built in Listing Buider directly to Seller Central.
To sync a listing to Amazon Seller Central using Listing Builder, you must have:
- The listing linked to a specific product
- A basic product listing added to Seller Central
Syncing can result in lost content. Read “What Do I Need To Know to Successfully Sync My Listing with Amazon?” before you initiate any sync.
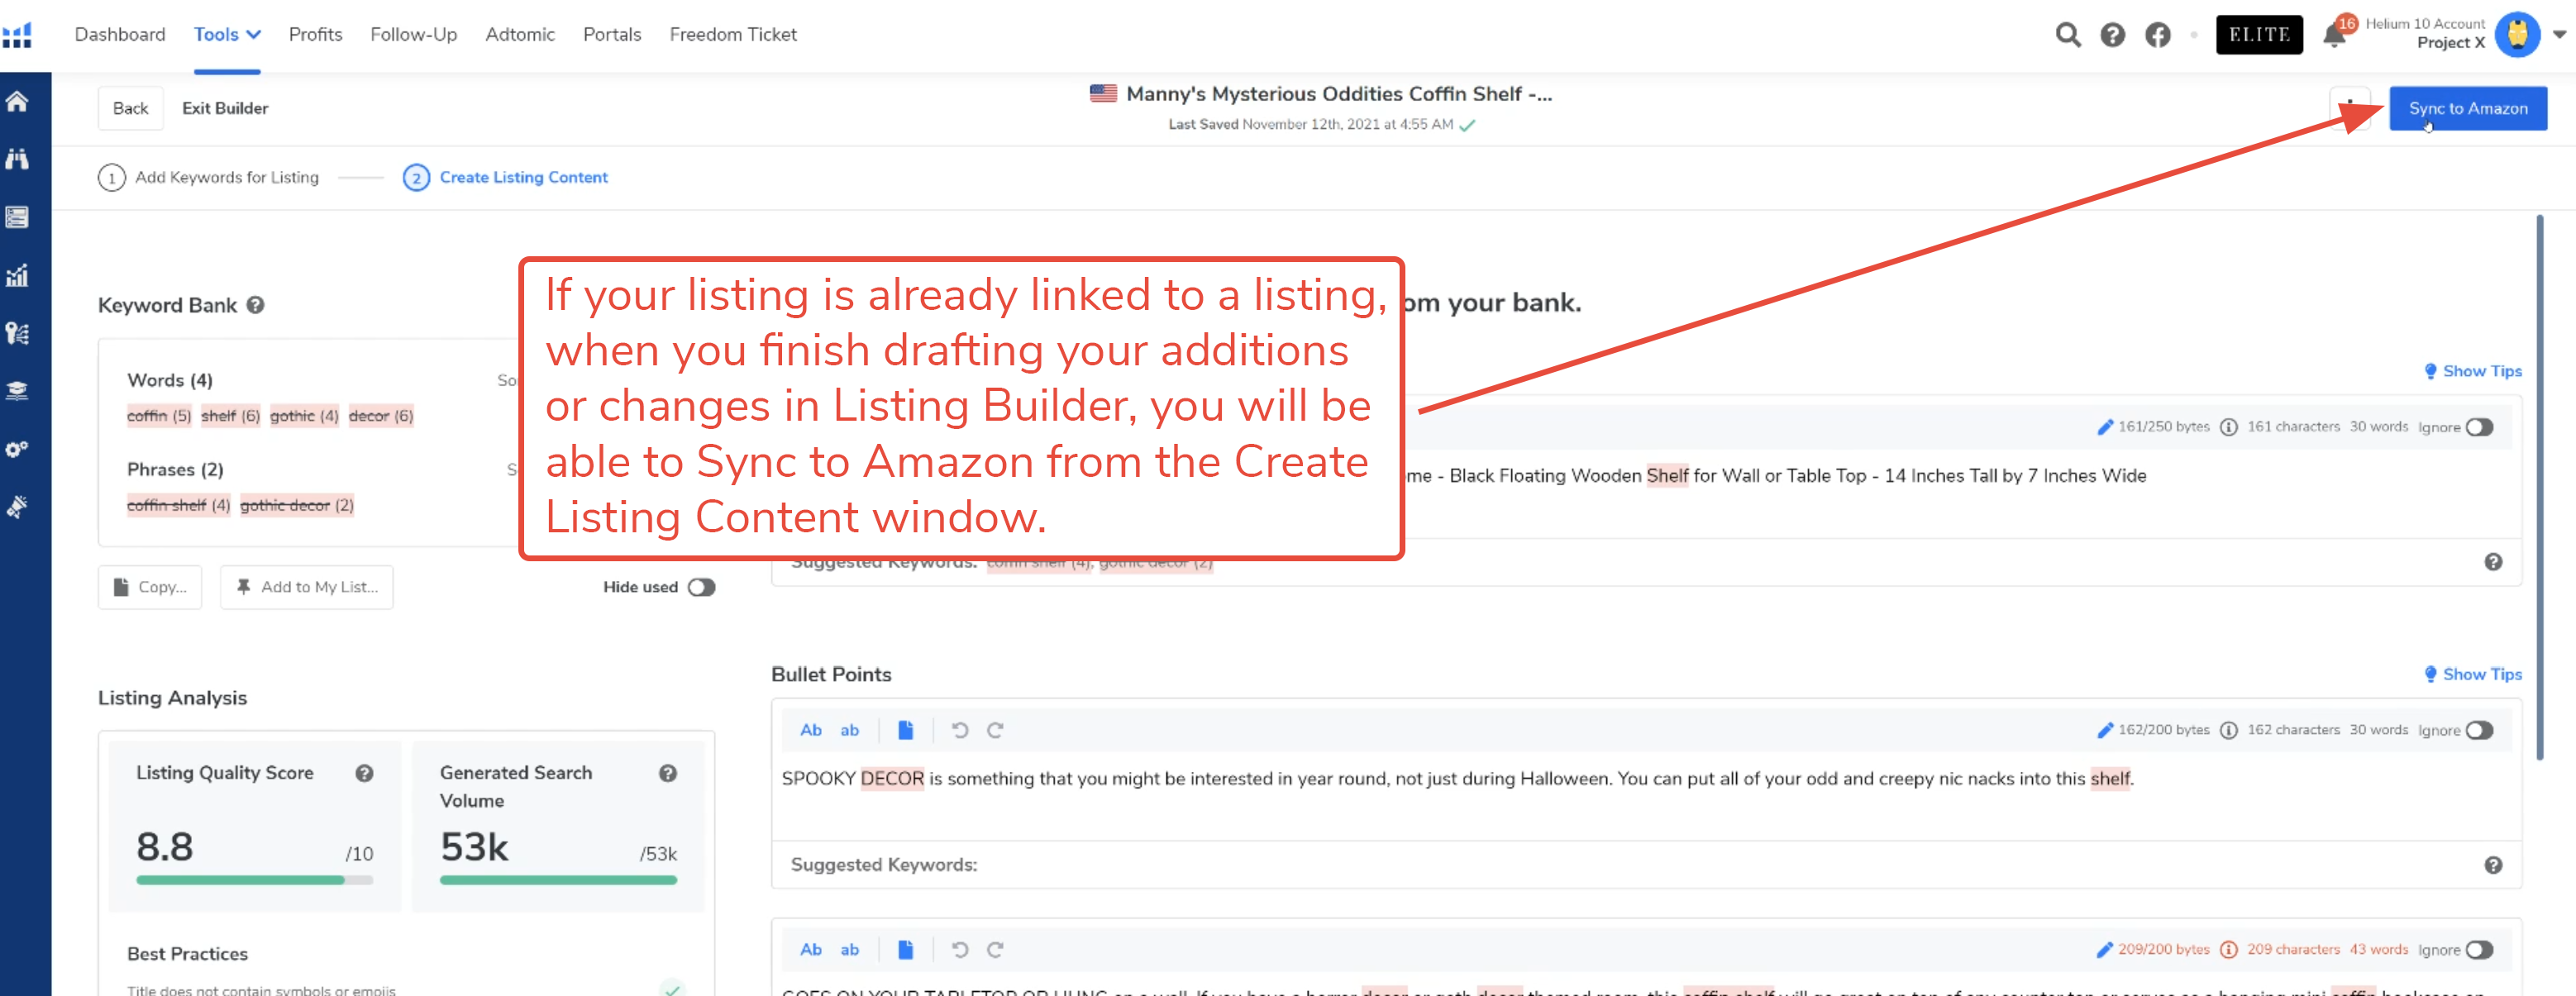
41. If you linked your listing prior to finishing your draft, or you are optimizing a listing you imported from Amazon, so the listing is already linked to an existing product on Amazon, you can click the blue Sync to Amazon button in the top right corner of the Create Listing Content window.
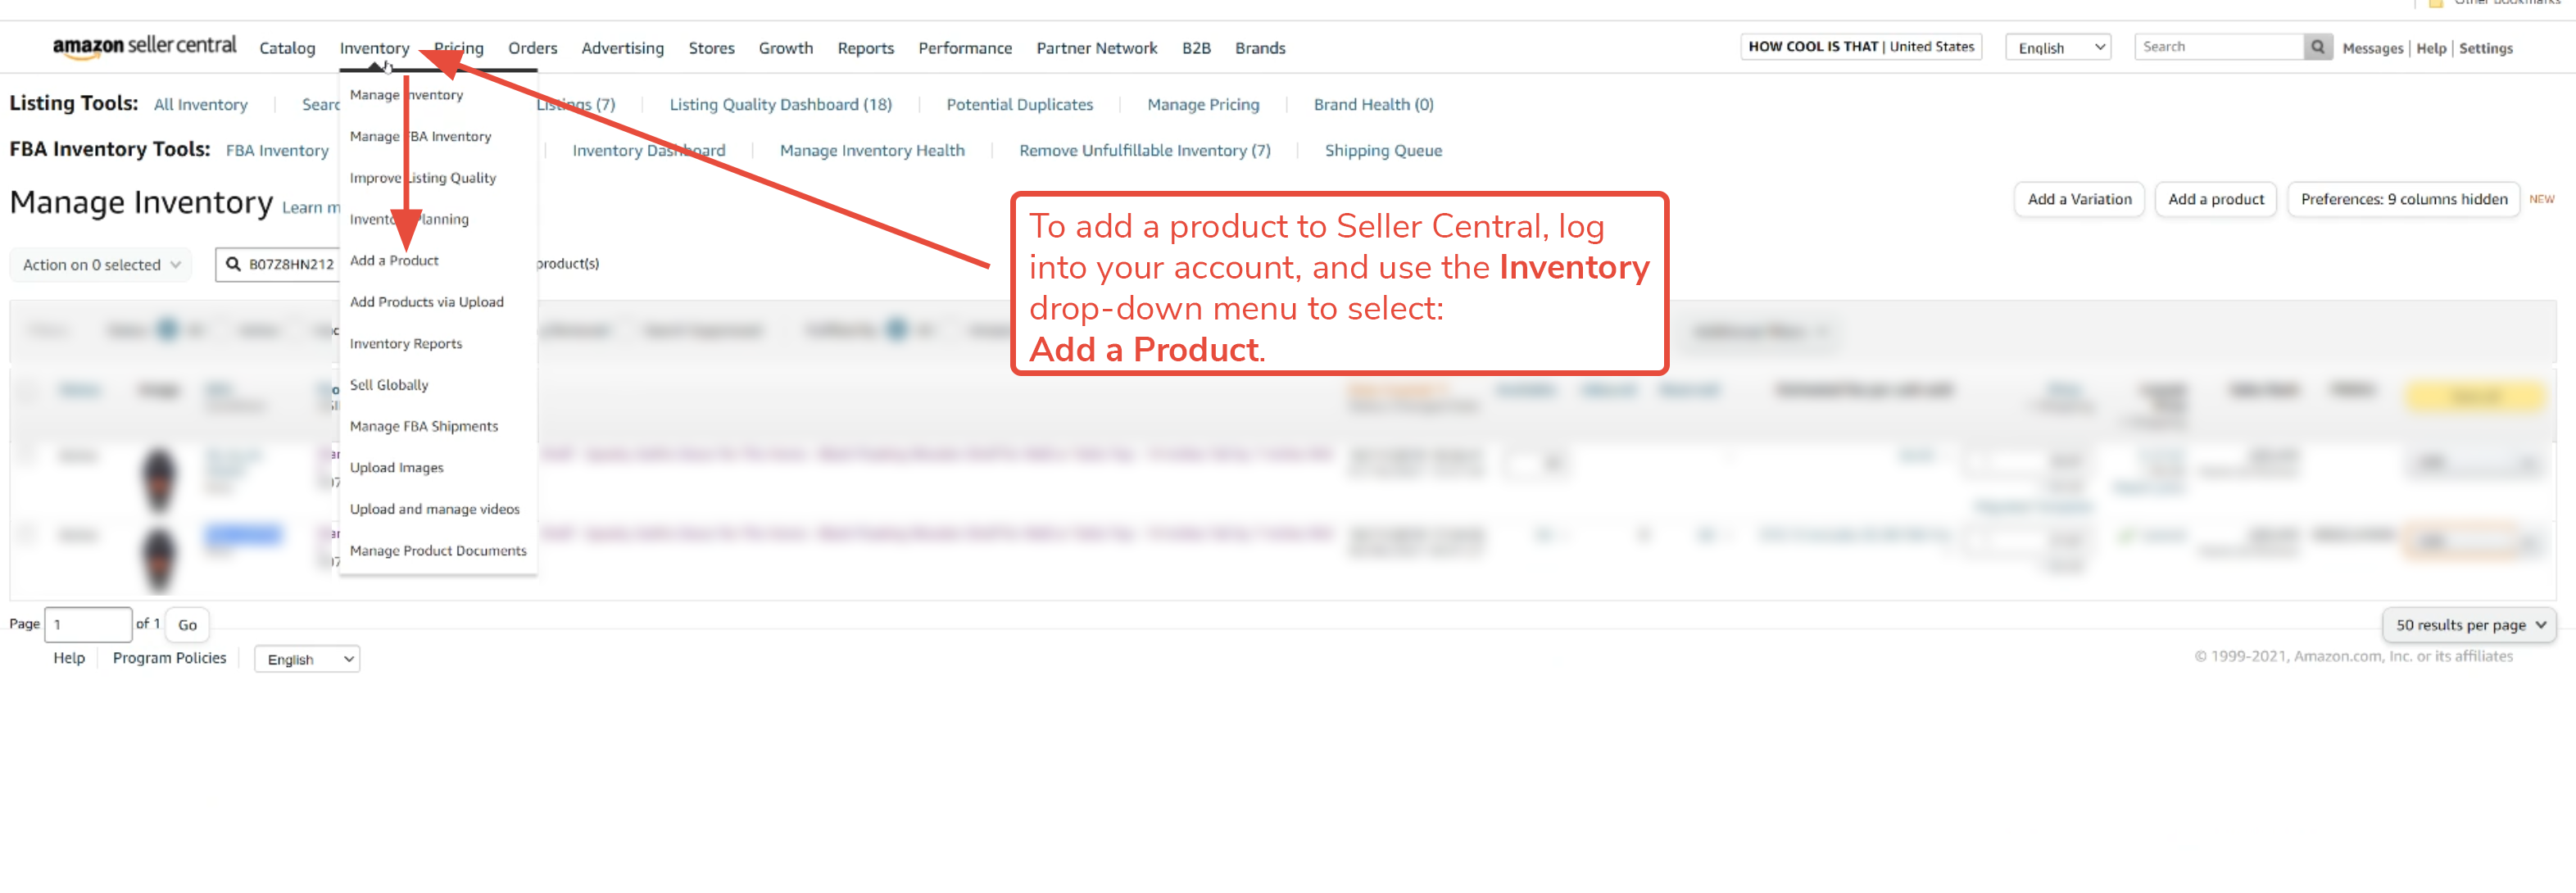
42. If you have not yet created a product listing on Seller Central for the product that you want to sync to, go to your Seller Central Account and add it. The Add a Product action is located in the drop-down menu under Inventory.
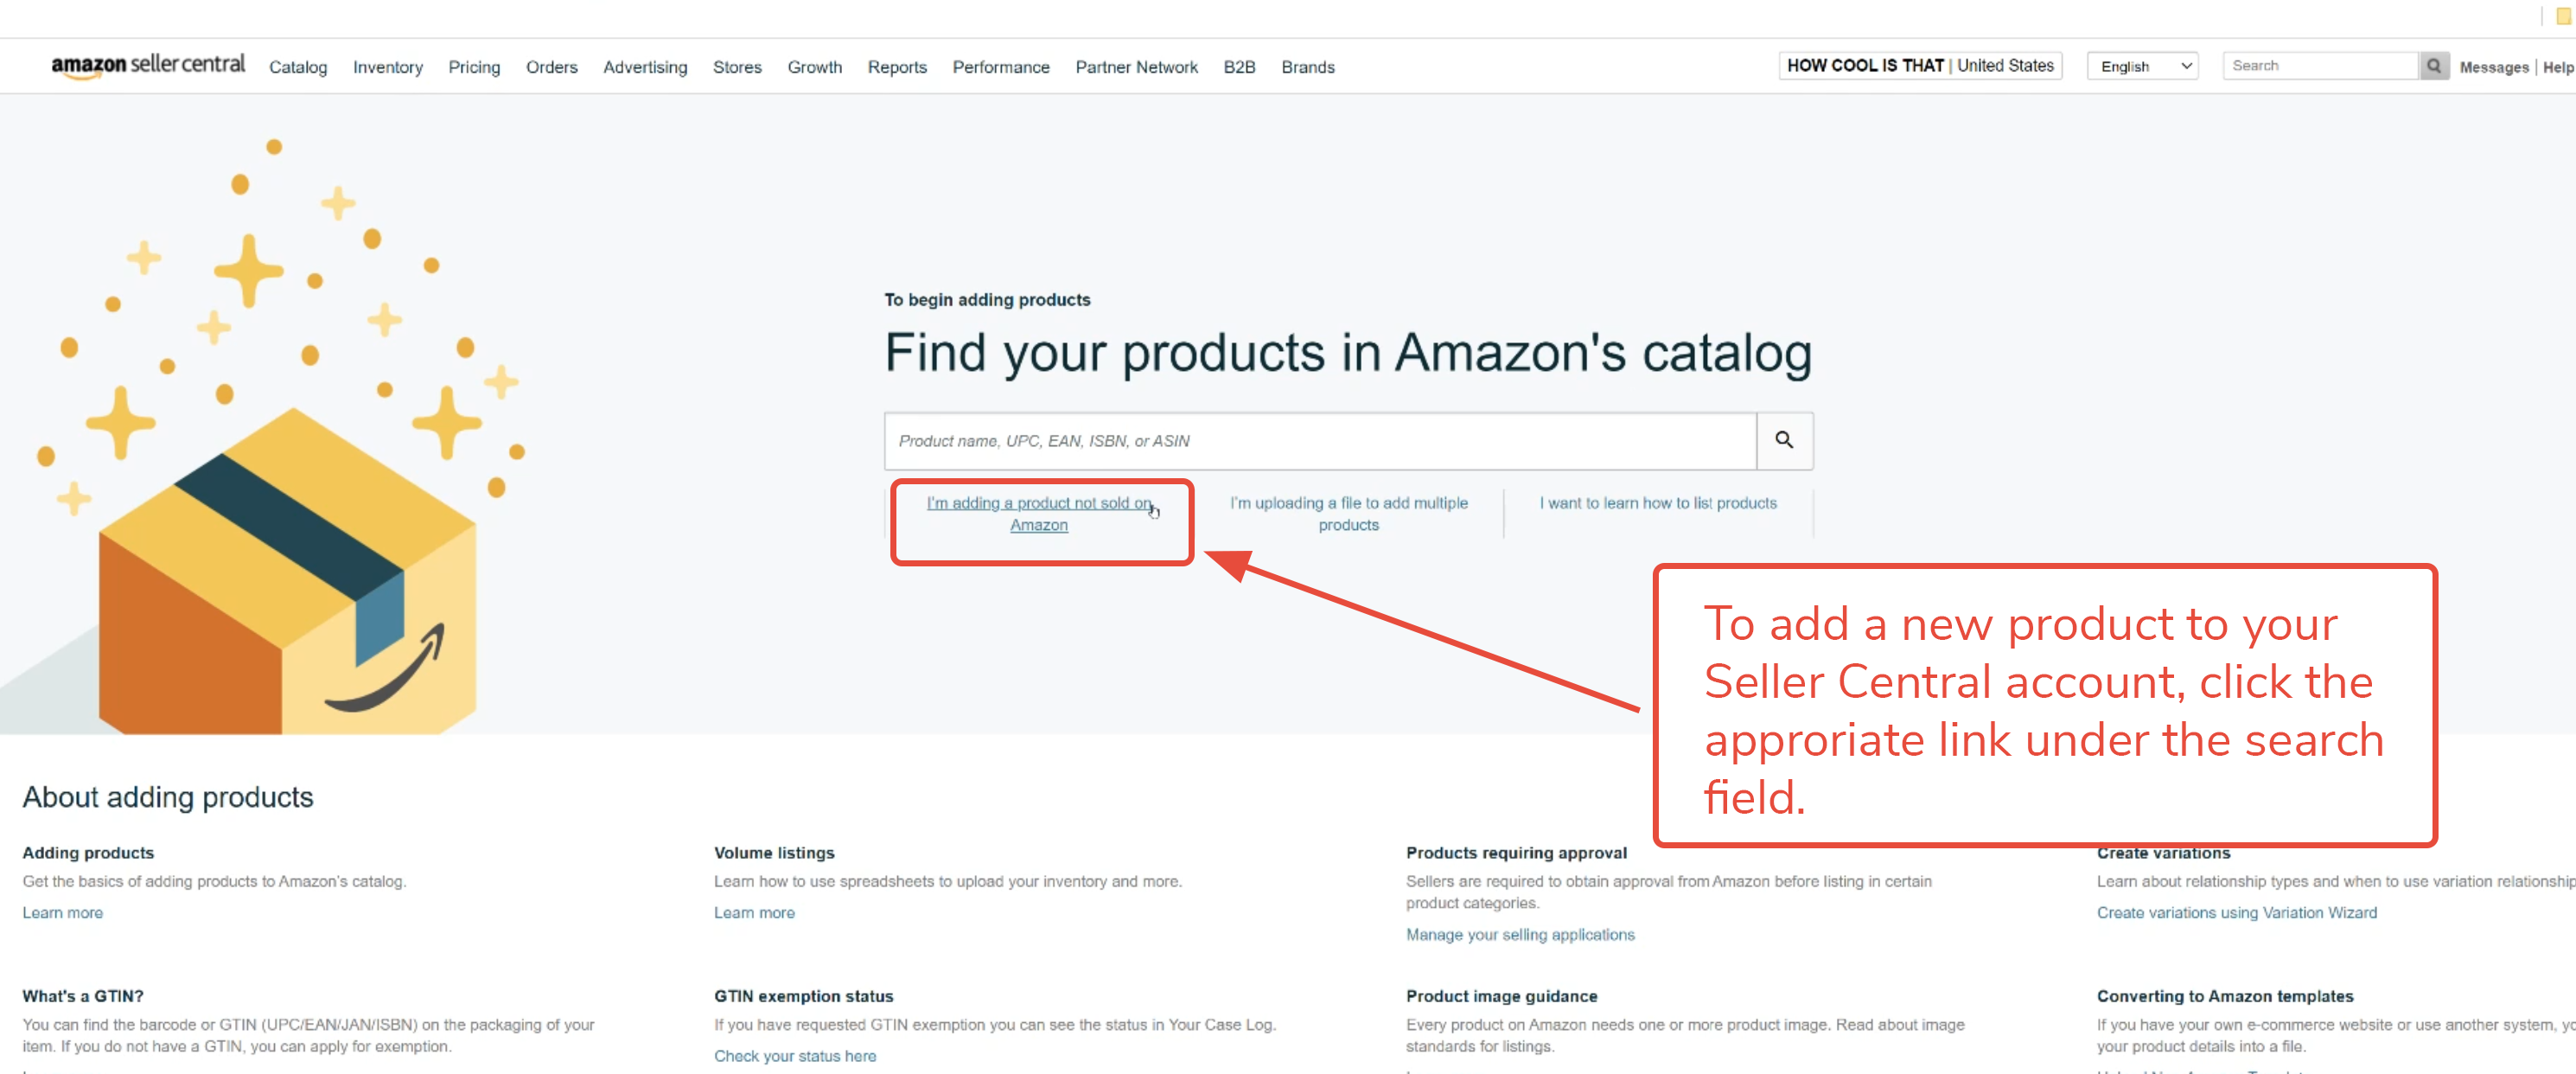
43. On the Add a Product page, use the search field to locate your product or click the text “I’m adding a product not sold on Amazon” located directly under the search field.
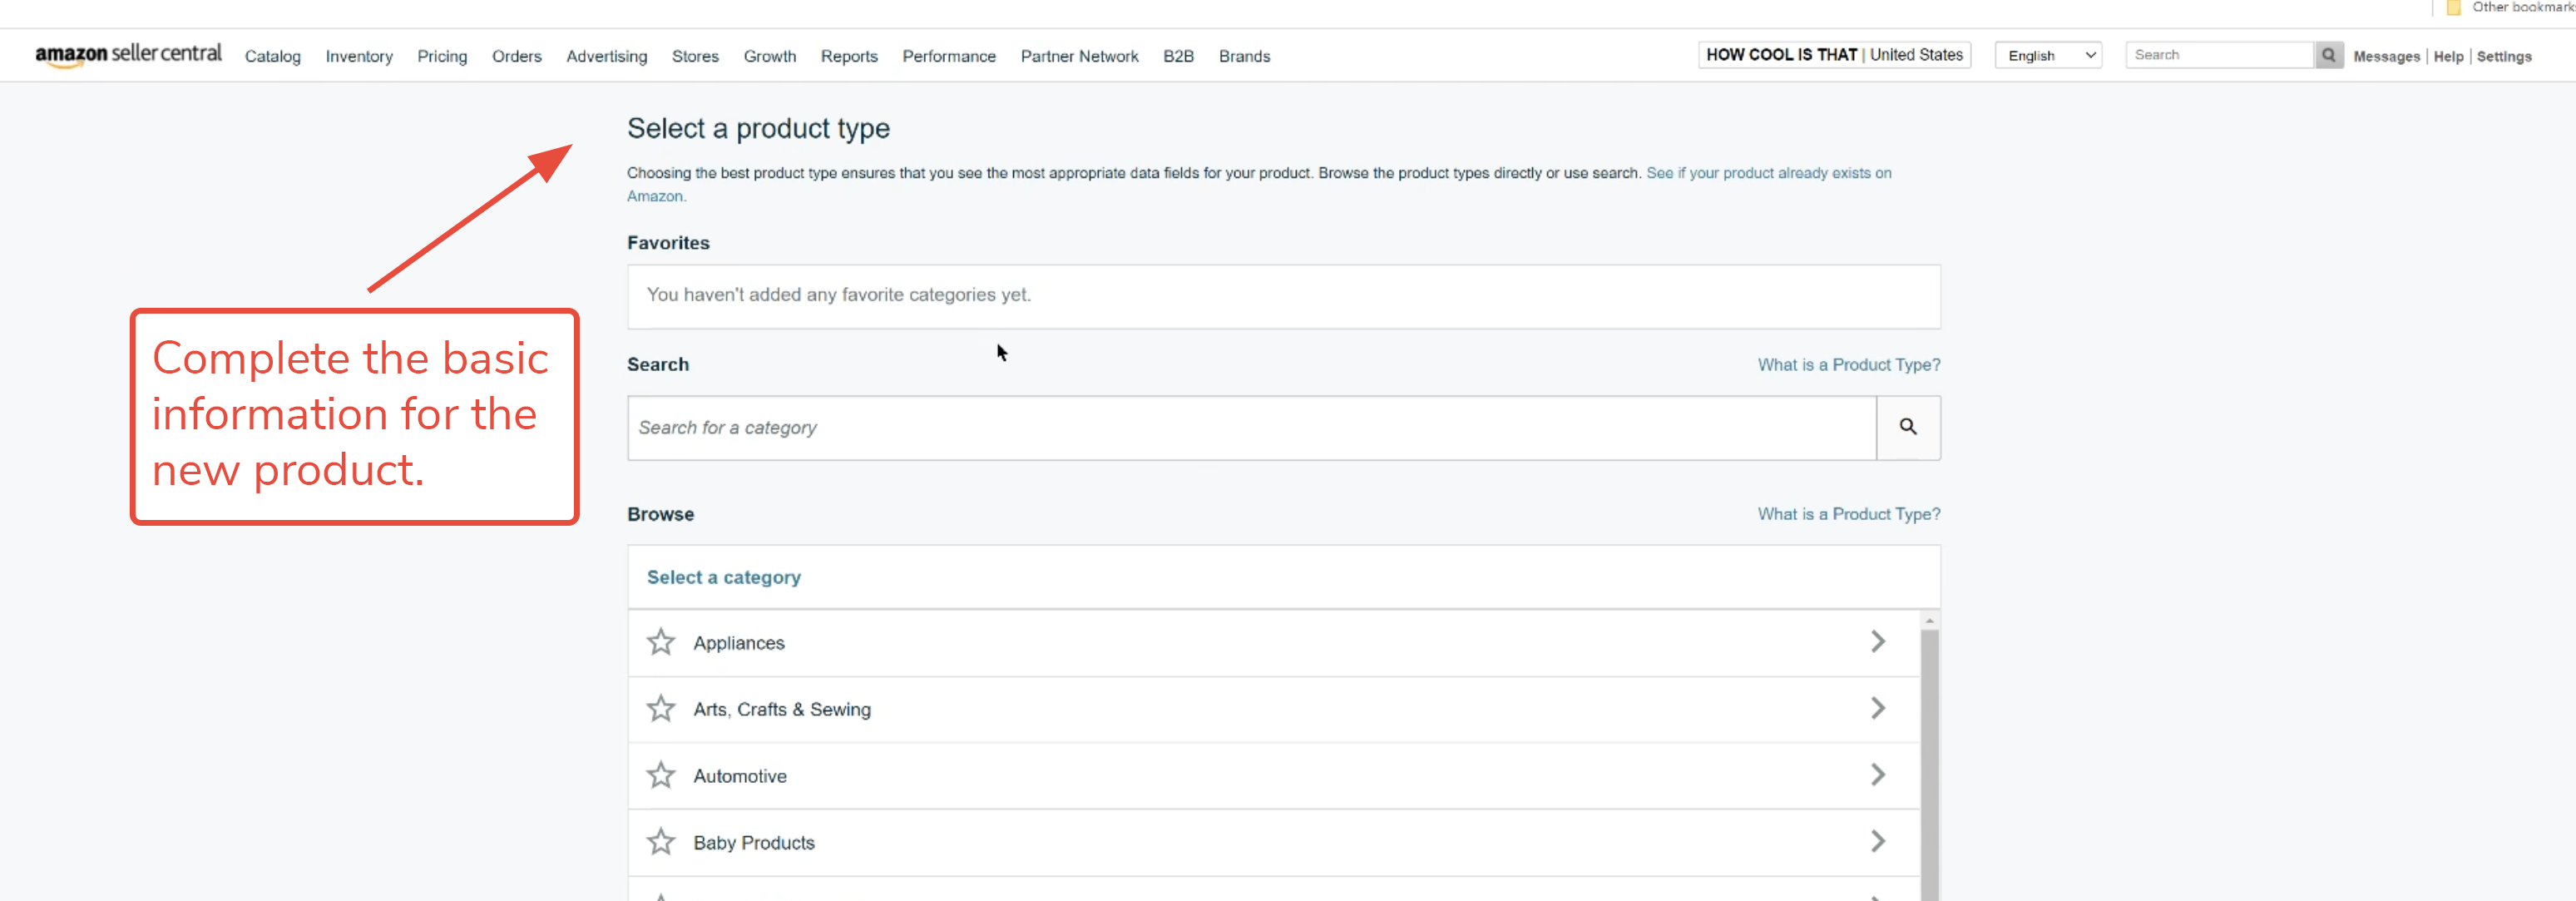
44. Complete all the basic information for the product, including its category and a title. You can also add your graphics at this time if you like. Currently, Listing Builder does not include the ability to load graphics.
45. Now, return to the Listing Builder dashboard. Find your drafted listing in the list, and use the drop-down action menu on the far right to open access to the Link Listing button.

46. In the new pop-up window, search for and find the product that you want linked to the selected listing. Click the light blue Link button to connect them.

47. Once the listing is linked to your product on Amazon, an action which can take up to 24 hours, but usually happens in about an hour, you’ll see the ASIN and SKU appear on the dashboard. Now when you click on the action menu, the option to Sync to Amazon appears. Click Sync to Amazon.

48. Listing Builder will immediately begin the syncing process. Once the listing has been synced to Seller Central, the Status column will read as Synced.
 49. If you have more than five (5) Bullet Points and/or images to add to your listing, you will want to return to Seller Central and complete the final listing there.
Once your listing syncs to Seller Central, Amazon decides if and when to push the listing to their storefront. If there are multiple sellers for the same listing, your listing may not be selected by Amazon for the storefront. If your listing does not sync to your Seller Central account, please contact Customer Service for assistance.
Comments
Article is closed for comments.